
Core Assembly Removal

crwdns2944109:0crwdnd2944109:0Tobias Isakeitcrwdnd2944109:0crwdnd2944109:0crwdnd2944109:0crwdne2944109:0
crwdns2944111:0Kho 16, 2021crwdne2944111:0
crwdns2915892:0crwdne2915892:0
crwdns2942287:0crwdne2942287:0Use this guide to remove the core assembly in the Samsung Galaxy Watch.
crwdns2942213:0crwdne2942213:0
crwdns2943215:0crwdne2943215:0


crwdns2944105:0crwdne2944105:0

-
-
Remove the four Tri-point #00 screws (4.2 mm length) on the backside of the watch.
-
-
-
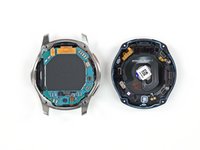
Use an opening tool to get between the back cover and the metal housing of the watch.
-
Carefully pry the plastic back cover open.
-
-
-
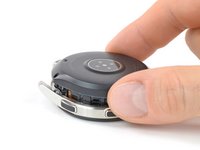
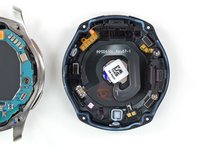
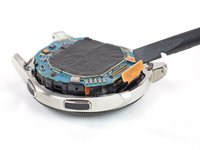
Lay down the watch and lift the back cover to access the sensor connector on the motherboard.
-
-
-
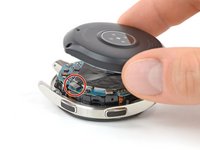
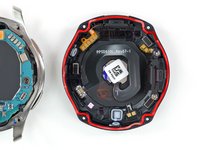
Use a spudger to disconnect the sensor flex cable from the motherboard.
-
-
-
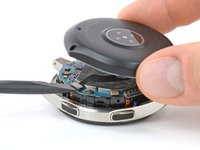
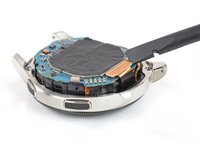
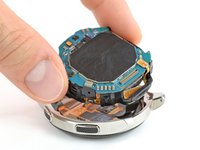
Use a spudger to disconnect the display flex cable from the motherboard.
-
-
-
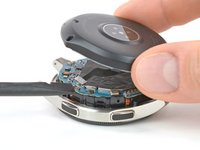
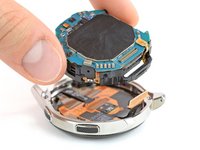
Lift the core unit out of the housing.
-


To reassemble your device, follow these instructions in reverse order.
crwdns2935221:0crwdne2935221:0
crwdns2935229:07crwdne2935229:0
crwdns2947821:0crwdne2947821:0
crwdns2947823:0crwdne2947823:0


crwdns2935287:0crwdne2935287:0

Tobias Isakeit - Repairability Engineer crwdns2935289:0Tobias Isakeit - Repairability Engineercrwdne2935289:0
Business
crwdns2934841:01crwdne2934841:0
crwdns2935297:01,145crwdne2935297:0
crwdns2947412:03crwdne2947412:0
thanks, loved seeing this watch from the inside!
Great, but now I need to know how to get to the glass to replace it.
you mean this? Samsung Galaxy Watch Display Replacement
I can't get them to budge
Irene - crwdns2934203:0crwdne2934203:0
Same here, its impossible to get the screws off. They’re almost stripped now too.
Prabhat - crwdns2934203:0crwdne2934203:0
Sorry to hear that. Here are some tips on how to get those screws off hopefully: How to Remove a Stripped Screw
Tobias Isakeit -
Just started working on watch. Can not get the screws out. I purchased the recommended tools. Screws won't budge. I have not stripped them yet. How do I get them to loosen up?
joyce c - crwdns2934203:0crwdne2934203:0
Same here. I did buy your Electronics repair Bundle. The Y000 is too pointy, we need a flatter tool
Robertob67 - crwdns2934203:0crwdne2934203:0
Hi Ladies & Gentleman, please try as follows:
Use a spray can of "WD 40" with a spray pipe/tube but DO NOT spray into the screw holes. Just spray shortly on a piece of paper, a drop of WD40 will remain at the end of the spray pipe. This drop I put into the screw hole position. Do this for each screw hole and leave the stuff approx. 10 minutes alone. Afterwards use the screw driver as normal to turn the screws out.
*** After the drop is placed into the hole do not wait too long as WD40 is crawling into "even not existing gaps"
*** just use a small drop of WD40.
*** I intend for using 4 new screws as the head (Tri-Pont profile) seems worn out. But if I get new screws for sure I will go for a TORX profile because its the best as you don't need to apply axial force on screw driver.
Very best regards from Harald (a German machine building engineer)
Harald - crwdns2934203:0crwdne2934203:0
Harald again to Robertob67:
It is NOT the Tool Y000 but the Y00
Best regards
Harald
Harald - crwdns2934203:0crwdne2934203:0
same problem here, i have the tri wing screwdriver but screws will not move! tried WD-44, tried heating it up, no luck
Michael Fry - crwdns2934203:0crwdne2934203:0