Do you still have this problem?
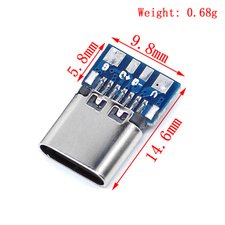
As @dadibrokeit said, finding a USB C connector that perfectly matches the position of the old MicroUSB socket will be nigh-on impossible. However if you can find a small space in the case for a 6-wire USB C female port and a couple of 5.1k resistors, you can make a basic USB 2 charging connection through a new USB C connector on your keyboard.
You can see the socket needs a 5.3mm x 12mm rectangular hole, 14mm deep. You may be able to enlarge the hole for the MicroUSB socket, but failing that - a shallower hole and some hot glue will keep the new socket in place.
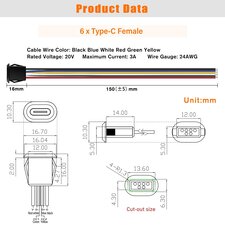
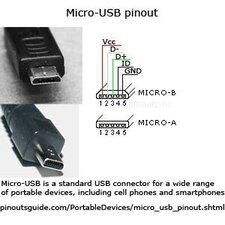
Solder the Vbus (red), D+ (blue), D- (white), and Ground (black) wires to the PCB connections for the original MicroUSB port: Vcc, D+, D-, and Ground:
Then "pull down" both the CC1 (green) and CC2 (yellow) wires by connecting each to Ground through a pair of 5.1K resistors.
By adding those two "pull down" resistors, you tell any power supply, laptop, TV etc. connected to the far end of the USB C cable plugged into your new USB C port that you need 5V power on the Vbus lines - which will power up the Vcc line on the old USB 2 interface and begin charging your keyboard. Hopefully.
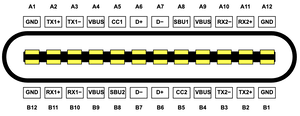
The socket will still function even if the cable is reversed because a USB C socket has Vbus, D-, D+, Ground and CC(x) pins symmetrically placed on both sides:
This should work - I'll be testing it on another project in the next few days and I'll let you know how it goes.
crwdns2934105:0crwdne2934105:0
crwdns2934113:0crwdne2934113:0
crwdns2915270:0crwdne2915270:0
crwdns2889612:0crwdne2889612:0
2


crwdns2944067:04crwdne2944067:0
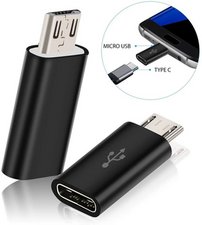
Thank you for your help and advice. After reading your post it looks like I will just replace the existing port and go out and pick up a USB-C to USB micro adapter. Now I have to look and see if I can find out what micro-USB connector was used by Logitech when they made it so I can try to order a replacement to solder back onto the board. Thank you again for all the information and help you provided.
crwdns2934271:0crwdnd2934271:0 N200 Setup crwdne2934271:0
@n200setup If you open it up and take some high resolution photos of both sides of the circuit board and hopefully the front back and sides of the connector itself, we've got some folks on here (myself included) that are pretty good at locating compatible replacement parts. Ideally if you could unsolder the broken port and get us a photo of the circuit board footprint that would help the most, but we can work with the other photos if not.
crwdns2934271:0crwdnd2934271:0 Jerry Wheeler crwdne2934271:0
Hello! I came across this post while looking for a solution for my own K830 since I love it annd I never wanna throw it away, and thought I’d come back to add my two cents, since there are several people here saying it’s impossible. After some searching, I found diy usb c ports on Amazon that come with a pcb on the back in the arrangement of micro usb connections and it comes built in with two tiny surface mount pull down resistors. I’ve just put it all back together and it’s working like a beauty… after ripping off the pads on the keyboard pcb due to a lack of hot air desolderer, and having to scratch the traces as a last resort. I’m not sure if I can post a link here, but I’ll give it a shot: https://www.amazon.com/dp/B0DRP5YS5L?ref...
I hope you still have the keyboard and this help you if you haven’t already figured it out by now.
crwdns2934271:0crwdnd2934271:0 Josh Fudge crwdne2934271:0
Well I wrote a long response and then it got tossed when it made me log in.. the part you’re looking for exists! I just finished retrofitting my K830 today with the help of a pack of diy usb c ports I found on Amazon that have a pcb on the back with soldering pads and pull down resistors, to boot. Not sure if I can post links here but I’ll give it a shot.. chenyang 5 Pack USB C DIY... https://www.amazon.com/dp/B0DRP5YS5L?ref...
Hope this helps you if you haven’t already sorted it out
crwdns2934271:0crwdnd2934271:0 Josh Fudge crwdne2934271:0