
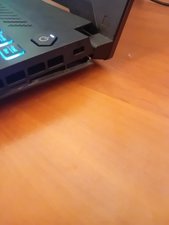
My hinge broke on my tuf gaming f15 fx507zc
it's like the screen is pulling the case apart. Whenever I open it the motherboard bends unless I push it together.
crwdns2934109:0crwdne2934109:0
crwdns2889612:0crwdne2889612:0
2

crwdns2934065:0crwdne2934065:0: 25
![]() 1
1
![]() 1
1
it's like the screen is pulling the case apart. Whenever I open it the motherboard bends unless I push it together.
crwdns2934109:0crwdne2934109:0

crwdns2934065:0crwdne2934065:0: 831.4crwdns2936485:0crwdne2936485:0
![]() 1.3crwdns2936485:0crwdne2936485:0
1.3crwdns2936485:0crwdne2936485:0
![]() 938
938
![]() 2.4crwdns2936485:0crwdne2936485:0
2.4crwdns2936485:0crwdne2936485:0
@leventecsaki looks like it may have cracked the bottom case. Kind of hard to tell. Time to replace those. Since iFixit does not yet have a guide for this try something like this video different model but identical case.Not great but it'll help to get there. you can find the hinges by doing an online search at many online stores. The case will be more difficult and may require some epoxy repair :-) you an of course post some pictures of any damaged parts with your question. That way we can see what you see and hopefully help you further. Adding images to an existing question
While you work on your laptop, take lots of pictures. Once you are done with it, take those pictures and create a guide for iFixit. That will help the next person that has a device with the same issues as you do. It's easy and fun to create these guides. https://ifixit.com/Guide/new The iFixit community will appreciate this.
Repair is War on Entropy!
crwdns2934105:0crwdne2934105:0
If the right hinge is broken and not just loose, search online for 13NR09M0M09021 to find hinge suppliers that suit you bets.
The above number is the Asus part number for the right hinge in your model laptop.
it may have cracked the bottom case. and the small black thing that holds on to the golden threaded things is broken now the whole base is poing out my laptop is under warranty will asus completely cover this and repair or should I try alternatives I have opened the back panel and have the broken black parts should the whole chassis be replaced
Hey op, i have the same laptop and same issue. The plastic that holds screws together broke by itself.
Have you found solution for this?
Seems to be a common problem on these so called "TUF" Laptops. My sons has the same problem. The plastic that holds the brass nuts breaks so the hinge assembly that is supposed to stay fastened to the bottom the the laptop case breaks. I used epoxy for the first fix, to try to hold the brass nuts in the broken plastic. It's probably a temp fix. Seems like a terrible design flaw. If it happens again I will epoxy the whole hinge down to the plastic and hope it holds.
@rajesh89153 hello, i faced exactly the same issue, how did you resolved it?

crwdns2934065:0crwdne2934065:0: 13
![]() 2
2
well, i have asus tuf f15 variant, FX507ZC4-HN116W this one
and the right screw holding the hinge fell out for no reason, so i visited there service center and they told me that the black thing

which are used to stick it using screws to the hinge and base are broken, and i am supposed to change the whole keyboard assembly part for it? that too for the hinge only, how can i fix it with any alternative
crwdns2934105:0crwdne2934105:0
We just had this problem too, son's computer, found that of the 6 tiny screws that hold bottom case in place, 3 had fallen out, right on that same corner as original poster. Completely missing. Possibly because the computer runs so hot, the screw coating fails and they just loosen and fall out over time? We took a screw from other side and secured the corner, solved, but now looking for additional replacement screws.
crwdns2934105:0crwdne2934105:0
this happened to me , i have the same model as you
basically what happened was the hinge screw was missing for some reason , as well as a lot of internal screws were loose , so i had to buy some new screws and tighten the remaining screws. that should fix ur problem
crwdns2934105:0crwdne2934105:0
This just happened to me and I found a fix so I wanted to add to thread for the next person. The hinge screws (that you screw in when you take on and off the back cover) screw into brass screw mounts that are held to the keyboard assembly by plastic nuts, which are part of the keyboard assembly. This is not Tufdash-specific design, or an Asus-specific design, so you can look for more general advice on this issue. The plastic nuts popping off is pretty common. Asus tech support will tell you to ship the whole machine in, costing at least 90 bucks, and will most likely replace the keyboard assembly, which costs at least 100 bucks, not including labor. I decided I would rather put that 300 bucks toward buying a new computer, and that it was worth backing up the machine and trying to fix it myself. I found this video on fixing the issue on an Asus gaming computer: https://www.youtube.com/watch?v=XrSrVBAf... ; this video on fixing the problem more generally: https://www.youtube.com/watch?v=AtF_PBLh... and this video on tensioning the hinges to be a bit looser: https://www.youtube.com/watch?v=5y8eIeyF... .
PROCEDURE:
I backed up my entire computer. I bought some Araldite ultra strong 2-part epoxy for 12 bucks. I then removed the back cover and secured a paper towel over the whole computer except the hinges, to avoid dropping anything directly onto the motherboard. I removed the two screws that hold down the hinges. I did not manage to loosen the tension nut, despite adding machine oil, so I ended up just prying the hinges up with a screwdriver (advisable? maybe not haha). I was then able to pick out all the little chunks of plastic. I do wish I had tried harder to keep track of where the bigger ones had come from. I carefully examined what was broken. Several of the plastic nuts were damaged, and in one case the brass screw mount had come out of the nut completely. I PROTECTED THE HINGES WITH TAPE so they would not get epoxied shut and set up my work area to minimize the spread of epoxy, including keeping close by a large box of nitrile gloves, newspaper, paper towel, epoxy mixing surface, toothpicks, and q tips. I then mixed up my 90-min-work-time 14-hour-cure super-strength heat-resistant 2-part epoxy, which I applied in tiny (poppyseed-sized) quantities with a toothpick to the areas that were cracked and broken. For the brass screw mount that needed placing, I built up a kind of support using plastic chunks and epoxy, then used a toothpick to make sure it was flush with the bracket above it and sitting straight in the hole. I changed my gloves every time I got epoxy on my hands and threw out the toothpicks and q tips continuously to avoid accidental spread. When I got some epoxy on the brass screw mount threads, I soaked it in water and rinsed it abundantly, drying before trying to place it again. At the end, I wiped the tops of the brackets with q tips to make sure no epoxy was out of place. When I was sure I was done, I veeeeery carefully removed the tape from the hinges, thinking that if it cured in place, it might be impossible to remove. I left it to sit overnight. In the morning, I tested all the brass screw mounts to make sure there was no epoxy on them, then screwed the hinge screws back in, then all the chassis screws. To my great delight, I can open my computer again, with no crunching or cracking!!!!
Some notes: always back up your machine before working on it. Lower your expectations. Go SLOW. Get an epoxy with a very long application time - you are better having more time to work than less. Keep track of all the little bits and bobs. Take lots of pictures. If you don't have good dexterity...maybe find someone to do this for you. I love working on small machines and I have previously replaced other computer components (although this was my first time introducing glue into my computer and I was very nervous about it).
This seemed like a sort of stupid idea at first, but I'm glad I tried. It worked better than expected. I will be very gentle with my computer from now on and will be using it primarily as a desktop that just happens to close.
Hope this can help someone else in a time of panic!
crwdns2934105:0crwdne2934105:0
crwdns2936751:024crwdne2936751:0 10
crwdns2936753:07crwdne2936753:0 90
crwdns2936753:030crwdne2936753:0 418
crwdns2942667:0crwdne2942667:0 4,263
crwdns2944067:05crwdne2944067:0
How did you get rid of this of this problem or do you still have it ?
If yes, could you please tell me how to fix it, I don't have anything broken on the backside as far as I see, just the screws from the bottom have fallen out, I just want to get the right screw sizes
crwdns2934271:0crwdnd2934271:0 Pratham Soni crwdne2934271:0
I have that exact same problem what you probably need is a new keyboard area and maybe a new bottem cover. If you feel comfortable doing a repair your self you can buy the parts from https://www.a-accessories.com/asus-fx707... . Good luck to you. :)
crwdns2934271:0crwdnd2934271:0 hello crwdne2934271:0
even i faced the exact same issue, visited there service center, and they directly told me to change whole keyboard assembly part which costs 6437rs
crwdns2934271:0crwdnd2934271:0 Gaurav Mandhare crwdne2934271:0
@prathamson96816 hello, i am also right now facing the same problem, how did you solved this problem?
crwdns2934271:0crwdnd2934271:0 Gaurav Mandhare crwdne2934271:0
I had the same issue in left side they say you've to replace the keyboard as well pls answer what should I do
crwdns2934271:0crwdnd2934271:0 Jarry Dinar crwdne2934271:0