Hi @elshara ,
The screw mount appears to be integral to the top cover assembly and not a separate part.
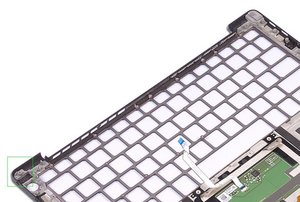
Here’s an image from the service manual showing the screw mount. Go to p.60 in the manual to view the necessary pre-requisite steps and then the procedure to remove the top cover assembly.
(click on image to enlarge)
I think that the screw mount thread may be stripped.
You could try applying some Loctite (example only) to the screw thread and then screwing it in tight, clamping the top cover and base cover together until it sets.
Alternatively, slice a thin, suitable length piece off a wooden matchstick and drop it in the screwhole and then, holding the top cover and base cover together, screw the screw into the hole. The wood will help to jam and hold the screw in place. Applying a dab of glue to the wood will also help. As with the Loctite not too much as you don’t want it to overflow the screw mount and run into the rest of the laptop etc.
crwdns2934105:0crwdne2934105:0
crwdns2934113:0crwdne2934113:0
crwdns2915270:0crwdne2915270:0
crwdns2889612:0crwdne2889612:0
2


crwdns2947414:01crwdne2947414:0
I too have an issue with loose screws. Not sure if it's the exact same screw as you are describing, but it's the screw that holds the display (and hinge) to the mainboard. The screws become lose from normal use of the hinge. Screws have even come out entirely (still inside the case) and have left imprints on the battery - which doesn't seem safe.
For me, one of the screw holes is stripped bare and is useless. I am looking at ways of getting the screw to stay "screwed" in.
crwdns2934271:0crwdnd2934271:0 Alex crwdne2934271:0