How you change serpentine belt
Cerpintine belt
crwdns2934109:0crwdne2934109:0
crwdns2889612:0crwdne2889612:0
2
crwdns2934065:0crwdne2934065:0: 25
![]() 1
1
![]() 1
1
Cerpintine belt
crwdns2934109:0crwdne2934109:0

crwdns2934065:0crwdne2934065:0: 830.2crwdns2936485:0crwdne2936485:0
![]() 1.3crwdns2936485:0crwdne2936485:0
1.3crwdns2936485:0crwdne2936485:0
![]() 937
937
![]() 2.4crwdns2936485:0crwdne2936485:0
2.4crwdns2936485:0crwdne2936485:0
Troy, this is what the manual says :"
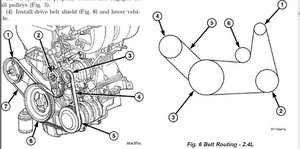
2.4L
REMOVAL GENERATOR AND AIR CONDITIONING BELT
(1) Raise vehicle on hoist.
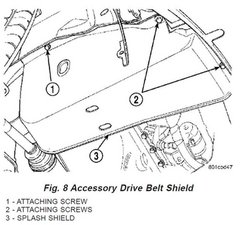
(2) Remove the drive belt shield (Fig. 8).
WARNING: DO NOT ALLOW DRIVE BELT TENSIONER TO SNAP BACK, AS DAMAGE TO TENSIONER AND/OR PERSONAL INJURY COULD
RESULT.
(3) Position a wrench on the belt tensioner lug (Fig. 3).
(4) Release belt tension by rotating the tensioner clockwise (Fig. 3).
(5) Remove belt.
(1) Carefully return tensioner to its relaxed position.
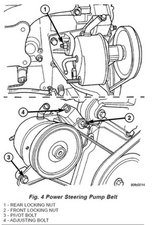
POWER STEERING PUMP
(1) From top of the vehicle, loosen locking nuts (1) and (2) (Fig. 4).
(2) From under the vehicle, loosen the pivot bolt
(3). Loosen adjusting bolt (4) until belt can be removed.

GENERATOR AND AIR CONDITIONING BELT
(1) Install belt onto all pulleys except for the
crankshaft (Fig. 5).
(2) Rotate belt tensioner clockwise until belt can be installed onto the crankshaft pulley (Fig. 3).
Slowly release belt tensioner.
(3) Verify belt is properly routed and engaged on all pulleys (Fig. 5).
(4) Install drive belt shield (Fig. 8) and lower vehicle.
DRIVE BELTS - 3.3/3.8L
REMOVAL
(1) Raise vehicle on hoist.
(2) Remove the drive belt shield (Fig. 8).
WARNING: DO NOT ALLOW DRIVE BELT TENSIONER TO SNAP BACK, AS DAMAGE TO TENSIONER AND/OR PERSONAL INJURY COULD RESULT.
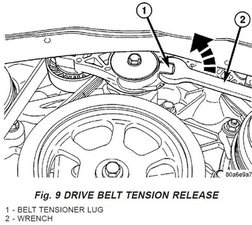
(3) Position a wrench on the belt tensioner lug (Fig. 9).
(4) Release belt tension by rotating the tensioner counterclockwise (Fig. 9).
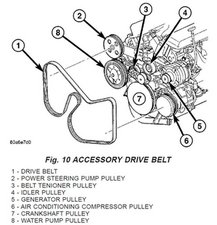
(5) Remove the drive belt (Fig. 10).
(6) Carefully return tensioner to its relaxed position.
INSTALLATION
(1) Route and position the drive belt onto all pulleys, except for the crankshaft (Fig. 10).
(2) Rotate belt tensioner counterclockwise until belt can be installed onto the crankshaft pulley (Fig.9). Slowly release belt tensioner.
(3) Verify belt is properly routed and engaged on all pulleys (Fig. 11).
(4) Install drive belt shield (Fig. 8) and lower vehicle.
crwdns2934105:0crwdne2934105:0
Not the answer I wanted to hear, but a good and accurate answer. I sure wish I had that hoist!

crwdns2934065:0crwdne2934065:0: 13
![]() 1
1
New belt appear to be 3/4 inch short ( tight ) will not go on.
crwdns2934105:0crwdne2934105:0

crwdns2934065:0crwdne2934065:0: 13
![]() 1
1
These vans have a reputation for the tensioner refusing to release. In any case, do not underestimate the torque required-- and in a direction opposite of that needed to put belt over crank pulley.
crwdns2934105:0crwdne2934105:0
crwdns2936751:024crwdne2936751:0 2
crwdns2936753:07crwdne2936753:0 27
crwdns2936753:030crwdne2936753:0 108
crwdns2942667:0crwdne2942667:0 35,544