

Note (Aug. 2021): Since this post was first published (July 2019), we’ve learned that CloudReady (now owned by Google) can be difficult to get working on newer (2018 and later) Chrome devices. CloudReady may not support the devices’ audio, Bluetooth, trackpad, or Wi-Fi. The Brunch project, while more complicated to install and set up, may yield better results installing a generic Chrome OS on Intel or AMD-based Chromebooks.
Also, starting with the 2018 Pixelbook, Chromebooks offer a “closed case” means of disabling writing protection, eliminating the need to open the device and physically disable write protection.
For older, pre-2018 Chrome devices, this guide may still be useful.
Chromebooks, the lightweight laptops focused on web browsing, receive updates to their OS for up to 6.5 years, depending on when they were built. That’s fine and good, and for the Chromebook’s first owners, that might be all they need.
But many Chromebooks work perfectly fine long beyond their official end-of-life date, especially if they were packed with relatively strong hardware when they debuted. You can keep using them beyond their official expiration, but doing so means getting regular warnings that “This device is no longer supported,” and they won’t get security or feature updates. If you’re browsing the web, security updates are a good idea.
Luckily, there is a solution for many Chromebooks. It usually involves only a screwdriver, sometimes with some odd bits, and rarely a bit of electrical tape. You’ll do some weird stuff with a USB drive, and you’ll have to type a couple things into a command prompt. When you’re done, though, your Chromebook will be running CloudReady, a virtual clone of Chrome OS. CloudReady is intended to turn old Windows and Mac computers into snappy Chromebooks for schools and businesses. But it also works well on Chromebooks, since it has many of the hardware drivers baked into it.
When you’ve got CloudReady installed, your device will keep getting security and feature updates, just a little behind the official Chromebook channels. Plus, it’s a pretty fun and low-risk beginner’s hardware project. Let’s dig in.
Note: Before you jump in, check to see if your Chromebook is included in either of the “FULL ROM firmware” columns on this supported devices page for the Mr. Chromebox script. If your device only has a checkbox for RW_Legacy, you should probably skip this procedure. You may be able to install CloudReady with a BOOT_STUB firmware, but I’ve never done it, so you’re on your own if something gets tricky.
If at any point you hit a wall, it’s easy enough to return to a working regular Chrome OS setup. Follow Google’s instructions on creating a recovery USB stick for your device, boot into recovery mode, and run the recovery stick. You can do this even after you’ve enabled developer mode or removed the write-protect screw.
Step 1: Back Up Data and Make a CloudReady Installer
Generally, you won’t have too much stuff stored on your Chromebook’s tiny hard drive, and everything about your browser should be synced to your Google account. But check your Downloads folder, just in case. Move anything you want to keep to either Google Drive or onto a USB drive. We’re going to wipe the Chromebook’s storage, twice!

Before we wipe the Chromebook, you might want to use it to create the USB stick for installing CloudReady Home Edition. You can also use a Windows or Mac computer, if that’s easier. Download the appropriate file from Neverware, then follow the instructions for making a USB stick into an installer. From experience: if it seems like everything is right, but the installer just won’t work, try a different USB stick. They’re finicky, and sometimes the cheap or free ones will work when the expensive one you actually bought will not.
Step 2: Remove Your Chromebook’s Write Protection
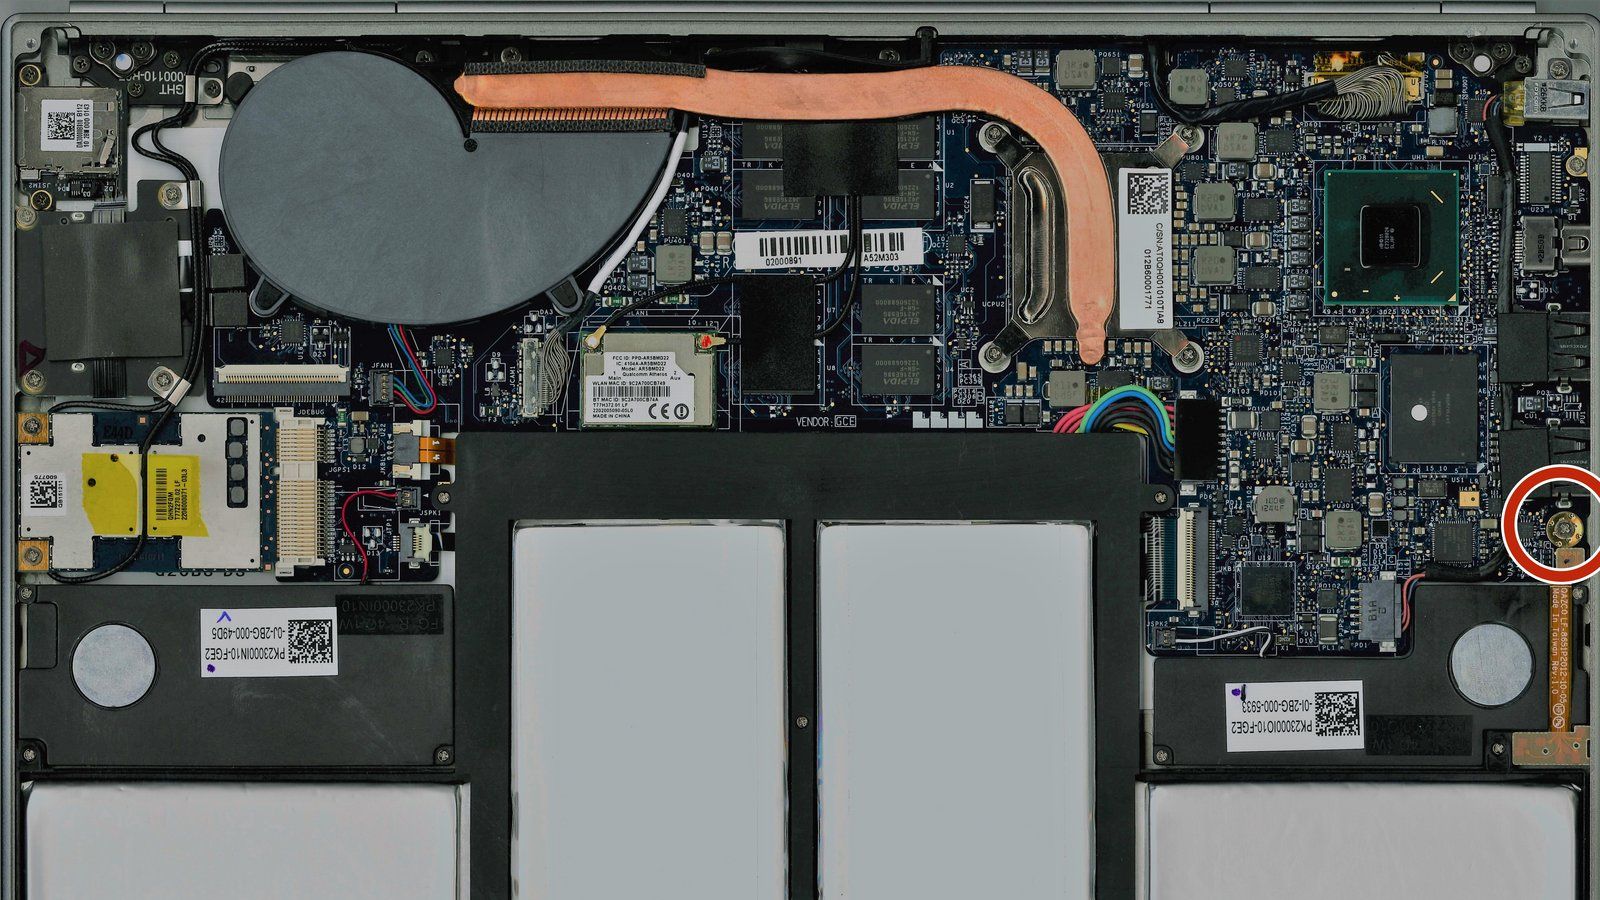
You can actually do this first, if you like, but it makes sense to back up your files and make the USB installer before we tinker with hardware. Most Chromebooks have a special screw on their main board, one that connects to metal pieces and completes a circuit that protects the deeper parts of their firmware. By removing this screw, we’re opening up the storage for writing CloudReady onto the device.
The write-protect screw (or sometimes a sticker, or, rarely, a jumper) is in a different location on every Chrome device. You can search iFixit to see if we’ve got a guide to removing the write-protect mechanism on your specific machine—I contributed to the guide for the 2013 Chromebook Pixel write protect screw. If we don’t have a guide, you can Google (or DuckDuckGo!) for “write protect [name of Chromebook],” replacing that bracket with your Chromebook model. You can try for either the generic name of your Chromebook (“Acer Chromebook 14”), or look on the device for the specific model number (“CB3-431-C5EX”). For older Chromebooks, you can also check the device’s page on the Chromium Projects to see if the details are there.
These are the notable (and firmware-supported) Chromebooks about to run out of updates as of this post, but obviously there will be more over time. I’ve linked write-protect removal instructions for each:
- Toshiba Chromebook
- Samsung Chromebook 3
- Lenovo’s Thinkpad 11e from 2014 (on page 22 of the service manual (PDF), which we love to see)
- Lenovo N20
- HP Chromebook 11 and Chromebook 14,
- Acer C720
I’ve rarely been stumped with the location of a write-protect screw after a couple searches. Even if a teardown or how-to guide doesn’t specifically call it out, you can often find it yourself. On many Chromebooks, the write protect screw looks different than others, with a wider rim of segmented metal around it. Sometimes it even has a “WP” label and arrow pointing at it.
By the way, if your Chromebook is 5-6 years old when you open it up to remove the write protection? You might want to consider replacing its battery, since you’ve already got it open. We sell a few tested batteries for older models.


Step 3: Enable Recovery Mode, Then Developer Mode
With write-protect disabled, it’s time to dig deep into your Chromebook.
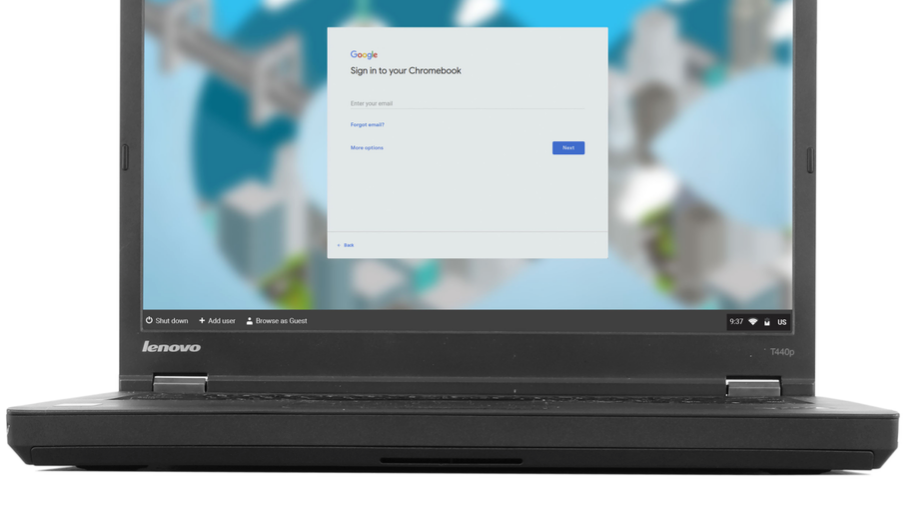
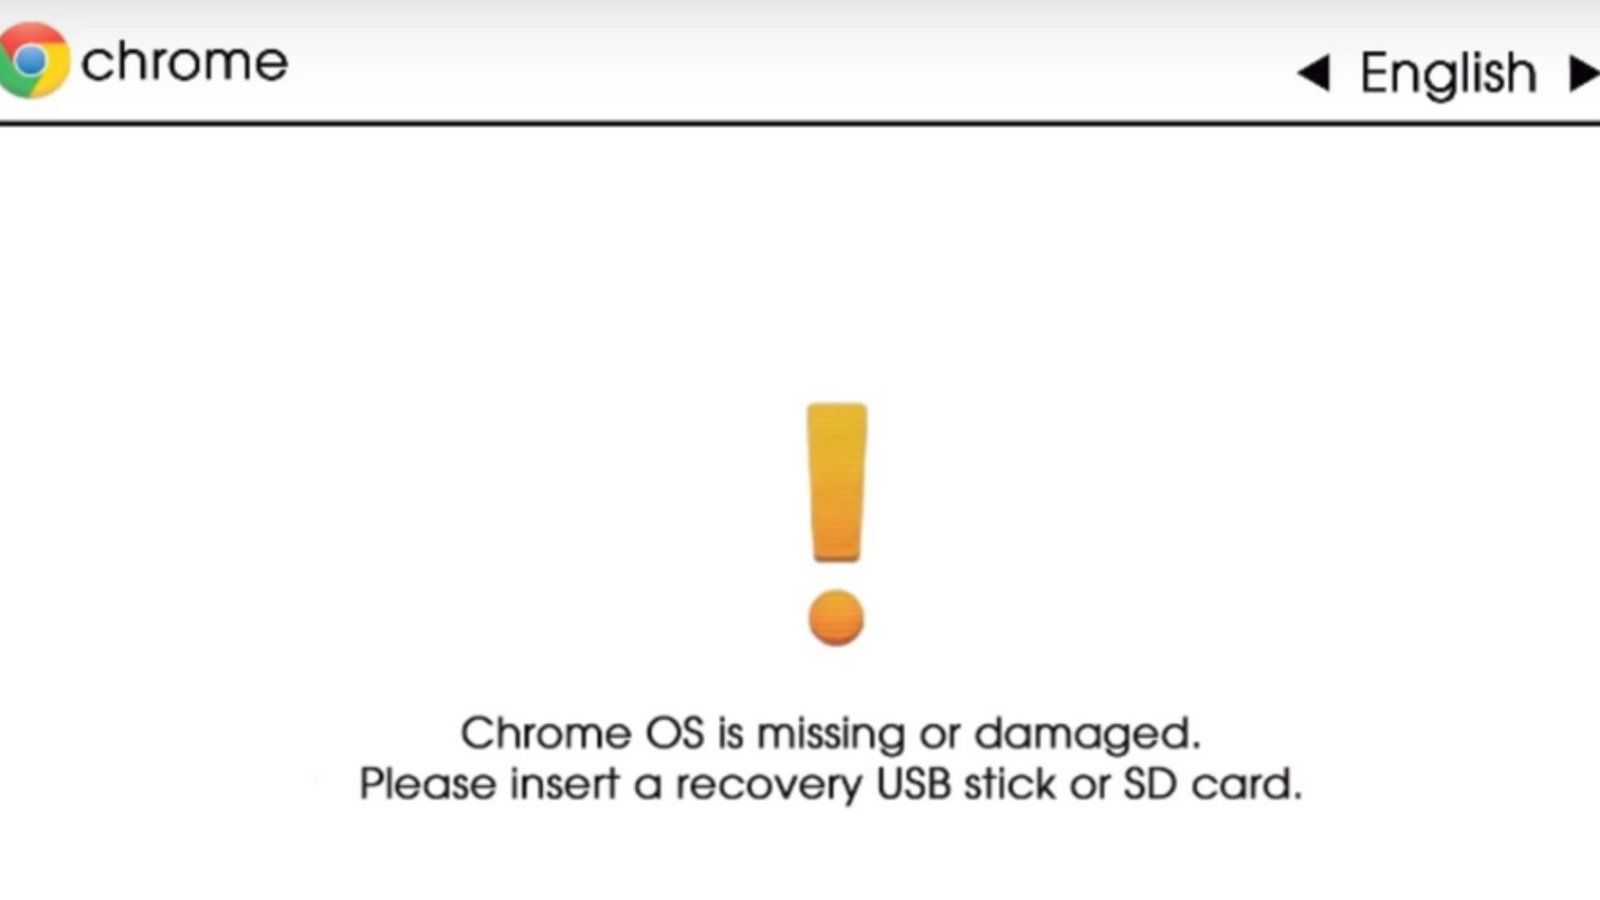
First, you need to boot the device into Recovery Mode. Generally, this means holding down the Esc and “Refresh” keys (the page-reloading circular arrow symbol, two or three keys to the right of Esc), then holding down the Power button until the device powers off (if it was on), or pressing the power key briefly until the device turns on. If it worked, you’ll see either “Chrome OS is missing or damaged,” or “Please insert a recovery USB stick or SD card.”
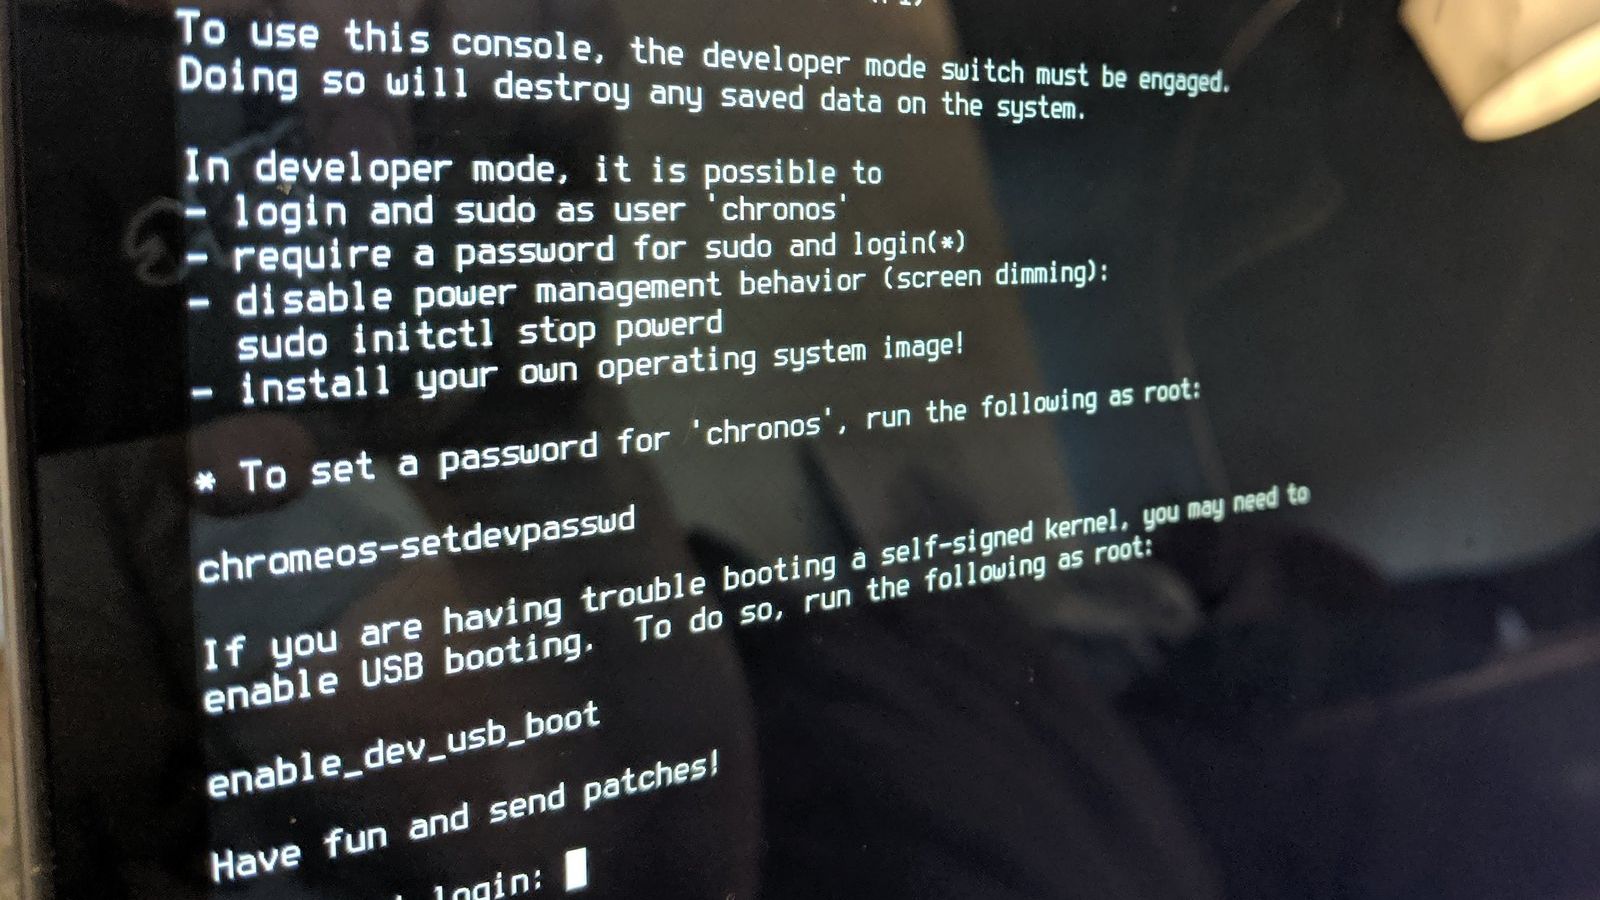
When you see this scary message, hold the Ctrl key and press “D.”
You’ll get a screen asking if you want to disable OS verification. You do, so press Enter. Your Chromebook will wipe itself and reboot once or twice. You’ll land at yet another scary screen: “OS verification is OFF, press SPACE to re-enable.”
Yet again, you will hold the Ctrl key and press “D.” It’s not listed anywhere; it’s just the “I’m a developer, this is okay” shortcut. It’s a good thing we’re hacking this firmware, because you’d have to do this every time you booted your Chromebook, otherwise. Eventually, you will land on the same setup screen you saw when you first set up your Chromebook.
Step 4: Install a New BIOS
Click whatever buttons (“OK,” “Let’s go,” etc.) on the setup screens to get to the part where you pick your Wi-Fi network. Select your Wi-Fi and connect with a password, but don’t go any further. Hold down Ctrl and Alt and press the second key to the right of the Esc key, whether that’s a “forward” or “refresh” arrow. You’ll flash over to a stark-looking terminal, but you’ll only be here for a few minutes.
On the command line, type in one command to download and run the MrChromebox script, which can install a new BIOS on your Chromebook suitable for installing a new system. As of this writing, the command below is current, but check the site, just in case.
cd; curl -LO https://mrchromebox.tech/firmware-util.sh && sudo bash firmware-util.sh
Note that the second character after the first dash is a capital “oh” O, not a zero.

After running that command, you’ll get a menu. At the top, it shows you the device, CPU, firmware type, and whether write-protection is enabled (“Fw WP: Disabled”). If this script says your write-protect is still enabled, you’ll need to look up what you might have done wrong, and try again. Otherwise, pick the option to “Install/Update Full ROM Firmware” (usually the third option). The script will do its thing (perhaps asking you to confirm you want to do this one more time). When it’s done, enter “P” and then hit Enter to power off your Chromebook.
Congratulations: your Chromebook is no longer special! It’s just like a regular laptop now, so we can boot up and install CloudReady.
Step 5: Install CloudReady
Plug the CloudReady USB stick you made into your Chromebook. Most USB ports should work, but a few Chromebooks will not let you boot from a blue (USB 3.0) port. When you see the running bunny on your new boot-up screen (hello, new BIOS!), press the Esc key. On the BIOS setup screen that appears, tap the Down key until you end up at Device Manager. Hit Enter, and then choose whatever looks like your USB key in the list of devices that comes up.
The next thing you should see is a setup screen for CloudReady, which looks a lot like the setup screen for Chrome OS. Try out a few things while this screen is up: move the cursor with your trackpad, try entering your Wi-Fi password, and make sure your Chromebook can connect via Wi-Fi. If that seems good, you don’t have to continue going through CloudReady’s setup—that is technically to set up a temporary “live” session. You can click on the settings panel in the lower-right corner and choose “Install CloudReady.”
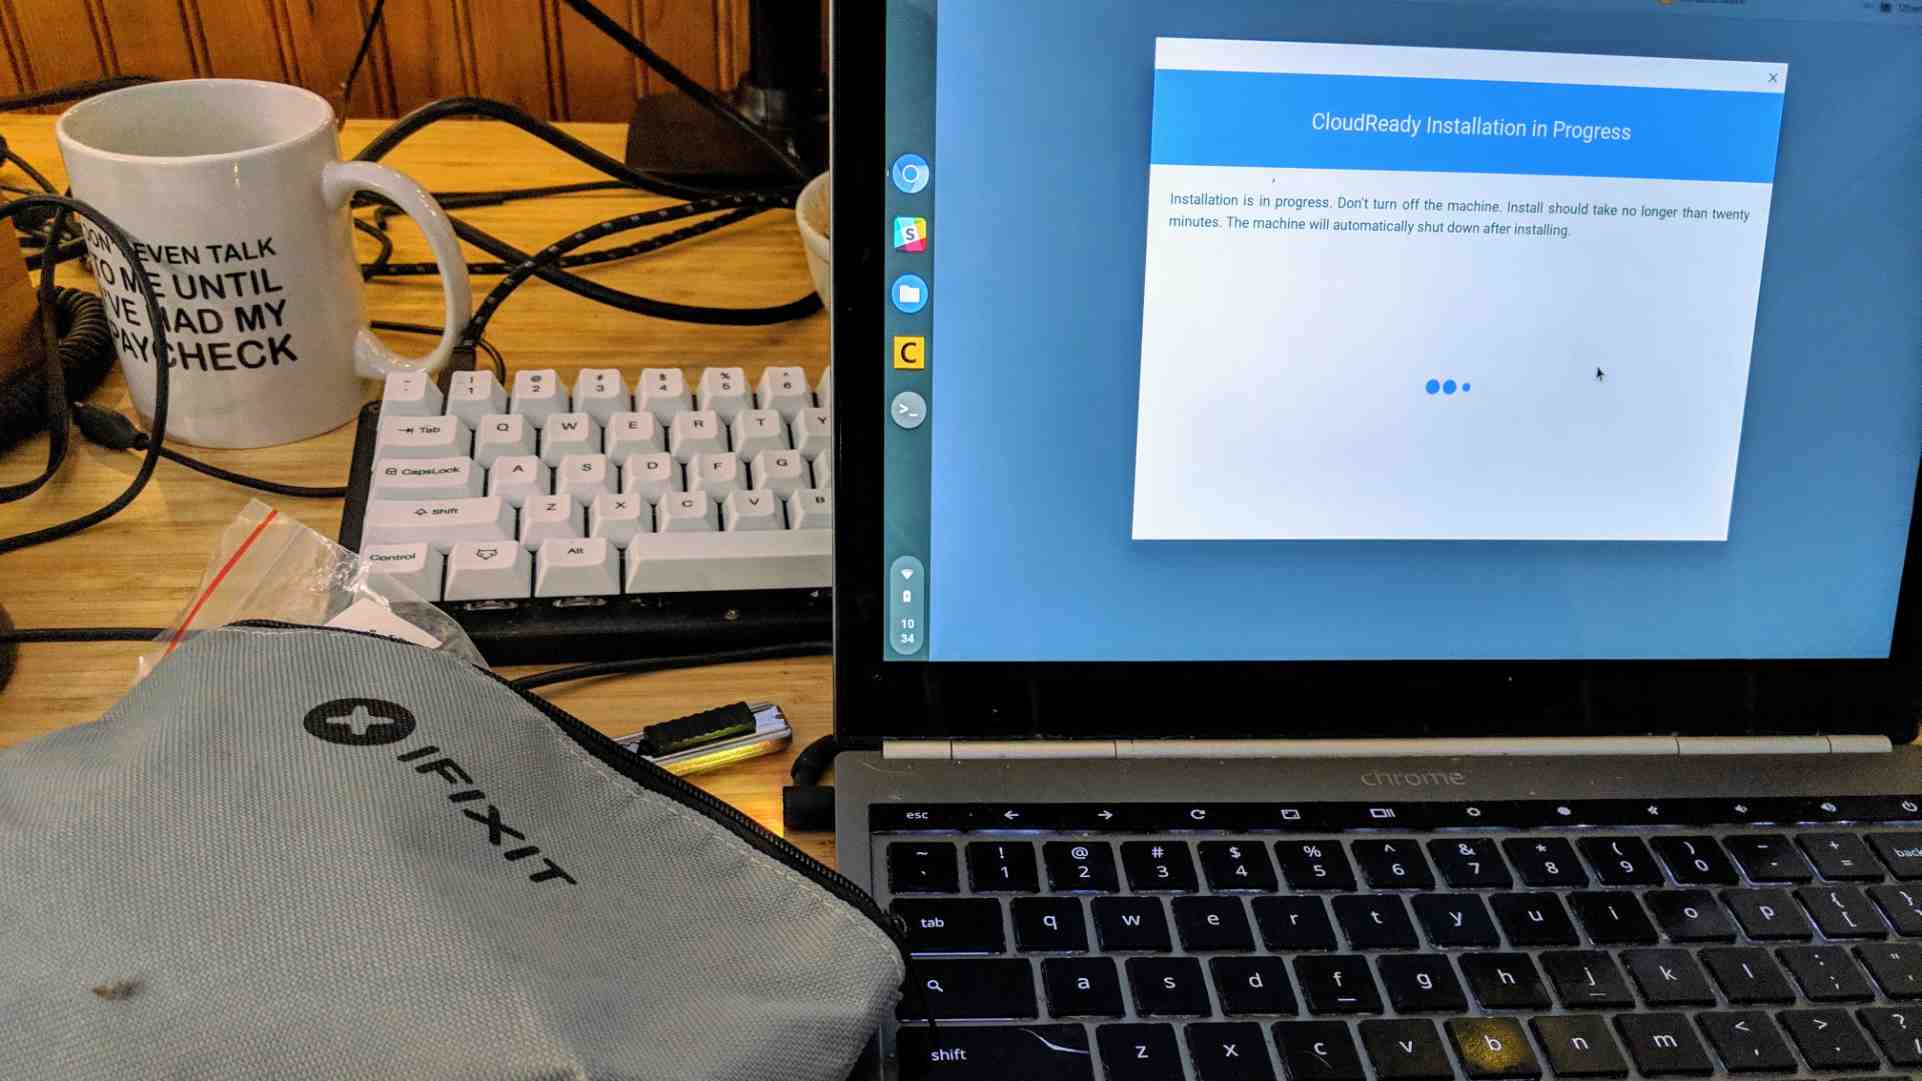
Now comes the culmination of all your work. CloudReady writes its open-source copy of Chrome OS deep into your Chromebooks’ storage. Your laptop boots up like a regular laptop, without warnings or loud beeps. And you’ve got a modern, secure web browser to use again.
This post, originally published July 2, 2019, was republished on Aug. 25, adding a note at the top regarding compatibility and newer Chromebooks.


crwdns2944067:077crwdne2944067:0
You should do windows next
Sailor Priddy - crwdns2934203:0crwdne2934203:0
Thanks for a decent read and valuable resource! Though I don't need to do this yet, I think the idea is terrific (like Crouton, which also has added surprising value to these modest machines), and appreciate the clarity and thoroughness with which this was written.
Ken Manheimer - crwdns2934203:0crwdne2934203:0
Well this is timely and much-appreciated! I'm archiving it for the day when my wife lets me get her Acer C710 in my clutches, and I've got a CTL J5 lying around here somewhere that I've not used in a long while because I just don't like Chrome's love of ads.
I assume this walkthrough also allows installation of other Linux distros, so maybe I can finally have the Firefoxbook I've wanted for a while.
Thank you!
K B Tidwell - crwdns2934203:0crwdne2934203:0
Thanks for your effort.
I’ll try soon.
Anyway, does it support OTA if I installed it on ACER C720?
ludien - crwdns2934203:0crwdne2934203:0
With respect to this comment in the posting “Congratulations: your Chromebook is no longer special! It’s just like a regular laptop now” does it mean you could now install some other Linux distro?
Bushy3 - crwdns2934203:0crwdne2934203:0
Yes. There’s a special chromebook/box remix of Ubuntu called gallium os. I also had windows 10 running on my dell chromebook 11. Ran surprisingly well. I put the hyper-v version of windows server on my chrome box and had some virtual machines running on it. It’s very versatile hardware.
John Ipson -
update and reply please
Billy -
Thank-you IFixit!
You have continually found creative ways to keep Macs alive, long after their ‘Best Before’ date. Now you’re doing it for Chromebooks!
Your work on finding repairs for Android devices are also incredibly innovative.
Well done!
Shaun Browne - crwdns2934203:0crwdne2934203:0
As Bushy3 asked, will the Chromebook now boot from USB, or the uSD/SD Card slot with bootable media inserted?
Sounds to me like a great way to change it into a portable/lightweight Linux box.
I might just give this a shot with my older Asus Chromebook Flip.
Thanks!
Mike - crwdns2934203:0crwdne2934203:0
Thank you, I've just liberated my Acer C720. Had couple of wee challenges along the way. Had to login to terminal to run commands and had to experiment with how to chose menu item from firmware utility. Also it would only run Cloudready setup from a Chromebook formatted USB. Given the amount of Chromebooks about to get bricked your advice has the potential to stop tons of hardware being tipped. Excellent.
Graham Castle - crwdns2934203:0crwdne2934203:0
OK, I’m doing this on an Acer 720. I get to the command line fine, where it shows “localhost login:” but when I type the “cd…” command nothing happens. At one point, i managed to change to chronos ( don’t know how) and when I entered the command line you show, I got “unable to resolve host mrchromebox.tech”
What steps am I missing?? I have 2 of these ACER 720s that I’d really like to get working!
Jim Melville - crwdns2934203:0crwdne2934203:0
I’m on an Acer 720 and this guide worked really well, I received my EOL message a few weeks ago. Thank you for writing this.
I just wanted to point out a few missing pieces in this guide, after you enter the terminal it will show a login id, before you can type the command you must first enter the login id as chronos (this information appears on the first few lines in the terminal). I tried entering the command on the same line as loginid and nothing happens. took me awhile to realize
Also, once you have the new BIOS installed, you don’t find the usb under device manager. You find it under boot device, you have to go there and select USB here, the machine will reboot to the install Cloud Ready ‘live session’.
I’m following the instructions to the letter so these things jumped out. You also may want to include better screenshots for each steps as I was confused about where I was a few times by just reading text (and the process is a little unnerving for a newbie) . This guide was great, you saved my device!
derfnoslen - crwdns2934203:0crwdne2934203:0
Thank you, derfnoslen! I had the same issues and was able to resolve after reading your post. Instructions need to be amended.
Jerry Granderson -
It is still Greek to me… What exactly should I type in for “local host login:” and How should I pursue? Can you share more details for a dummy like myself? Thanks!
adallak -
Thanks, this was so helpful! I was hung up on a couple of steps until I read your tips.
Chris Austin -
Cloud Ready installed nicely on my Acer C720 but it apparently doesn’t support the touchscreen. Also, to get the Mr. Chromebox script to run, you must first login at the terminal. So in the debug GUI process just before that step, I used I set a root password I could easily remember.
Buffalo BillC - crwdns2934203:0crwdne2934203:0
Hi I am at the login phase with the same chromebook as you. Can you describe how to go back and set up a root password?
Keiran Rutherford -
How I can do my dell chromebook version 58.0.32.029.89 for running android apps
Please help me..
Shaif - crwdns2934203:0crwdne2934203:0
What about Android? Does this give you the option of enabling the Google Play Store (and thus run Android in a container) on the Chromebook?
alisonnic - crwdns2934203:0crwdne2934203:0
Sadly, the answer to this question is no. Here’s what Neverware, the developer of CloudReady, has to say:
https://cloudreadykb.neverware.com/s/art...
alisonnic -
how long does this take to accomplish?
laumic54 - crwdns2934203:0crwdne2934203:0
I’d plan on 3 hours minimum. Probably longer. Set aside an afternoon…
SCOTT KERNS -
Hi, I’m trying this on the original chromebook pixel, but when i try to put the computer into recover mode (esc+refresh+power) it just goes to a blank black screen with backlit keys. Waiting for an hour with no change. The only way out of this stage is to reboot (refresh+power). I’ve tried holding the keys for a variety of durations with no success. Any ideas?
Dale - crwdns2934203:0crwdne2934203:0
At step 4 I type in the command, hit enter and it goes blank then brings me back to the same screen with the last line localhost login. Any suggestions?
Keiran Rutherford - crwdns2934203:0crwdne2934203:0
@kpifixit Does this application work with the HP Pavilion Chromebook model D1A51UT#ABA i’m in the same rut as others, unable to update.
Shelton - crwdns2934203:0crwdne2934203:0
Works great, I’ve been using mine as a linux laptop for years now. I recommend using straight debian now since ubuntu is becoming increasingly annoying in recent years. Here is my guide: '''How to turn HP Pavilion Chromebook into linux laptop'''
tcagle53 -
I’ve got an ACER C720 and I got all the way to the screen where I choose the USB installer but it doesn’t install. Kinda discouraged…I downloaded the install package from CloudReady but it just won’t fire up. Any advice?
SCOTT KERNS - crwdns2934203:0crwdne2934203:0
Figured out one mistake. I didn’t properly prepare the CloudReady installer. It takes quite a while!
SCOTT KERNS - crwdns2934203:0crwdne2934203:0
Got it installed! Do you leave the USB drive in the computer? I pulled it out and I didn’t think it was going to start up again. Finally got it going again and it’s running fine with the drive in place.
SCOTT KERNS - crwdns2934203:0crwdne2934203:0
Update: I figured out that the program has to work for a while to actually be installed on the Chromebook. There’s an icon that is on the little setting menu at the bottom right that says something like “install”. Hit that and it went to work! Any who, got ‘er done
SCOTT KERNS - crwdns2934203:0crwdne2934203:0
Quick question, none of this is mentioned on the Neverware’s (The creators of Cloudready) official guide for installing their software on a Chromebook. Is this only necessary for specific models?
Official Guide found here: https://guide.neverware.com/build-instal...
Craig Rogers - crwdns2934203:0crwdne2934203:0
I was wondering about the same thing too and would be great and appreciated to get this clarified.
Thank you.
Ahmed Ali -
My ASUS C300 loaded but no sound. The Cloud Ready people did not know how to fix this 8 months ago. Has anyone figured it out
Jim Sgarlat - crwdns2934203:0crwdne2934203:0
The significant limitation of CloudReady is it does not, and NEVER WILL support PlayStore/Android apps or LINUX. programs or dual booting.
If you need either of these, look for refurbished machines or ones that have been out for more than 1 year to get the best prices —measured as cost of ownership per month of support life remaining.
End of updates doe not mean the machine will stop running, that it lacks security, or that the “missing” security updates will help you. The most significant attack vectors known today are through the Intel processor and local physical attacks that updates can not prevent against.
Avoid installing Chrome extensions except through the Chrome Store and iuse the Developer mode switch in Extensions to update the extensions regularly. You are safe from everything except sneaker-net, stupidity and files shared through channels besides Drive.
P Schmied - crwdns2934203:0crwdne2934203:0
Excellent instructions for the laptop, it helped me a lot. I accidentally deleted files from disk. Can I restore them using Uneraser?
klarkostin - crwdns2934203:0crwdne2934203:0
I have an LG Chromebase desktop computer - does the same fix apply?
leers - crwdns2934203:0crwdne2934203:0
This didn’t work for me. After running the command it kept asking for a password. I guess I’m too big a rookie.
Dale Ballard - crwdns2934203:0crwdne2934203:0
Awesome! Thank you! Got more life out of my old Chromebook.
Philip Bartholomew - crwdns2934203:0crwdne2934203:0
Converted an HP Chromebook 14 (ak040wm) to Cloudready today. I had to use the old one-line script from mrchromebox - still applicable for Linux. I reloaded Chrome OS from a recovery USB stick made 2 years ago and made sure no updates occurred, after error messages came back from using the specified script. I used another Chromebook to download the Cloudready image zip file and the Recovery Utility to make an image on a USB stick.
Thank you for the detailed instructions.
ogw - 06/02/2020
J Baker - crwdns2934203:0crwdne2934203:0
Converted a 2nd HP Chromebook 14 , (same model), to Cloudready. Restored the first HP Chromebook back to Chrome OS because of no sound.
Neither Chromebook had sound after loading the Cloudready Home Edition. Played with the alsamixer in both Chromebooks while in Cloudready and had no success. Have at least 15 months more of Chrome OS updates for the first Chromebook and will continue to use the second Chromebook for tasks that doesn’t require sound. (maybe a future Cloudready Build will support sound or another solution will fix the no sound problem in this model Chromebook)
J Baker - crwdns2934203:0crwdne2934203:0
This is above my level. How can I find someone to do this for me? I have a 2014 LG chromebox with the AUE up now in June 2020. I’m only conderned about security for online banking.
eva - crwdns2934203:0crwdne2934203:0
I followed all the steps and loaded CloudReady on a Chromebook 14, had to tweak it a bit since these steps are not suitable for every Chromebook model but at the end I was able to install it and it runs just fine. The only problem I see is that CloudReady uses Chromium instead of Google Chrome as the default browser and of course, you cannot download and install Chrome. Why is this a problem? Because some sites will not work on Chromium. I was trying to watch the CNN and MSNBC live TV but the video does not load. You can access all websites but some might not work the way you expect. I was able to use the regular Google Apps like Gmal, Google Docs, Google drive, etc so I’d say if you want full functionality, just buy another Chromebook but if you are willing to sacrifice some features, you can load CloudReady and for the most part, it will work just fine.
Oskar Salazar - crwdns2934203:0crwdne2934203:0
I updated my Chromebook C720 from Asus to GalliumOS, it works fine for surfing the web and such.
Guy R Cook - crwdns2934203:0crwdne2934203:0
I accidentally used the command “rollback” in crosh and now my chromebook won’t update. I have tried powerwashing and data resetting it but nothing is working. Does anyone know how to fix this?
Brayden Williams - crwdns2934203:0crwdne2934203:0
For those who are getting stuck once in the Terminal at the “localhost login”. You want to login as “root” without the quotes, then run the command: chromeos-setdevpasswd and set a memorable password. Then swap to the “chronos” user by running “su - chronos” without the quotes. Now you’re ready to input the Mr. Chromebox script to ensure that your Chromebook is “no longer special”.
Christopher Ingram - crwdns2934203:0crwdne2934203:0
Thanks!! Worked for me , had to log in by entering “chronos” and press enter at the”localhost login:” prompt before running the script. script kept failing with download errors, my chromebook network must be very flakey in this mode as it worked about 10th time. Same with the flash step took a lot of attempts. Just keep trying!
Andrew Lansdowne - crwdns2934203:0crwdne2934203:0
Some Tips:
* USB 3.0 and 2.4Ghz wifi, and your kitchen microwave overlap in frequencies, and interfere with each other.
Basically, use 5Ghz wifi instead, or disable wifi when using usb, use a USB port that’s away from your wifi antenna, or use shielded USB drives.
* For updating firmware, be sure to charge your chromebook to 100% battery & keep the power cable in. Also, never poweroff during a firmware update, else it could brick your system (requires reprogramming\replacing your bios\eeprom chip, which is probably soldered to your motherboard). I’ve had a bad bios firmware once (old Celeron), and was lucky that the chip was replaceable, which is rare now a days. On a lenovo windows laptop, a firmware update once took 18 or so hours to finish, but it was successful (I just let it sit overnight).
Darren DeHaven - crwdns2934203:0crwdne2934203:0
In chrome dev mode, you can switch between the gui and terminal by pressing:
ctrl-alt-F1 (for GUI). “F1” is the key right of the ESC key.
ctrl-alt-F2 (for CLI). “F2” is two keys to the right of the ESC key.
I “think”, you can also use "ctrl-alt-t”, to bring up a terminal window, then type “shell”. I don’t know if there’s any issues with that way for doing the above.
Darren DeHaven - crwdns2934203:0crwdne2934203:0
I have a couple of used chromebook that are locked in enterprise enrollment. Will this let me get them back running?
accounts - crwdns2934203:0crwdne2934203:0
Does this work on a Asus c201P?
K A - crwdns2934203:0crwdne2934203:0
Great article, very helpful, thanks a lot.
Rutger Broekhuizen - crwdns2934203:0crwdne2934203:0
Thank you! :)
Henrik Wiman - crwdns2934203:0crwdne2934203:0
I can add that the new BIOS has been updated at the mrchromebox site. It now consists of three lines of code and you can place it all on one line if you type:
“ && “ [spaceAMPERSANDAMPERSANDspace]
between each line of code, so it looks like this:
cd; curl -LO mrchromebox.tech/firmware-util.sh && sudo install -Dt /usr/local/bin -m 755 firmware-util.sh && sudo firmware-util.sh
Thanks for clear instructions. Now my first gen HP Chromebook has a new life!
John Culshaw - crwdns2934203:0crwdne2934203:0
Please note- this does not work for Chromebooks (like the ASUS C100P) that use ARM processors. The command-line utilities are only for Intel 64-bit processors. non-Chrome OS’s for ARM systems are limited . From MrChromebox…”Cloudready doesn't support ARM processors. Pretty sure your only options on that device are ChromeOS or Arch ARM, but not familiar with booting Linux on ARM ChromeOS devices really. “
Jerry Rotz - crwdns2934203:0crwdne2934203:0
Not to take anything away from this guide or Cloudready but there is another new solution available to keep old Chromebooks running. That is Brunch framework, which enables you to load the most current real ChromeOS images, INCLUDING the Play store/Android apps, even if your Chromebook never had them. I was able to get both an Acer C720 (PEPPY) and a 1st generation Dell 11 (WOLF) running perfectly on current (V86) versions of ChromeOS. You need to be able to run Mr Chromebox UEFI BIOS. Brunch can even turn an underpowered tatty Windows machine into a zippy chromebook, if desired. Worth a look…
rick s - crwdns2934203:0crwdne2934203:0
can you email me a how to do it idiot guide with links for any downloads? acer c720. many thanks
zazahecror@gmail.com
zaza hector -
HP Chromebox G1 (bought second hand). Localhost login: standard password (test0000) doesn´t work. Is there a way around it? Without it I can´t run the script. Reading things about chronos and sudo but have no idea wthat they are and what to do.
Eduard van den Berg - crwdns2934203:0crwdne2934203:0
With an Acer C720 I was able to complete the install… thank you! Should I reinstall the write-protect screw?
Todd Panek - crwdns2934203:0crwdne2934203:0
These instructions need to be updated, as some of the wording is off and can confuse the common user. Also, some of these instructions (like booting into Recovery Mode) do not apply to users of an LG Chromebox. In the end, I figured it out with your help. Thank you.
Von Wraith - crwdns2934203:0crwdne2934203:0
Does anyone have a STEP by step guide on how to change a Lenovo Thinkpad X131e Chromebook over to the Cloudready OS ?
Raymond Oickle - crwdns2934203:0crwdne2934203:0
Does anyone know if this applies to Chromebox as well?
pastor - crwdns2934203:0crwdne2934203:0
may god almighty bless you above measure! i thank god for you so much & for taking the time to have care to help those of us who are presently or for several several months, trying to find a reasonable non stressful eay of correcting/fixing our fussy chromebook. i am so incredibly thankful to god for you! please please please know you are an absolutely great blessing and you are so incredibly appreciated!!! numbers 6:25-26 and jeremiah 33:3 to you beloved.
samuelchapter1 - crwdns2934203:0crwdne2934203:0
For my Acer Chromebook 720p I actually just went into developer mode then enabled the boot from usb. I couldn't just enter in your MrChromebox command because it required other steps first then I found out you didn't need it at all.
The YouTube video by Bennett Bytes ran through the steps to get it up and running:
How to Enable Developer Mode and USB Booting Chromebook - YouTube
Otherwise, all the steps are the same. Thank you for the help!
Ethan Osgood - crwdns2934203:0crwdne2934203:0
cd; curl -LO https://mrchromebox.tech/firmware-util.s... && sudo bash firmware-util.sh no longer appears to wrk, as the location has moved to
https://raw.githubusercontent.com/MrChro...
Rick S - crwdns2934203:0crwdne2934203:0
My Chromebook Pixel passed the whole procedure. Is running the Flex now. However: the vent is working full speed all the time. The sleep after lid close is turning off the device. Tried to recover to the "official" chromeos, but i'm not able to do that as the new bios is not permitting to restore the os from usb stick. Can anybody help me with: or stabilizing power related options, or with reverting to the "factory" settings
Bartek Chodkowski - crwdns2934203:0crwdne2934203:0
How TU install anydesk on Chromebook version 69.0
Meharma Malik - crwdns2934203:0crwdne2934203:0
I have an Acer Chromebook 15, manufacture dated 4/2016. Will this work for this model? Also, where does one find someone who is computer knowledgeable (not me!) who can do this for me?
S. Bode - crwdns2934203:0crwdne2934203:0
Will this work for my Acer Chromebook 15, manufactured 4/ 2016? Where can one find someone (not me) tech savvy enough to do this without losing data or harming computer?
S. Bode - crwdns2934203:0crwdne2934203:0
A very clear guide. It works well on my HP14 until step 5. I can't see anything in the Device Manager which looks like USB, only a 'Platform Driver Override selection'.
The Boot Manager > Change Boot Order has options <SATA ...> and <UEFI Shell>
The Boot Manager > Add Boot Option offers 5 options: NO VOLUME LABEL, ROOT-A, ROOT-A, OEM, EFI-SYSTEM
The Boot Manager > Boot from File offers the same.
Can anyone provide a clue as to how to proceed? Thanks.
John Bloxham - crwdns2934203:0crwdne2934203:0
hello please check comments and reply and update your page
Billy - crwdns2934203:0crwdne2934203:0
I have a Samsung 3, and it seems like a lot of work for a cheap, low powered Chromebook.
Don - crwdns2934203:0crwdne2934203:0
Don't think you can do this anymore. Google has taken over CloudReady and imposed all its restriction on it as well.
Graeme - crwdns2934203:0crwdne2934203:0
It's still working for me. This is the guide I followed: https://support.google.com/chromebook/an...
Though I installed the Chrome Web Store extension called Chromebook Recovery Utility and it perfectly wrote the Flex OS to my USB drive.
Andy Traver -
Thank you!! So far it's working on HP Chromebook G4, I had to login to the shell with default login, username Chronos before being able to type the command to download/install the Firmware Utility Script. The login step is not mentioned in the guide but I'd love to add it, except there's no edit button. Great guide though. The steps for the boot menu are a bit different, it looks a bit different. You have to enter the boot menu and select your USB drive to boot from. It's no longer called Device Manager.
Andy Traver - crwdns2934203:0crwdne2934203:0
Internal sound and mic won't work on mine, since it's not an officially supported model. Just to note. I have G4 but others have no sound too. But you can use a USB adapter to get sound or mic. Webcam works though! Apparently it may be a Linux problem, Linux may not support the audio chip in my G4.
Andy Traver - crwdns2934203:0crwdne2934203:0
I figured out a fix if you can't get your USB drive to show up in the boot menu. So if you have USB 2.0 ports, plug your installation USB into it. I think those show up in the boot menu without issue.
But if you only have USB 3.0 ports, sometimes your USB drive won't show up in the BIOS boot menu. So what you have to do is enter the BIOS like normal (pressing esc), unplug then plug your USB drive back in, then reenter the boot menu and your USB drive may show up now. At least my USB drive shows up if I do that.
Andy Traver - crwdns2934203:0crwdne2934203:0
Update, I noticed this doesn't always work the first time. Instead I'd boot up with USB drive plugged in and keep it plugged in. Go to the BIOS menu (press esc), check Boot Menu to see if it appears. If it doesn't, go back to BIOS menu and select reboot.
Check Boot Menu again. Repeat until you see the USB drive appear in boot menu. It may take a few reboots. Seems that my previous comment may work too if you repeat it over and over, but it doesn't always work.
Andy Traver -