crwdns2933423:0crwdne2933423:0

Remplacement de l'ensemble de la carte mère de l'iPod Touch 4ème génération

crwdns2931529:0crwdnd2931529:0crwdnd2931529:0crwdnd2931529:02crwdnd2931529:0crwdne2931529:0

crwdns2936315:0crwdne2936315:0
crwdns2936317:0crwdne2936317:0
crwdns2931653:02crwdne2931653:0
iPod Touch 4th Generation Logic Board Assembly Replacement: crwdns2935265:00crwdnd2935265:01crwdnd2935265:03crwdne2935265:0 iPod Touch 4th Generation Logic Board Assembly Replacement: crwdns2935265:00crwdnd2935265:02crwdnd2935265:03crwdne2935265:0 iPod Touch 4th Generation Logic Board Assembly Replacement: crwdns2935265:00crwdnd2935265:03crwdnd2935265:03crwdne2935265:0
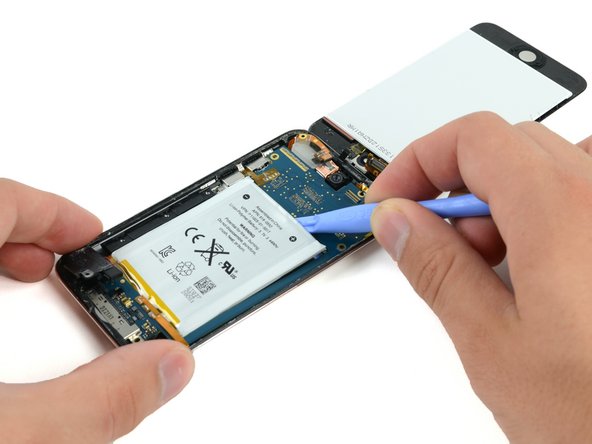
  • In the next few steps, you will loosen the adhesive from underneath the battery, the logic board, and the frame under the battery. Do this slowly, carefully, and evenly. Take care not to puncture the battery or bend the logic board.

  • Use a plastic opening tool to pry up the adhesive around the three exposed edges of the battery.

  • Do not try to pry the battery out, just start loosening the adhesive.

Dans les prochaines étapes, vous ferez céder l'adhésif sous la batterie, la carte mère et le cadre sous la batterie. Travaillez lentement, soigneusement et uniformément. Veillez à ni perforer la batterie ni plier la carte mère.

Utilisez un outil d'ouverture en plastique pour décoller l'adhésif autour des trois bords apparents de la batterie.

N'essayez pas de retirer la batterie, commencez simplement à décoller l'adhésif.

crwdns2944171:0crwdnd2944171:0crwdnd2944171:0crwdnd2944171:0crwdne2944171:0