crwdns2933423:0crwdne2933423:0

Sustitución del Conjunto de la Placa Lógica del iPod Touch 4th Generation

crwdns2931529:0crwdnd2931529:0crwdnd2931529:0crwdnd2931529:02crwdnd2931529:0crwdne2931529:0

crwdns2936315:0crwdne2936315:0
crwdns2936331:0crwdne2936331:0
crwdns2931653:02crwdne2931653:0
iPod Touch 4th Generation Logic Board Assembly Replacement: crwdns2935265:00crwdnd2935265:01crwdnd2935265:03crwdne2935265:0 iPod Touch 4th Generation Logic Board Assembly Replacement: crwdns2935265:00crwdnd2935265:02crwdnd2935265:03crwdne2935265:0 iPod Touch 4th Generation Logic Board Assembly Replacement: crwdns2935265:00crwdnd2935265:03crwdnd2935265:03crwdne2935265:0
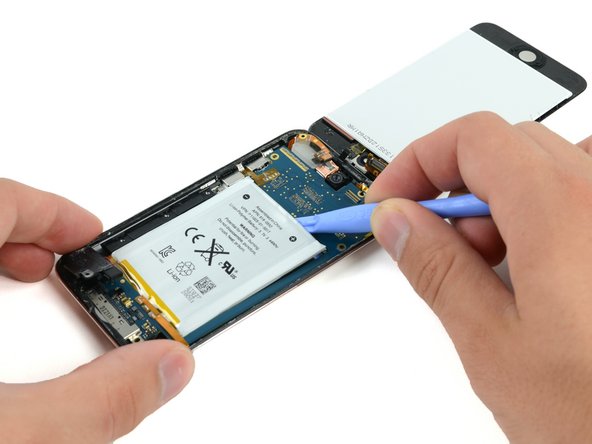
  • In the next few steps, you will loosen the adhesive from underneath the battery, the logic board, and the frame under the battery. Do this slowly, carefully, and evenly. Take care not to puncture the battery or bend the logic board.

  • Use a plastic opening tool to pry up the adhesive around the three exposed edges of the battery.

  • Do not try to pry the battery out, just start loosening the adhesive.

En los siguientes pasos, aflojarás el adhesivo de debajo de la batería, la placa lógica y el marco debajo de la batería. Haz esto lentamente, con cuidado y de manera uniforme. Ten cuidado de no perforar la batería ni doblar la placa lógica.

Usa una herramienta de apertura de plástico para levantar el adhesivo alrededor de los tres bordes expuestos de la batería.

No intentes sacar la batería haciendo palanca, simplemente comienza a aflojar el adhesivo.

crwdns2944171:0crwdnd2944171:0crwdnd2944171:0crwdnd2944171:0crwdne2944171:0