crwdns2933423:0crwdne2933423:0

Remplacement du LCD du Sanyo VPC-S1415

crwdns2936315:0crwdne2936315:0
crwdns2936317:0crwdne2936317:0
crwdns2931653:04crwdne2931653:0
Sanyo VPC-S1415 LCD Replacement: crwdns2935265:00crwdnd2935265:01crwdnd2935265:03crwdne2935265:0 Sanyo VPC-S1415 LCD Replacement: crwdns2935265:00crwdnd2935265:02crwdnd2935265:03crwdne2935265:0 Sanyo VPC-S1415 LCD Replacement: crwdns2935265:00crwdnd2935265:03crwdnd2935265:03crwdne2935265:0
  • Remove the screw on the bottom of the battery compartment. Keep this screw with the one removed on the previous step. These two screws have a different length than all the other screws. They are the shortest ones in the camera

  • With those two screws removed, you can not separate the back part of the case.

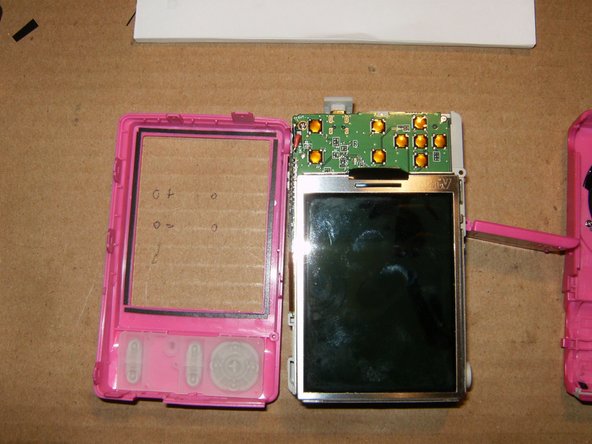
  • Flip the LCD to the right and out of the frame. Do NOT try to remove it yet.

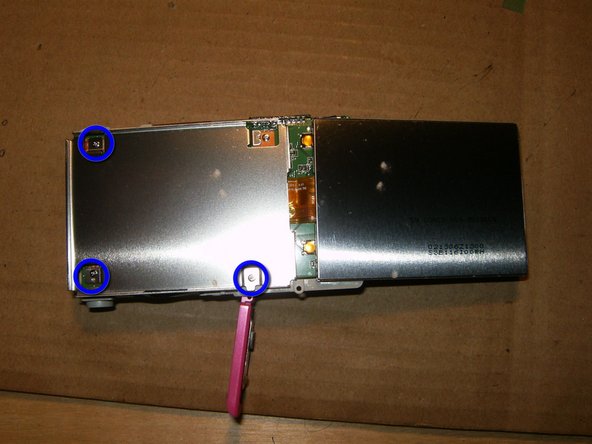
  • Remove the screw screws that hold the LCD frame to the logic board. Keep the 3 screws separated from the rest of the screws, due to different length.

Retirez la vis au bas du compartiment à piles. Conservez cette vis avec celle retirée à l'étape précédente. Ces deux vis ont une longueur différente de toutes les autres vis. Ce sont les plus courts de la caméra

Une fois ces deux vis retirées, vous ne pouvez pas séparer la partie arrière du boîtier.

Faites pivoter l'écran LCD vers la droite et hors du cadre. N'essayez PAS de le supprimer encore.

Retirez les vis qui maintiennent le cadre LCD à la carte mère. Gardez les 3 vis séparées du reste des vis, en raison de la longueur différente.

crwdns2944171:0crwdnd2944171:0crwdnd2944171:0crwdnd2944171:0crwdne2944171:0