crwdns2933423:0crwdne2933423:0

iPhone 4S スクリーンの交換

crwdns2931529:0crwdnd2931529:0crwdnd2931529:0crwdnd2931529:04crwdnd2931529:0crwdne2931529:0

crwdns2936315:0crwdne2936315:0
crwdns2936323:0crwdne2936323:0
crwdns2931653:011crwdne2931653:0
iPhone 4S Screen Replacement, Display Assembly Installation (Cont'd): crwdns2935265:00crwdnd2935265:01crwdnd2935265:03crwdne2935265:0 iPhone 4S Screen Replacement, Display Assembly Installation (Cont'd): crwdns2935265:00crwdnd2935265:02crwdnd2935265:03crwdne2935265:0 iPhone 4S Screen Replacement, Display Assembly Installation (Cont'd): crwdns2935265:00crwdnd2935265:03crwdnd2935265:03crwdne2935265:0
Display Assembly Installation (Cont'd)
  • Whether installing a replacement display assembly or re-using the existing display assembly, note the following:

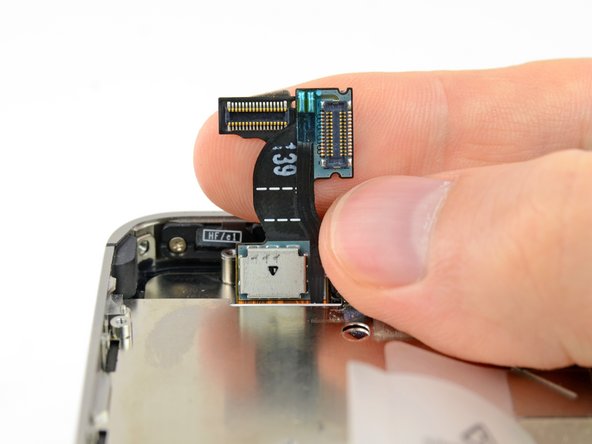
  • Carefully straighten the digitizer and LCD data cables, and feed them through the slot cut in the outer case.

  • The middle photo shows the digitizer cable being correctly fed through to its full length.

  • This photo shows the display assembly being installed incorrectly, with too much slack in the digitizer cable, which then forms a bend/loop that gets caught in the slot. The third photo also shows this loop.

  • If the digitizer cable has been installed incorrectly, it will not reach its socket on the logic board. Do not attempt to pull it through by force, or it will be cut by the sharp edge of its slot in the enclosure. Remove the display assembly, straighten the cable, and re-feed the cable through completely and correctly.

交換用のディスプレイアセンブリを取り付けるか、今使用中のディスプレイアセンブリを再利用する場合は、次の点にご注意ください:

デジタイザーとLCDデータケーブルを丁寧にまっすぐ伸ばして、外ケースのスロットカットへ貫通し繋げます。

中央の画像はデジタイザーケーブルの長さ全部を使って、正しく装着されています。

この画像はディスプレイアセンブリが正しく装着できていない画像です。デジタイザーケーブルに余分のたるみを帯びており、スロットの中で曲がっています。3番目の画像もまたこのループを写したものです。

デジタイザーケーブルが正しく装着されていない場合はロジックボード上のソケットが届きません。引っ張って伸ばさないようにご注意ください。エンクロージャのスロットは鋭いエッジになっているため、切断してしまうことがあります。もう一度ディスプレイアセンブリを取り出して、ケーブルをまっすぐ伸ばして、ケーブルを正しく貫通して繋げます。

crwdns2944171:0crwdnd2944171:0crwdnd2944171:0crwdnd2944171:0crwdne2944171:0