crwdns2933423:0crwdne2933423:0

Remplacement de la pile de la cartouche de jeu Nintendo 64

crwdns2936315:0crwdne2936315:0
crwdns2936317:0crwdne2936317:0
crwdns2931653:08crwdne2931653:0
Nintendo 64 Game Cartridge Battery Replacement WITHOUT LOSING SAVE FILES., Removing the old Cartridge Battery: crwdns2935265:00crwdnd2935265:01crwdnd2935265:03crwdne2935265:0 Nintendo 64 Game Cartridge Battery Replacement WITHOUT LOSING SAVE FILES., Removing the old Cartridge Battery: crwdns2935265:00crwdnd2935265:02crwdnd2935265:03crwdne2935265:0 Nintendo 64 Game Cartridge Battery Replacement WITHOUT LOSING SAVE FILES., Removing the old Cartridge Battery: crwdns2935265:00crwdnd2935265:03crwdnd2935265:03crwdne2935265:0
Removing the old Cartridge Battery
  • IT IS RECOMMENDED TO HAVE ANOTHER PERSON WITH YOU TO HELP WITH THIS STEP

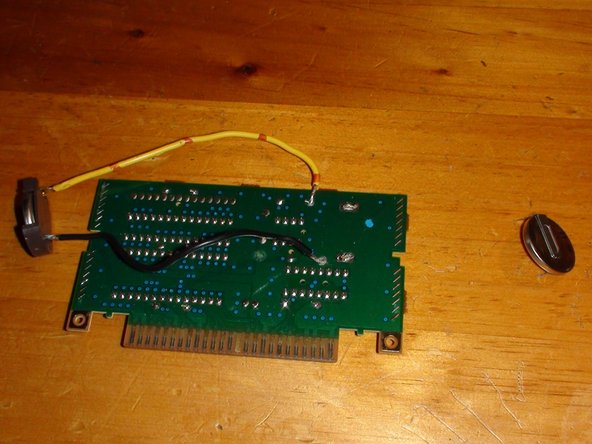
  • Now that the parity battery is attached, it's time to remove the old battery that we'll be replacing.

  • Grab a flat head screwdriver in place it underneath the battery on the other side of the PCB. Now start carefully heating up the solder on one of the main batteries terminals. While melting the solder, use the screwdriver to carefully push the battery out from the board using the screwdriver as a lever.

  • Eventually, the battery should come loose and the pin should fall from the PCB easily, given you're providing enough pushing force with the screwdriver.

  • Follow the same method for removing the other pin from the PCB. This time however, you can pull the battery out while melting the solder rather than using the screwdriver to lever the battery out.

  • Just to be sure, use your Multimeter to test the main battery terminals after you've removed the old battery and check that there's still electricity running through the circuit. If you get a stable voltage reading from the main battery terminals (circled Red in step 5) after you've removed the old battery, then your save game is still safe.

IL EST RECOMMANDÉ D'ÊTRE ACCOMPAGNÉ D'UNE AUTRE PERSONNE POUR VOUS AIDER DANS CETTE ÉTAPE

Maintenant que la pile de parité est en place, il est temps de retirer l'ancienne pile que nous allons remplacer.

Prenez un tournevis plat et placez-le sous la batterie, de l'autre côté du circuit imprimé. Commencez maintenant à chauffer délicatement la soudure sur l'un des contacts de la pile principale. Tout en faisant fondre la soudure, utilisez le tournevis pour lever la pile en utilisant le tournevis comme levier.

La pile devrait finir par céder et la broche devrait se détacher facilement du circuit imprimé, à condition que vous exerciez une poussée suffisante à l'aide du tournevis.

Suivez la même méthode pour retirer l'autre broche du circuit imprimé. Cette fois-ci, vous pouvez retirer la pile en faisant fondre la soudure au lieu d'utiliser le tournevis pour faire levier.

Par sécurité, utilisez votre multimètre pour tester les bornes de la pile principale après avoir retiré l'ancienne pile et vérifiez qu'il y a toujours de l'électricité dans le circuit. Si vous obtenez une tension stable sur les bornes de la batterie principale (entourées en rouge à l'étape 5) votre sauvegarde est toujours présente.

crwdns2944171:0crwdnd2944171:0crwdnd2944171:0crwdnd2944171:0crwdne2944171:0