crwdns2933423:0crwdne2933423:0

Remplacement de l'écran du Insignia Flex 8 NS-P16AT08

crwdns2936315:0crwdne2936315:0
crwdns2936317:0crwdne2936317:0
crwdns2931653:08crwdne2931653:0
Insignia Flex 8 NS-P16AT08 Screen Replacement: crwdns2935265:00crwdnd2935265:01crwdnd2935265:02crwdne2935265:0 Insignia Flex 8 NS-P16AT08 Screen Replacement: crwdns2935265:00crwdnd2935265:02crwdnd2935265:02crwdne2935265:0
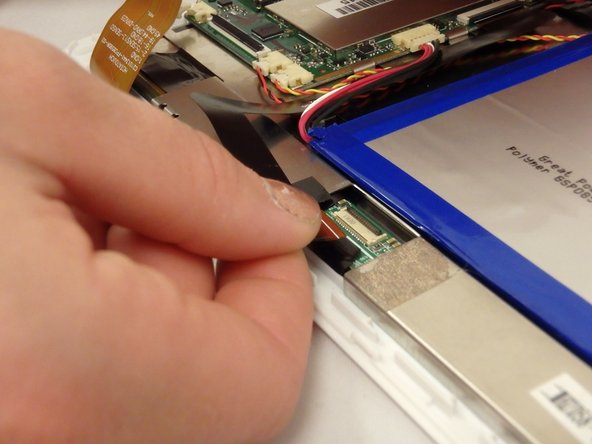
  • Flip up the black flap of the connector that connects the screen to the motherboard.

  • If the black flap of connector will not lift by using your finger, then use the nylon spudger.

  • Gently pull the connector ribbon by hand from the connector until it separates from the connector.

  • The connector ribbon will remain attached to the motherboard and separated from the screen.

Relevez le rabat noir du connecteur qui relie l’écran à la carte mère.

Si le rabat noir du connecteur ne se soulève pas avec votre doigt, utilisez le spudger en nylon.

Tirez doucement le ruban du connecteur à la main du connecteur jusqu'à ce qu'il se sépare du connecteur.

Le ruban du connecteur restera attaché à la carte mère et séparé de l'écran.

crwdns2944171:0crwdnd2944171:0crwdnd2944171:0crwdnd2944171:0crwdne2944171:0