crwdns2933423:0crwdne2933423:0

Electronics Skills Kit 101

crwdns2936315:0crwdne2936315:0
crwdns2936321:0crwdne2936321:0
crwdns2931653:026crwdne2931653:0
Electronics Skills Kit 101: crwdns2935265:00crwdnd2935265:01crwdnd2935265:03crwdne2935265:0 Electronics Skills Kit 101: crwdns2935265:00crwdnd2935265:02crwdnd2935265:03crwdne2935265:0 Electronics Skills Kit 101: crwdns2935265:00crwdnd2935265:03crwdnd2935265:03crwdne2935265:0
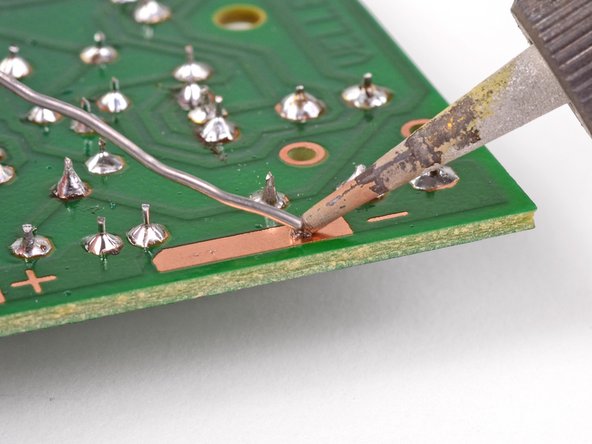
  • Bonus! You thought you were just learning how to through-hole solder, but Included with this kit is a complimentary intro to surface-mount soldering. Surface-mount soldering is commonly used to attach batteries to circuit boards in some devices, such as iPods.

  • Set the tip of your soldering iron on the large copper negative solder pad. This will allow heat to conduct through the solder pad, making soldering easier.

  • Touch your solder to the tip of the soldering iron and keep feeding it until you have a smooth, convex solder dome on the copper pad.

  • If the solder doesn't come out quite right, you can always use the iron to melt it again or add more solder.

Bonus! Pensavi stessi imparando solo le saldature per fori passanti, ma inclusa in questo kit c'è anche un'introduzione omaggio per le saldature in superficie. La saldatura in superficie è solitamente utilizzata per attaccare le batterie alle schede logiche in alcuni dispositivi, come gli iPod.

Appoggia la punta del tuo saldatore sul contatto grande del polo negativo. Questo permetterà al calore di spargersi sul contatto, semplificando la saldatura.

Appoggia lo stagno alla punta del saldatore e continua ad aggiungerne fino ad avere una saldatura liscia e convessa sul contatto.

Se la saldatura non viene come speravi, puoi sempre usare il saldatore per scioglierla ancora o aggiungere dell'altro stagno.

crwdns2944171:0crwdnd2944171:0crwdnd2944171:0crwdnd2944171:0crwdne2944171:0