crwdns2933423:0crwdne2933423:0

MacBook Core 2 Duo Replacing the top board

crwdns2935425:08crwdne2935425:0

crwdns2936323:0crwdne2936323:0
crwdns2936315:0crwdne2936315:0
crwdns2931653:08crwdne2931653:0
MacBook Core 2 Duo 天板の交換: crwdns2935265:00crwdnd2935265:01crwdnd2935265:03crwdne2935265:0 MacBook Core 2 Duo 天板の交換: crwdns2935265:00crwdnd2935265:02crwdnd2935265:03crwdne2935265:0 MacBook Core 2 Duo 天板の交換: crwdns2935265:00crwdnd2935265:03crwdnd2935265:03crwdne2935265:0
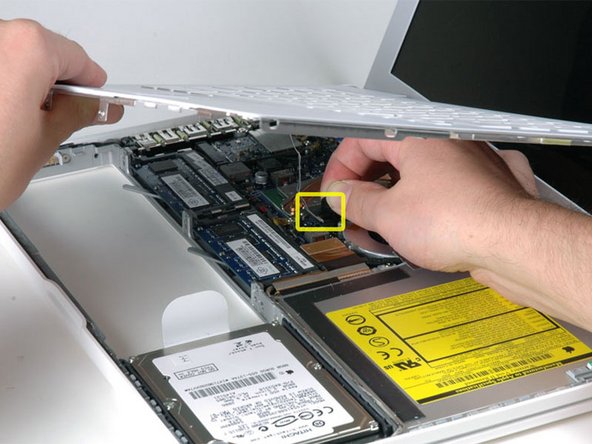
  • 天板を持ち上げながら、銀色のケーブルのコネクタ部分の黒いタブを上に引っ張ってコネクタを外してください。

  • もし黒いタブが無い場合スパッジャーを梃子の原理で使えばコネクタハウジングからコネクタを外すことが可能です。このコネクタは長いため、確実にまっすぐ上に外してください。

  • 天板を外す際に天板に付いているケーブルを切ってしまった場合でもiFixitはケーブルを個別で販売していますのでご安心ください。交換ガイドもあり、簡単にできます。

  • 天板を外している間、埃や髪の毛等を取り除く機会としてみてはいかがでしょうか。ベストなのは圧縮された空気の入った缶を使うことです。建材で作られた固いブラシ(一般的な動物の毛を使ったもの)でやると静電気が発生しコンピューターを壊しかねません。

  • 組み立てなおすにあたり、4つの灰色のプラスチッククリップはキーボードの光学ドライブ側にあることをご確認ください。(二枚目の画像を参考にしてください。)キーボードがしっかりと固定されるようにクリップをしっかりと取り付けてください。

  • 組み立てなおす工程を楽にするには、クリップ部分を寄せてやるほうが良いでしょう。強い力でやると破損の原因となるのでご注意ください。

  • (翻訳者のコメント)キーボードを固定する際強い力でくっつけないと固定されないので、光学ドライブの挿入口が強い力で歪む恐れがあります。DVD等のディスク一枚といらなくなったクレジットカード等を二枚重ねに挿入口に半分まで入れておくと歪む心配がありません。

While lifting the top board, please pull the black tab on the connector part of the silver cable upwards and remove the connector.

If there is no black tab it is possible to remove the connector from the connector housing by using the spatger with the lever principle.Because this connector is long, please be sure to remove it straight up.

Even if you disconnected the cable attached to the top board when removing the top board, please be assured that iFixit sells the cables individually. There is an exchange guide, it can do easily.

How about trying as an opportunity to remove dust, hair, etc while removing the top board? The best is to use a can containing compressed air. If you do it with a solid brush made of building materials (using common animal hair), static electricity will be generated and you can destroy your computer.

In reassembling, please confirm that the four gray plastic clips are on the optical drive side of the keyboard. (Please refer to the second image.) Please firmly attach the clip so that the keyboard is securely fixed.

To ease the reassembly process, it is better to clip the clip part. Please note that doing with a strong force may cause damage.

(Translator's comment) Since it will not be fixed unless you attach it with a strong force when fixing the keyboard, the insertion opening of the optical drive may be distorted with a strong force.

There is no worry about being distorted if you put half of the disc such as a DVD and the credit card etc which you no longer need into the insertion opening in half.

crwdns2944171:0crwdnd2944171:0crwdnd2944171:0crwdnd2944171:0crwdne2944171:0