crwdns2933423:0crwdne2933423:0

Remplacement de la carte mère du HTC One M8

crwdns2931529:0crwdnd2931529:0crwdnd2931529:0crwdnd2931529:02crwdnd2931529:0crwdne2931529:0

crwdns2935425:04crwdne2935425:0

crwdns2936315:0crwdne2936315:0
crwdns2936317:0crwdne2936317:0
crwdns2931653:04crwdne2931653:0
HTC One M8 Motherboard Replacement: crwdns2935265:00crwdnd2935265:01crwdnd2935265:03crwdne2935265:0 HTC One M8 Motherboard Replacement: crwdns2935265:00crwdnd2935265:02crwdnd2935265:03crwdne2935265:0 HTC One M8 Motherboard Replacement: crwdns2935265:00crwdnd2935265:03crwdnd2935265:03crwdne2935265:0
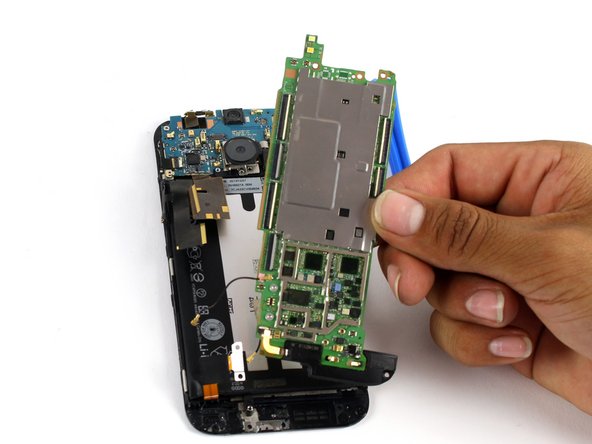
  • Use an iOpener or a heat gun to loosen up the adhesive securing the motherboard to the display assembly.

  • Use a plastic opening tool to gently pry the motherboard free of the display assembly.

  • At this point, the bottom speaker is still attached to the motherboard. If you are only replacing the motherboard, refer to the bottom speaker guide to swap your existing speaker to the new motherboard.

Utilisez un iOpener ou un pistolet thermique pour desserrer l'adhésif fixant la carte mère à l'ensemble d'affichage.

Utilisez un outil d'ouverture en plastique pour retirer doucement la carte mère de l'ensemble d'affichage.

À ce stade, le haut-parleur inférieur est toujours attaché à la carte mère. Si vous ne remplacez que la carte mère, reportez-vous au guide du haut-parleur inférieur pour échanger votre haut-parleur existant sur la nouvelle carte mère.

crwdns2944171:0crwdnd2944171:0crwdnd2944171:0crwdnd2944171:0crwdne2944171:0