crwdns2933423:0crwdne2933423:0

Remplacement de l'écran du Motorola Moto X 2nd Generation

crwdns2936315:0crwdne2936315:0
crwdns2936317:0crwdne2936317:0
crwdns2931653:011crwdne2931653:0
Motorola Moto X 2nd Generation Screen Replacement, Remove the Speaker Grills from the Broken Screen: crwdns2935265:00crwdnd2935265:01crwdnd2935265:03crwdne2935265:0 Motorola Moto X 2nd Generation Screen Replacement, Remove the Speaker Grills from the Broken Screen: crwdns2935265:00crwdnd2935265:02crwdnd2935265:03crwdne2935265:0 Motorola Moto X 2nd Generation Screen Replacement, Remove the Speaker Grills from the Broken Screen: crwdns2935265:00crwdnd2935265:03crwdnd2935265:03crwdne2935265:0
Remove the Speaker Grills from the Broken Screen
  • The newly purchased screen will likely not have speaker grills so you must remove them from the broken screen and put them onto the new screen

  • On both the upper and lower speakers remove the speaker foam that is adhered lightly. Peel away gently. This foam will not be reused so its ok if it gets torn.

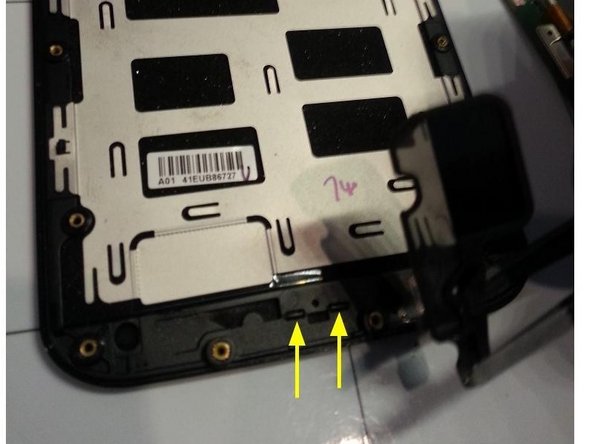
  • Locate the two tabs that holds the speaker grill in place. Highlighted in photo with yellow arrows.

  • Push out the speaker grill by forcing either one of those two tabs out of the frame by pushing onto the tab with a tweezer end. It requires a bit of force and it will pop out.

  • The photo only show the lower speaker grill removal, but the upper speaker grill is removed in the same manner.

L'écran nouvellement acheté n'aura probablement pas de grilles de haut-parleur, vous devez donc les retirer de l'écran cassé et les mettre sur le nouvel écran

Sur les haut-parleurs supérieur et inférieur, retirez la mousse de haut-parleur légèrement collée. Décollez délicatement. Cette mousse ne sera pas réutilisée donc c'est ok si elle se déchire.

Localisez les deux languettes qui maintiennent la grille du haut-parleur en place. Mis en évidence sur la photo par des flèches jaunes.

Poussez la grille du haut-parleur en forçant l'une de ces deux languettes hors du cadre en appuyant sur la languette avec une pince à épiler. Il faut un peu de force et ça sortira.

La photo ne montre que le retrait de la grille du haut-parleur inférieur, mais la grille du haut-parleur supérieur est retirée de la même manière.

crwdns2944171:0crwdnd2944171:0crwdnd2944171:0crwdnd2944171:0crwdne2944171:0