crwdns2933423:0crwdne2933423:0

Motorola Moto X 2nd Generation Screen Replacement

crwdns2936315:0crwdne2936315:0
crwdns2936331:0crwdne2936331:0
crwdns2931653:011crwdne2931653:0
Motorola Moto X 2nd Generation Screen Replacement, Remove the Speaker Grills from the Broken Screen: crwdns2935265:00crwdnd2935265:01crwdnd2935265:03crwdne2935265:0 Motorola Moto X 2nd Generation Screen Replacement, Remove the Speaker Grills from the Broken Screen: crwdns2935265:00crwdnd2935265:02crwdnd2935265:03crwdne2935265:0 Motorola Moto X 2nd Generation Screen Replacement, Remove the Speaker Grills from the Broken Screen: crwdns2935265:00crwdnd2935265:03crwdnd2935265:03crwdne2935265:0
Remove the Speaker Grills from the Broken Screen
  • The newly purchased screen will likely not have speaker grills so you must remove them from the broken screen and put them onto the new screen

  • On both the upper and lower speakers remove the speaker foam that is adhered lightly. Peel away gently. This foam will not be reused so its ok if it gets torn.

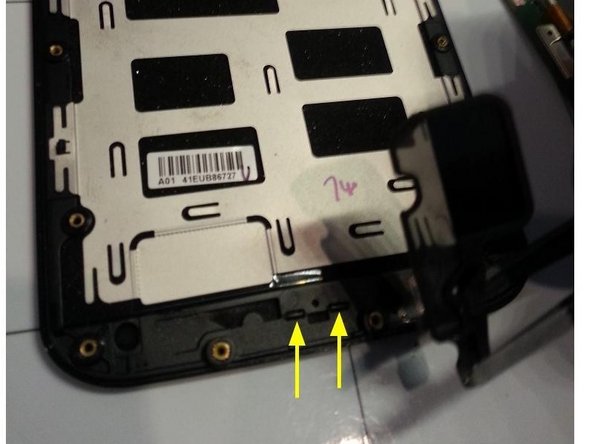
  • Locate the two tabs that holds the speaker grill in place. Highlighted in photo with yellow arrows.

  • Push out the speaker grill by forcing either one of those two tabs out of the frame by pushing onto the tab with a tweezer end. It requires a bit of force and it will pop out.

  • The photo only show the lower speaker grill removal, but the upper speaker grill is removed in the same manner.

Es probable que la pantalla recién comprada no tenga rejillas para altavoces, por lo que debe quitarlas de la pantalla rota y colocarlas en la nueva pantalla

En los altavoces superiores e inferiores quite la espuma del altavoz que se adhiere ligeramente. Pelar suavemente. Esta espuma no será reutilizada por lo que su bien si se desgarra.

Localice las dos lengüetas que sujetan la parrilla del altavoz en su lugar. Destacado en la foto con flechas amarillas.

Empuje hacia fuera la parrilla del altavoz forzando cualquiera de esas dos lengüetas hacia fuera del marco presionando sobre la lengüeta con un extremo de la pinza. Requiere un poco de fuerza y ​​saldrá.

La foto sólo muestra la extracción de la parrilla inferior del altavoz, pero la parrilla superior del altavoz se quita de la misma manera.

crwdns2944171:0crwdnd2944171:0crwdnd2944171:0crwdnd2944171:0crwdne2944171:0