crwdns2933423:0crwdne2933423:0

Samsung Galaxy Tab 2 10.1 Digitizer austauschen

crwdns2936315:0crwdne2936315:0
crwdns2936319:0crwdne2936319:0
crwdns2931653:05crwdne2931653:0
Samsung Galaxy Tab 2 10.1 Digitizer Replacement, Removing the Glass - The Somewhat-Frustratingly Crazy Step: crwdns2935265:00crwdnd2935265:01crwdnd2935265:03crwdne2935265:0 Samsung Galaxy Tab 2 10.1 Digitizer Replacement, Removing the Glass - The Somewhat-Frustratingly Crazy Step: crwdns2935265:00crwdnd2935265:02crwdnd2935265:03crwdne2935265:0 Samsung Galaxy Tab 2 10.1 Digitizer Replacement, Removing the Glass - The Somewhat-Frustratingly Crazy Step: crwdns2935265:00crwdnd2935265:03crwdnd2935265:03crwdne2935265:0
Removing the Glass - The Somewhat-Frustratingly Crazy Step
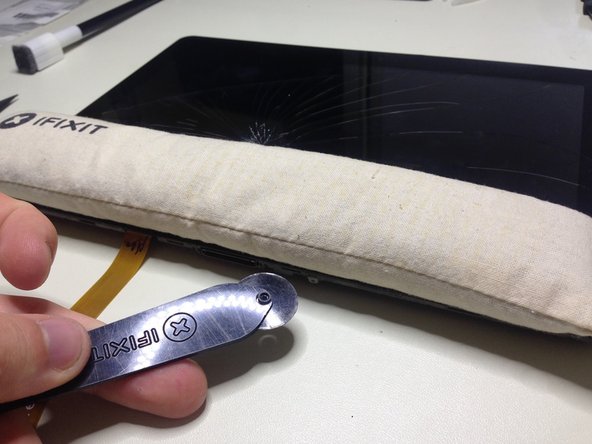
  • Your going to want to use the iOpener tool for this repair, using a Heat Gun or Hair Dryer is just dumb and can cause damage to the LCD and other components, always use the iOpener.

  • Follow instructions for heating the iOpener and then once done in the Microwave, lay it along the bottom of the device across the Samsung Logo so the entire bottom of the display is covered.

  • Let it sit for about 30 seconds or so and also press down on it slightly to speed up the loosening of the adhesive. You may be thinking to use the iMac Opening Tool for this one as it "slices" through the glue, think again, the glue on this device is so strong it will not slide, it will get stuck and keep popping off the handle, do not bother.

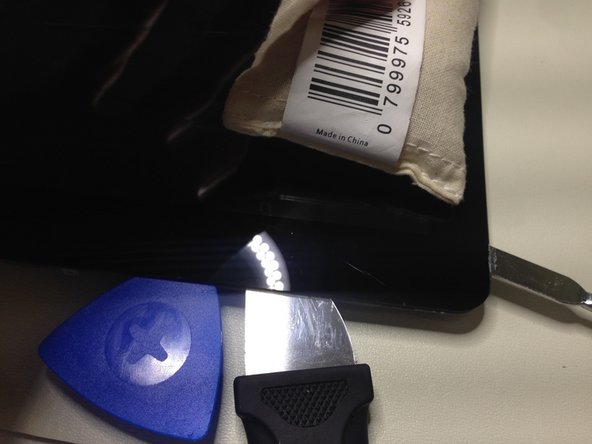
  • For this you have to take extreme care as it is very very hard to do! You must use the Jimmy for this repair and Guitar Picks to hold the device apart. Slowly slide the Jimmy along around the display, bottom, left side, right side but not yet the top.

  • Ensure you have enough of a gap between the glass touchscreen and the device itself or it will stick again, continuously apply heat, you may need to heat the iOpener multiple times to successfully remove the display, just remember, DO NOT LET THAT GLASS TOUCH THE DEVICE AGAIN OR THE ADHESIVE WILL BOND AGAIN and you'll be back to square one.

  • Slowly slide the Jimmy around the device until only the top of the display remains. This next step requires extreme care as it does involve the front camera etc.

Für den Ausbau der Scheibe musst du sie erwärmen. Benutze immer einen iOpener, er ist dafür weit besser geeignet als ein Haartrockner oder ein Heißluftgebläse.

Folge den Anweisungen für den iOpener. Nachdem er in der Mikrowelle erwärmt wurde kannst du ihn unten über den Rand mit dem Samsung Logo.

Drücke ihn 30 Sekunden lang gut an. Du denkst jetzt vielleicht an das iMac opening Tool, es würde aber steckenbleiben und nicht weiterhelfen.

Der nächste Schritt ist schwierig. Du brauchst den Jimmy zum Öffnen und Plektren um die Teile getrennt zu halten. Schiebe den Jimmy am Display erst von links oben nach unten, dann die Unterkante entlang und die rechte Seite nach oben. Die Oberkante wird zunächst ausgespart.

Stelle so einen genügend großen Spalt zwischen Touchscreen und dem Rest her. Wende dabei ständig Wärme mit Hilfe des iOpeners an und lasse die Teile nicht zusammen kommen, sie verkleben sonst gleich wieder.

Schiebe also den Jimmy rings um das Display, nur noch nicht entlang der Oberkante. Für diese musst du besonders vorsichtig sein, da dabei die Kamera und anderes betroffen ist.

crwdns2944171:0crwdnd2944171:0crwdnd2944171:0crwdnd2944171:0crwdne2944171:0