crwdns2933423:0crwdne2933423:0

Sustitución del Interruptor de Encendido del 1998-2002 Honda Accord

crwdns2936315:0crwdne2936315:0
crwdns2936331:0crwdne2936331:0
crwdns2931653:09crwdne2931653:0
1998-2002 Honda Accord Ignition Switch Replacement: crwdns2935265:00crwdnd2935265:01crwdnd2935265:03crwdne2935265:0 1998-2002 Honda Accord Ignition Switch Replacement: crwdns2935265:00crwdnd2935265:02crwdnd2935265:03crwdne2935265:0 1998-2002 Honda Accord Ignition Switch Replacement: crwdns2935265:00crwdnd2935265:03crwdnd2935265:03crwdne2935265:0
  • Users are reporting a variation of the ignition switch positions on the pictured diagram that corresponds to these numbers:

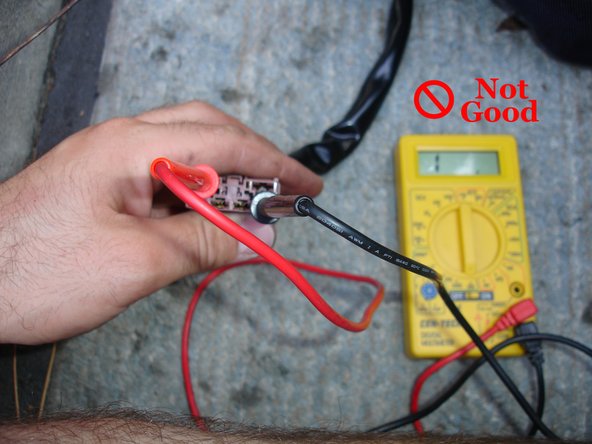
  • LOCK: All Open | ACC: 1 + 5 | ON: 1+3+4+5 | START 1+2+3

  • Now it's testing time. The key should be placed into the ignition switch and turned to the appropriate position; you should test for continuity between each of the points as outlined in the guide.

  • I want to mention that this testing should be performed as thoroughly as possible, since the switch may appear to be fine at first. I got lucky in the sense that the switch immediately failed one of the tests. The best way to test the switch is to plug in the multimeter leads into the 1 and 4 terminals, and then to cycle between "On" and "Start." Eventually the multimeter should read "no continuity" in the "On" position, indicating that the switch is bad.

Los usuarios informan una variación de las posiciones del interruptor de encendido en el diagrama ilustrado que corresponde a estos números:

BLOQUEO: Todo abierto | CAC: 1 + 5 | ENCENDIDO: 1+3+4+5 | INICIO 1+2+3

Ahora es tiempo de prueba. La llave debe colocarse en el interruptor de encendido y girarse a la posición adecuada; debe probar la continuidad entre cada uno de los puntos como se describe en la guía.

Quiero mencionar que esta prueba debe realizarse de la manera más exhaustiva posible, ya que al principio puede parecer que el interruptor está bien. Tuve suerte en el sentido de que el interruptor falló inmediatamente en una de las pruebas.

La mejor manera de probar el interruptor es enchufar los cables del multímetro en las terminales 1 y 4, y luego alternar entre "Encendido" e "Inicio". Eventualmente, el multímetro debe leer "sin continuidad" en la posición "Encendido", lo que indica que el interruptor está defectuoso.

crwdns2944171:0crwdnd2944171:0crwdnd2944171:0crwdnd2944171:0crwdne2944171:0