crwdns2933423:0crwdne2933423:0

Eine Apple Wireless Tastatur reparieren, ohne sie zu zerstören

crwdns2936315:0crwdne2936315:0
crwdns2936319:0crwdne2936319:0
crwdns2931653:09crwdne2931653:0
Repairing Apple Wireless Keyboard without destroying it., Locating the fault: crwdns2935265:00crwdnd2935265:01crwdnd2935265:03crwdne2935265:0 Repairing Apple Wireless Keyboard without destroying it., Locating the fault: crwdns2935265:00crwdnd2935265:02crwdnd2935265:03crwdne2935265:0 Repairing Apple Wireless Keyboard without destroying it., Locating the fault: crwdns2935265:00crwdnd2935265:03crwdnd2935265:03crwdne2935265:0
Locating the fault
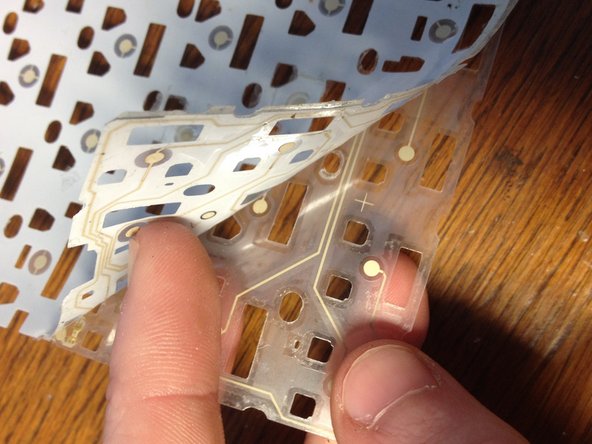
  • The membrane is composed of two thin layers of plastic that are - guess what...glued together. They are very difficult to separate and patience is key.

  • Use a thin blade to separate the layers at a corner (it helps to start at the corner closest to the faulty keys) and very slowly peel the layers apart. You probably won't need to separate them all the way, just enough to expose the region of the defective key should do.

  • On the inside you'll find a mess of white lines and dots. These are the conductive traces. Track down the two pads that align under the key(s) you are having problems with.

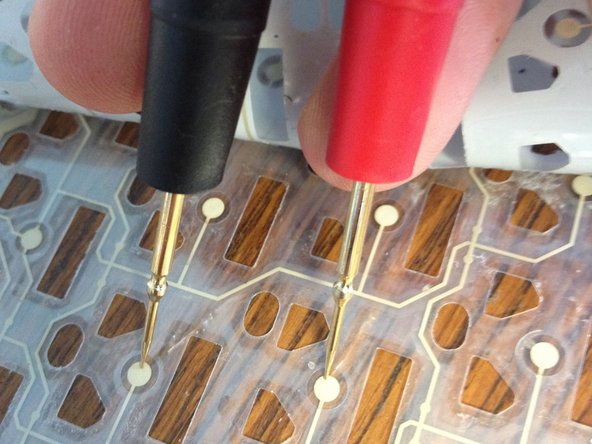
  • With your multimeter, set to measure continuity, check there are no breaks in the tracks between the pad in question and it's neighbours. You can follow the lines to see which ones should be electrically connected. Some areas are coated in plastic, so you'll have to work around them.

  • Try to find the exact point where the track is broken, and make a note of where it is. A page marker is great for this.

  • If there are any obviously discoloured/oxidised areas on the pads, even if there are no breaks in the line feeding it, this may be the issue. Touch these areas up to in the next step.

Die Membran besteht aus zwei Lagen von Kunststoff, die - du errätst es nicht - zusammengeklebt sind. Sie lassen sich nur sehr schwer trennen und du musst sehr geduldig sein.

Fange an einer Ecke damit an, die Schichten mit einer dünnen Klinge voneinander zu trennen (am Besten an der Ecke in der Nähe der schadhaften Tasten) und ziehe die Schichten ganz langsam auseinander. Wahrscheinlich musst du sie nicht komplett voneinander lösen, nur soweit, bis die Stelle mit den schadhaften Tasten offen liegt.

Auf den Innenseiten findest du ein unübersichtliches Durcheinander von weißen Linien und Punkten. Das sind die Leiterbahnen. Verfolge die Bahnen bis unter die Tasten, welche die Probleme machen.

Stelle dein Multimeter auf Durchgangstest und überprüfe, ob die Leiterbahnen zwischen den fraglichen Pads und seinen Nachbarn unterbrochen sind. Verfolge die Leiterbahnen und schaue nach, welche Pads miteinander in Kontakt sein sollten. Manche Stellen sind mit Kunststoff bedeckt, hier musst du drumherum arbeiten.

Versuche möglichst genau die unterbrochene Stelle zu finden und markiere sie ganz genau. Ein Buchzeiger zum Kleben (und wieder Ablösen) eignet sich sehr gut dafür.

Wenn einige Lötstellen offensichtlich verfärbt/oxidiert sind, könnten sie die Ursache des Problems sein, selbst wenn die Leiterbahnen nicht unterbrochen sind. Im nächsten Schritt wird beschrieben, was du tun kannst.

crwdns2944171:0crwdnd2944171:0crwdnd2944171:0crwdnd2944171:0crwdne2944171:0