crwdns2933423:0crwdne2933423:0

Riparare la Apple Wireless Keyboard senza distruggerla

crwdns2936315:0crwdne2936315:0
crwdns2936321:0crwdne2936321:0
crwdns2931653:08crwdne2931653:0
Repairing Apple Wireless Keyboard without destroying it., Removing the damaged membrane: crwdns2935265:00crwdnd2935265:01crwdnd2935265:03crwdne2935265:0 Repairing Apple Wireless Keyboard without destroying it., Removing the damaged membrane: crwdns2935265:00crwdnd2935265:02crwdnd2935265:03crwdne2935265:0 Repairing Apple Wireless Keyboard without destroying it., Removing the damaged membrane: crwdns2935265:00crwdnd2935265:03crwdnd2935265:03crwdne2935265:0
Removing the damaged membrane
  • Finally, we're in!

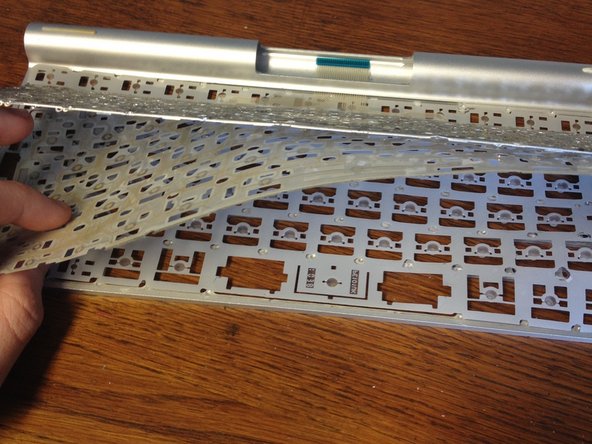
  • Now you've removed the metal plate, you'll be presented with the membrane we need to repair.

  • The ribbon cable from earlier is a part of it, and it needs to be fished through it's tiny slot before you can remove the membrane. There may be a little glue holding the membrane down, in which case pull up slowly at a shallow angle to release it.

  • Underneath the membrane it is a sheet with tactile domes serving to press the pads on the membrane together. This sheet can stay here as it's of no concern to us.

Finalmente, siamo dentro!

Dopo aver rimosso la piastra in metallo, troverai la membrana che dobbiamo riparare.

Il cavo a nastro di prima fa parte della membrana e deve sfilato dalla sua fessura prima di poter rimuovere la membrana. Ci potrebbe essere un po' di colla a tenere ferma la membrana. Nel caso tirala lentamente ed ad un basso angolo per scollarla.

Al di sotto della membrana c'è un foglio con delle cupole tattili che servono a chiudere i contatti sulla membrana. Questo foglio può restare qui senza problemi.

crwdns2944171:0crwdnd2944171:0crwdnd2944171:0crwdnd2944171:0crwdne2944171:0