crwdns2933423:0crwdne2933423:0

Leer elektronica solderen met de Maker Shed Solder Badge!

crwdns2936315:0crwdne2936315:0
crwdns2936313:0crwdne2936313:0
crwdns2931653:017crwdne2931653:0
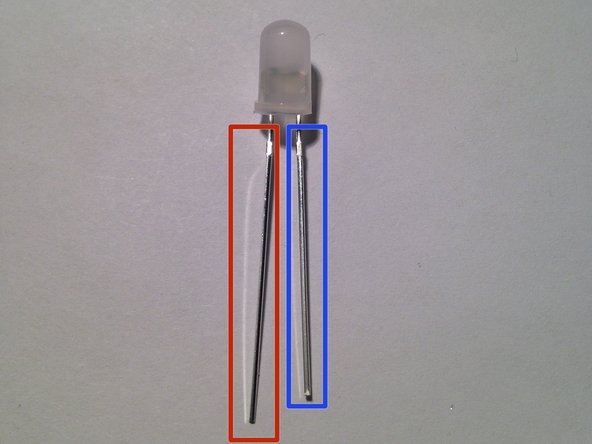
Learn to solder electronics with the Maker Shed Solder Badge!, Position the LEDs: crwdns2935265:00crwdnd2935265:01crwdnd2935265:03crwdne2935265:0 Learn to solder electronics with the Maker Shed Solder Badge!, Position the LEDs: crwdns2935265:00crwdnd2935265:02crwdnd2935265:03crwdne2935265:0 Learn to solder electronics with the Maker Shed Solder Badge!, Position the LEDs: crwdns2935265:00crwdnd2935265:03crwdnd2935265:03crwdne2935265:0
Position the LEDs
  • LEDs are polarized: one side of the diode is positive, the other is negative. It is typical convention for an LED to be manufactured with its positive lead longer than the negative lead.

  • Positive lead (longer)

  • Negative lead (shorter)

  • Insert the LED into the PCB as illustrated. Be sure to match up the positive lead of the LED (the longer one) with the positive pad on the PCB (marked with a "+").

  • Bend one of the leads down tightly. This serves as a securement so the part doesn't fall away while you solder.

LED's zijn gepolariseerd: de ene kant van de diode is positief, de andere is negatief. Het is gebruikelijk dat de positieve aansluiting van een LED langer is dan de negatieve aansluiting.

Positieve aansluiting (langer)

Negatieve aansluiting (korter)

Steek de LED zoals afgebeeld door de printplaat. Zorg ervoor dat de positieve draad van de LED (de langere) overeenkomt met het positieve aansluitpunt op de print (gemarkeerd met een "+").

Buig een van de draden stevig naar beneden. Dit dient als een ondersteuning zodat het onderdeel niet wegvalt tijdens het solderen.

crwdns2944171:0crwdnd2944171:0crwdnd2944171:0crwdnd2944171:0crwdne2944171:0