crwdns2933423:0crwdne2933423:0

PowerMac G3 All-In-One Teardown

crwdns2935425:07crwdne2935425:0

crwdns2936315:0crwdne2936315:0
crwdns2936319:0crwdne2936319:0
crwdns2931653:07crwdne2931653:0
PowerMac G3 All-In-One Teardown, Installing VideoRAM/SGRAM: crwdns2935265:00crwdnd2935265:01crwdnd2935265:03crwdne2935265:0 PowerMac G3 All-In-One Teardown, Installing VideoRAM/SGRAM: crwdns2935265:00crwdnd2935265:02crwdnd2935265:03crwdne2935265:0 PowerMac G3 All-In-One Teardown, Installing VideoRAM/SGRAM: crwdns2935265:00crwdnd2935265:03crwdnd2935265:03crwdne2935265:0
Installing VideoRAM/SGRAM
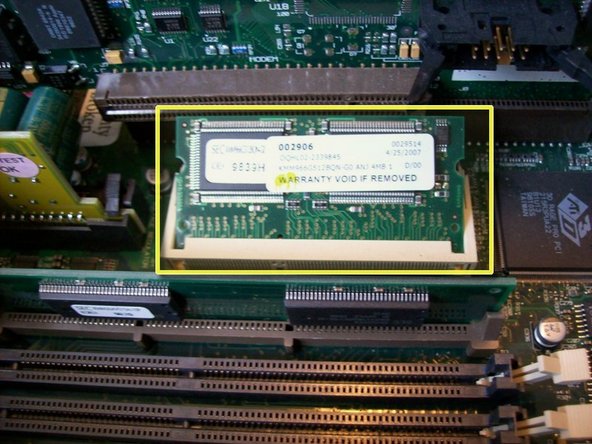
  • The VideoRAM/SGRAM slot is located between the video/sound card and the ROM slot.

  • Part A: Place the SGRAM in to the slot at an angle. Do not force the SGRAM in. If you are gentle the SGRAM will slide down into the slot and sit at an angle.

  • Part B: GENTLY Apply pressure to the corners of the SGRAM until it lies flat in the slot. The white slot has small clips that will "lock" the SGRAM in place. You may hear small clicks when the SGRAM is locked in place.

Der VideoRAM/SGRAM Slot ist zwischen der Grafik/Sound Karte und des ROM Slots. Rot im Kasten markiert.

Schritt A: Setze den SGRAM in den Slot in einen Winkel. Wende keine Gewalt an. Wenn dud en SGRAM vorsichtig in den Slot hereinwackelst, dann sollte dieser sicher im Slot sitzen.

Schritt B: Drücke den SGRAM vorsichtig herunter, bis dieser im Slot flach sitzt, der weiße Slot hat schmale Clips, welche den SGRAM im Slot "sperren/halten". Du hörst eventuell das Klicken, wenn du den SGRAM fest eingesetzt hast.

crwdns2944171:0crwdnd2944171:0crwdnd2944171:0crwdnd2944171:0crwdne2944171:0