crwdns2933423:0crwdne2933423:0

Reparatie van een voedingsadapter

crwdns2936315:0crwdne2936315:0
crwdns2936313:0crwdne2936313:0
crwdns2931653:04crwdne2931653:0
Power Brick Cord Repair, Push DC Cord Through Stress-Relief Collar: crwdns2935265:00crwdnd2935265:01crwdnd2935265:03crwdne2935265:0 Power Brick Cord Repair, Push DC Cord Through Stress-Relief Collar: crwdns2935265:00crwdnd2935265:02crwdnd2935265:03crwdne2935265:0 Power Brick Cord Repair, Push DC Cord Through Stress-Relief Collar: crwdns2935265:00crwdnd2935265:03crwdnd2935265:03crwdne2935265:0
Push DC Cord Through Stress-Relief Collar
  • This is the second most tricky step. You need to pull the DC cord out of the stress relief collar (where it is glued in), then enlarge the hole enough so you can cut off the damaged part of the cord and push the remaining part of the cord back through the collar. You'll end up sacrificing just a few inches of the DC cable.

  • Cut off the DC power cord where it attaches to the printed circuit board. Note carefully that one location is marked +V, while the other is unmarked is ground (Figure 1).

  • Pull the remaining cord out of the stress relief collar. It appears to be glued in there, so you'll likely end up with a long length of stripped wires. A bunch of black wire insulation remains inside the stress relief collar.

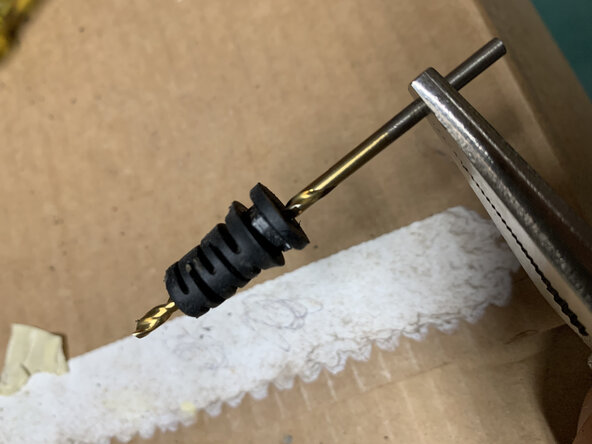
  • Using a small diameter drill bit, ream out the hole through the middle of the stress relief collar, so it is large enough to pass the DC cord back through it (Figure 2). A bunch of black wire insulation should come out. It may help to progress through several sizes of drill bits, from tiny upto small.

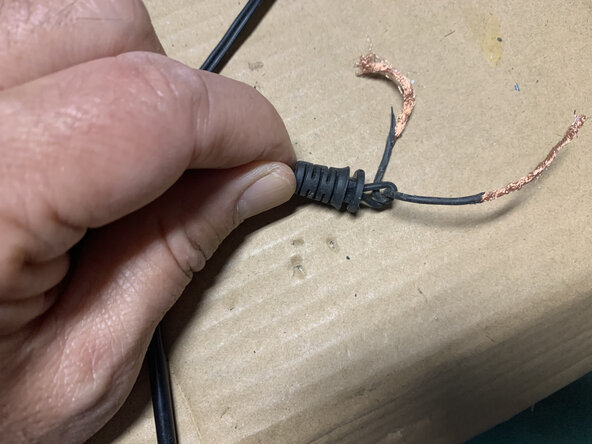
  • Push the DC power cord through the stress relief collar, starting at the pointy end. Use something stiff, thin and pointy to push it through such as a paper clip. When you are done, pull through about one inch of insulated wire. Tie a knot so the DC power cord can't slip back through the stress relief collar (Figure 3).

Dit is de tweede lastigste stap. Je moet het DC-snoer uit de trekontlastingskraag trekken (waar het vastgelijmd zit), het gat vervolgens zo groot maken dat je het beschadigde deel van het snoer kunt afknippen en het resterende deel terug door de kraag kunt duwen. Je verliest uiteindelijk maar een paar centimeter van het DC-snoer.

Knip de DC-voedingskabel af waar deze op de printplaat is aangesloten. Let goed op dat de ene plek gemarkeerd is met +V, terwijl de andere, ongemarkeerd, de negatieve aansluiting is (Figuur 1).

Trek het resterende snoer uit de trekontlastingskraag. Het lijkt erop dat het daar vastgelijmd zit, dus je zult waarschijnlijk een lange strook gestripte draden overhouden. Er blijft een hoop zwarte draadisolatie achter in de trekontlastingskraag.

Gebruik een boortje met een kleine diameter om het gat door het midden van de trekontlastingskraag ruimer te maken, zodat het groot genoeg is om de DC-kabel er weer doorheen te voeren (afbeelding 2). Er zou een hoopje zwarte draadisolatie moeten uitkomen. Het kan helpen om verschillende maten boortjes te gebruiken, van klein tot steeds wat groter.

Duw het netsnoer door de kraag, beginnend bij het puntige uiteinde. Gebruik hiervoor iets stijfs, duns en puntigs, zoals een paperclip. Trek na gebruik ongeveer 2,5 cm geïsoleerde draad door. Maak een knoop zodat het netsnoer niet terug door de kraag kan glijden (afbeelding 3).

crwdns2944171:0crwdnd2944171:0crwdnd2944171:0crwdnd2944171:0crwdne2944171:0