crwdns2933423:0crwdne2933423:0

Google Pixel 9a Rear Cameras Removal/Installation (Logic Board)

crwdns2931527:0crwdnd2931527:0crwdnd2931527:0crwdnd2931527:0crwdne2931527:0

crwdns2935425:01crwdne2935425:0

crwdns2936315:0crwdne2936315:0
crwdns2936325:0crwdne2936325:0
crwdns2931653:01crwdne2931653:0
Google Pixel 9a Rear Cameras Removal/Installation (Logic Board), Remove the rear cameras: crwdns2935265:00crwdnd2935265:01crwdnd2935265:03crwdne2935265:0 Google Pixel 9a Rear Cameras Removal/Installation (Logic Board), Remove the rear cameras: crwdns2935265:00crwdnd2935265:02crwdnd2935265:03crwdne2935265:0 Google Pixel 9a Rear Cameras Removal/Installation (Logic Board), Remove the rear cameras: crwdns2935265:00crwdnd2935265:03crwdnd2935265:03crwdne2935265:0
Remove the rear cameras
  • Be careful not to smudge the camera lenses when removing and installing them. If you accidentally do, wipe them with a clean cloth.

  • Hold the logic board slightly above your work surface while working on the cameras—don't press the board against your work surface, or you may damage fragile components.

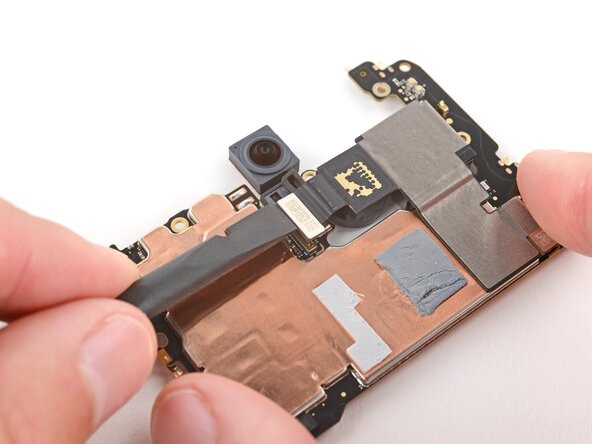
  • Use the flat end of a spudger to pry up and disconnect the ultrawide camera press connector.

  • Remove the ultrawide camera.

crwdns2935429:0crwdne2935429:0

crwdns2935429:0crwdne2935429:0

crwdns2935429:0crwdne2935429:0

crwdns2935429:0crwdne2935429:0

crwdns2944171:0crwdnd2944171:0crwdnd2944171:0crwdnd2944171:0crwdne2944171:0