crwdns2933423:0crwdne2933423:0

Google Pixel 9a Kleber für das Gehäuseinnere anbringen (alle Reparaturen)

crwdns2931529:0crwdnd2931529:0crwdnd2931529:0crwdnd2931529:09crwdnd2931529:0crwdne2931529:0

crwdns2936315:0crwdne2936315:0
crwdns2936319:0crwdne2936319:0
crwdns2931653:02crwdne2931653:0
Google Pixel 9a Inner Housing Adhesive Application (All Repairs), Apply the adhesive: crwdns2935265:00crwdnd2935265:01crwdnd2935265:03crwdne2935265:0 Google Pixel 9a Inner Housing Adhesive Application (All Repairs), Apply the adhesive: crwdns2935265:00crwdnd2935265:02crwdnd2935265:03crwdne2935265:0 Google Pixel 9a Inner Housing Adhesive Application (All Repairs), Apply the adhesive: crwdns2935265:00crwdnd2935265:03crwdnd2935265:03crwdne2935265:0
Apply the adhesive
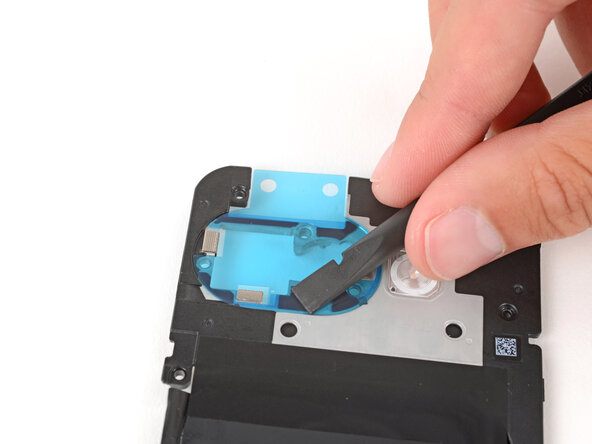
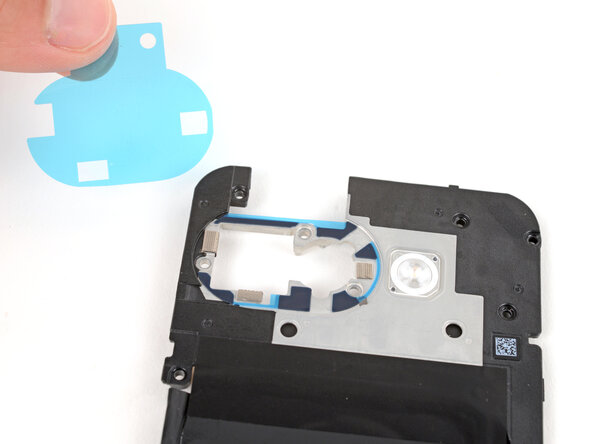
  • Remove the larger, clear liner from the inner housing adhesive and lay it in place around the camera holes.

  • Use the cutouts for the small silver pads to help align the adhesive.

  • Use the flat end of a spudger to firmly push down on each piece of adhesive, securing them in place.

  • Remove the colored liner using the pull tab on the top edge.

  • If the adhesive starts to pull up with the liner, lay it back in place and use your spudger to secure it again.

Entferne die größere durchsichtige Schutzfolie vom Kleber für das Gehäuseinnere und lege ihn an seine Stelle um die Kameraöffnungen.

Richte den Kleber mit Hilfe der Ausschnitte für die kleinen silbernen Pads aus.

Drücke alle Stücke des Klebers gut mit dem flachen Ende des Spudgers nach unten fest.

Fasse die Zuglasche an der Oberkante der farbigen Schutzfolie und ziehe sie ab.

Wenn der Kleber zusammen mit der Schutzfolie mitkommt, dann lege ihn wieder zurück und drücke ihn mit dem Spudger wieder fest.

crwdns2944171:0crwdnd2944171:0crwdnd2944171:0crwdnd2944171:0crwdne2944171:0