crwdns2933423:0crwdne2933423:0

Google Pixel 9aのバッテリー取り付け

crwdns2931527:0crwdnd2931527:0crwdnd2931527:0crwdnd2931527:0crwdne2931527:0

crwdns2936315:0crwdne2936315:0
crwdns2936323:0crwdne2936323:0
crwdns2931653:07crwdne2931653:0
Google Pixel 9a Battery Installation, Install the battery: crwdns2935265:00crwdnd2935265:01crwdnd2935265:03crwdne2935265:0 Google Pixel 9a Battery Installation, Install the battery: crwdns2935265:00crwdnd2935265:02crwdnd2935265:03crwdne2935265:0 Google Pixel 9a Battery Installation, Install the battery: crwdns2935265:00crwdnd2935265:03crwdnd2935265:03crwdne2935265:0
Install the battery
  • Hold the battery above its recess and use your finger to push down and reconnect the battery press connector.

  • Temporarily reconnecting the battery ensures that it's sitting properly in its recess.

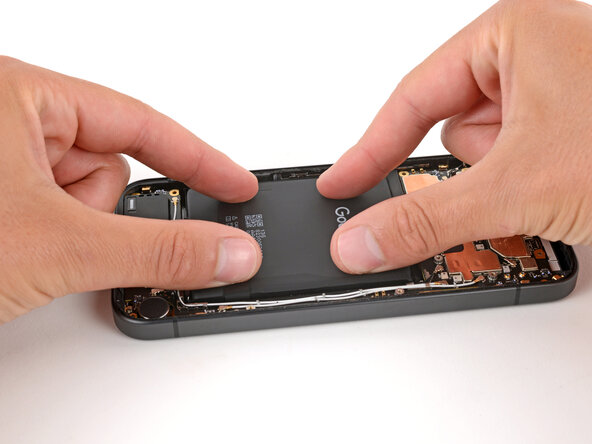
  • Lay the battery into its recess and press down firmly to secure it to the adhesive.

  • Once the battery's in place, disconnect it while you continue reassembly.

バッテリーを取り付けスペースの上で保持した状態で、バッテリーのプレスコネクタを指で押し下げて接続し直して下さい。

バッテリーを仮に接続することで、確実に取り付けスペース内の正しい位置に取り付けられるようにします。

バッテリーを取り付けスペース内に置いて、しっかり押し下げることで接着剤に取り付けます。

バッテリーが所定の位置に収まったら、組み立て作業の間は接続を外しておいて下さい。

crwdns2944171:0crwdnd2944171:0crwdnd2944171:0crwdnd2944171:0crwdne2944171:0