crwdns2933423:0crwdne2933423:0

Extracción del disipador de calor del HP EliteBook 840 Aero G8

crwdns2931529:0crwdnd2931529:0crwdnd2931529:0crwdnd2931529:03crwdnd2931529:0crwdne2931529:0

crwdns2935425:02crwdne2935425:0

crwdns2936315:0crwdne2936315:0
crwdns2936331:0crwdne2936331:0
crwdns2931653:02crwdne2931653:0
HP EliteBook 840 Aero G8 Heat Sink Prying, Pry up the heat sink: crwdns2935265:00crwdnd2935265:01crwdnd2935265:02crwdne2935265:0 HP EliteBook 840 Aero G8 Heat Sink Prying, Pry up the heat sink: crwdns2935265:00crwdnd2935265:02crwdnd2935265:02crwdne2935265:0
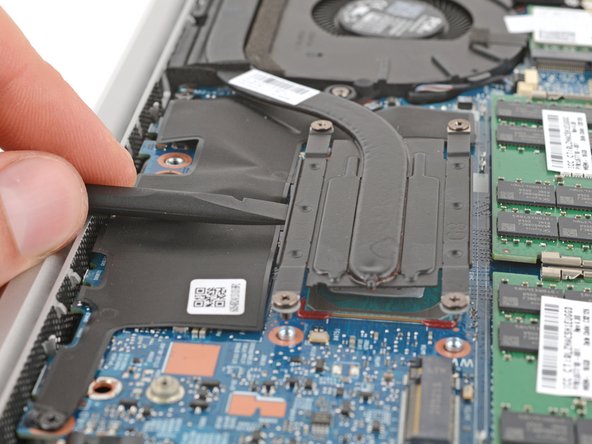
Pry up the heat sink
  • Be very careful not to pry on or damage any of the delicate surface‑mounted components around the heat sink.

  • Use the flat end of a spudger to pry up the top edge of the heat sink.

  • Thermal paste bonds the heat sink to the CPU. Depending on the age of your device and condition of the thermal paste, this may take some force. Pull up with constant, steady force to peel the heat sink away from the board.

Ten mucho cuidado de no hacer palanca ni dañar ninguno de los delicados componentes montados en la superficie alrededor del disipador de calor.

Usa el extremo plano de un spudger para levantar el borde superior del disipador de calor.

La pasta térmica une el disipador de calor a la CPU. Dependiendo de la antigüedad del dispositivo y del estado de la pasta térmica, es posible que tengas que aplicar cierta fuerza. Tira hacia arriba con una fuerza constante y firme para separar el disipador de calor de la placa.

crwdns2944171:0crwdnd2944171:0crwdnd2944171:0crwdnd2944171:0crwdne2944171:0