crwdns2933423:0crwdne2933423:0

HP EliteBook 840 G9 SSD 교체

crwdns2931527:0crwdnd2931527:0crwdnd2931527:0crwdnd2931527:0crwdne2931527:0

crwdns2936315:0crwdne2936315:0
crwdns2936325:0crwdne2936325:0
crwdns2931653:02crwdne2931653:0
HP EliteBook 840 G9 SSD Replacement, Remove the SSD shield: crwdns2935265:00crwdnd2935265:01crwdnd2935265:03crwdne2935265:0 HP EliteBook 840 G9 SSD Replacement, Remove the SSD shield: crwdns2935265:00crwdnd2935265:02crwdnd2935265:03crwdne2935265:0 HP EliteBook 840 G9 SSD Replacement, Remove the SSD shield: crwdns2935265:00crwdnd2935265:03crwdnd2935265:03crwdne2935265:0
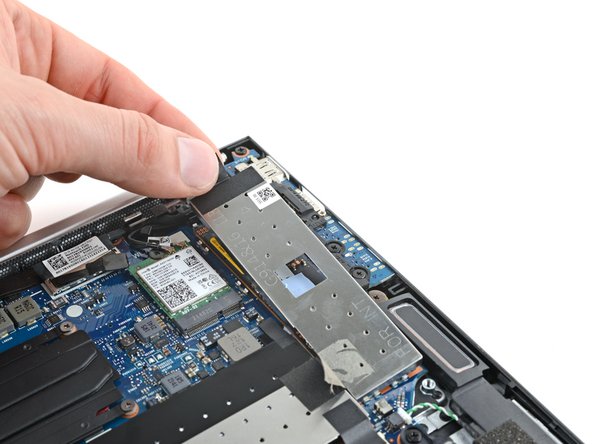
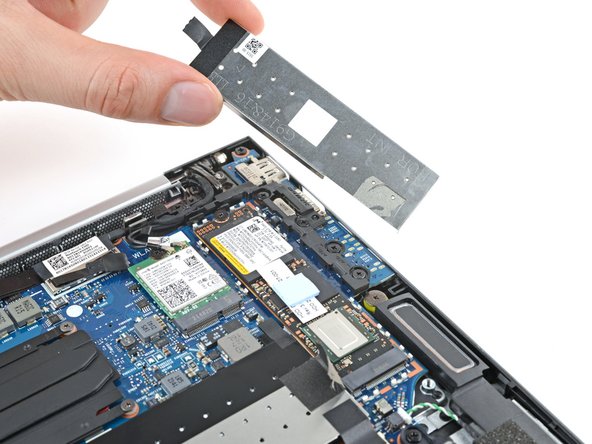
Remove the SSD shield
  • Use the pull tab on the top edge to lift and remove the shield.

  • During reassembly, align the shield with its metal clips on the board—to prevent damage, make sure the shield is sitting properly in the middle of each clip. Once the shield is properly aligned, firmly press down around the perimeter of the shield to secure it.

상단 가장자리에 있는 당김 탭을 사용하여 실드를 들어 올려 분리하세요.

재조립할 때 실드를 보드의 금속 클립에 맞춰 정렬하여 손상을 방지하고 실드가 각 클립의 중앙에 올바르게 놓여 있음을 확인하세요. 실드가 올바르게 정렬되면 실드 둘레를 단단히 눌러 고정하세요.

crwdns2944171:0crwdnd2944171:0crwdnd2944171:0crwdnd2944171:0crwdne2944171:0