crwdns2933423:0crwdne2933423:0

De eenvoudige Atari 1050-schijfstation conversie naar DC

crwdns2936315:0crwdne2936315:0
crwdns2936313:0crwdne2936313:0
crwdns2931653:03crwdne2931653:0
The simple Atari 1050 Disk Drive Conversion to DC, Prepare the drive: crwdns2935265:00crwdnd2935265:01crwdnd2935265:02crwdne2935265:0 The simple Atari 1050 Disk Drive Conversion to DC, Prepare the drive: crwdns2935265:00crwdnd2935265:02crwdnd2935265:02crwdne2935265:0
Prepare the drive
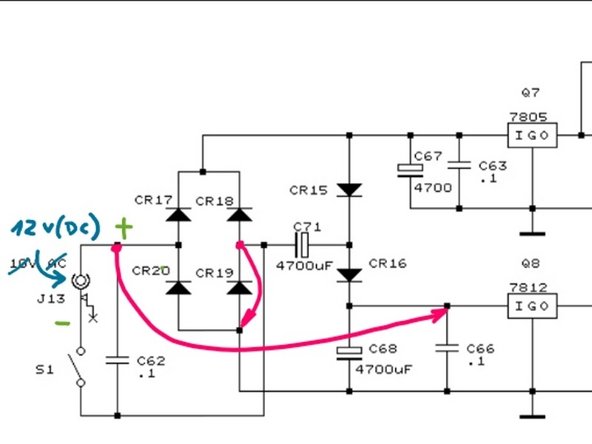
  • Take a look at the diagram: You are about to add the two jumper wires highlighted in red.

  • Prepare your Atari 1050 on a clean surface. Put a towel on top of the table to prevent scratches to the unit.

  • Remove all 6 philips screws on the underside of the unit

  • Flip the unit back on its feet and carefully remove both the top and front cover as if they were one single piece. Be gentle: This plastic is over 40 years old.

  • Place the drive in a way the SIO connectors are facing away from you and the front panel is facing you.

Kijk eens naar het diagram: je staat op het punt om de twee rood gemarkeerde jumperdraden toe te voegen.

Bereid je Atari 1050 voor op een schone ondergrond. Leg een handdoek of iets dergelijks op je tafel om krassen op het apparaat te voorkomen.

Verwijder de 6 kruiskopschroeven aan de onderkant van het apparaat

Zet het apparaat terug op zijn pootjes en verwijder voorzichtig zowel de boven- als de voorkant alsof het één geheel is. Wees voorzichtig: dit plastic is meer dan 40 jaar oud.

Plaats de schijf zodanig dat de SIO-connectoren van je af wijzen en het voorpaneel naar je toe is gericht.

crwdns2944171:0crwdnd2944171:0crwdnd2944171:0crwdnd2944171:0crwdne2944171:0