crwdns2933423:0crwdne2933423:0

Conversión de Atari 1050 a Corriente Continua DC

crwdns2936315:0crwdne2936315:0
crwdns2936331:0crwdne2936331:0
crwdns2931653:03crwdne2931653:0
The simple Atari 1050 Disk Drive Conversion to DC, Prepare the drive: crwdns2935265:00crwdnd2935265:01crwdnd2935265:02crwdne2935265:0 The simple Atari 1050 Disk Drive Conversion to DC, Prepare the drive: crwdns2935265:00crwdnd2935265:02crwdnd2935265:02crwdne2935265:0
Prepare the drive
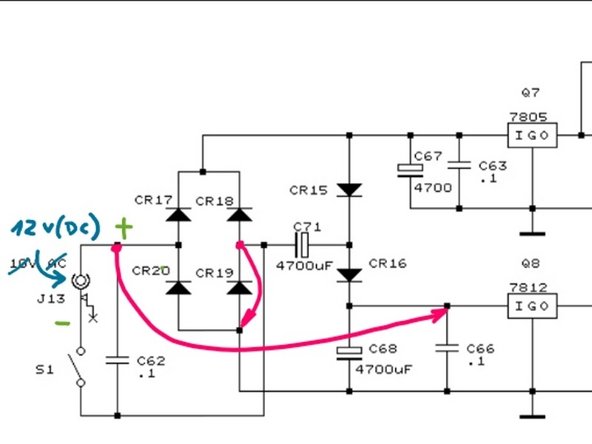
  • Take a look at the diagram: You are about to add the two jumper wires highlighted in red.

  • Prepare your Atari 1050 on a clean surface. Put a towel on top of the table to prevent scratches to the unit.

  • Remove all 6 philips screws on the underside of the unit

  • Flip the unit back on its feet and carefully remove both the top and front cover as if they were one single piece. Be gentle: This plastic is over 40 years old.

  • Place the drive in a way the SIO connectors are facing away from you and the front panel is facing you.

Fíjate en el diagrama: Estás por agregar dos cables que harán puente en las secciones señaladas en rojo.

Prepara tu unidad de diskette sobre una superficie limpia. Utiliza una toalla como base sobre la mesa para prevenir daños al plástico.

Remueve los 6 tornillos de cruz de la parte inferior

Da vuelta la unidad sobre sus pies y remueve cuidadosamente la parte superior (junto con la placa frontal). Sé gentil, recuerda que este plástico tiene más de 40 años de antigüedad.

Ubica la unidad en posición de tal manera en que los conectores SIO den hacia atrás y el panel frontal esté hacia tu dirección.

crwdns2944171:0crwdnd2944171:0crwdnd2944171:0crwdnd2944171:0crwdne2944171:0