crwdns2933423:0crwdne2933423:0

Retrait carte mère et haut-parleur interne (Pro)

crwdns2931529:0crwdnd2931529:0crwdnd2931529:0crwdnd2931529:02crwdnd2931529:0crwdne2931529:0

crwdns2936315:0crwdne2936315:0
crwdns2936317:0crwdne2936317:0
crwdns2931653:07crwdne2931653:0
Motherboard and Earpiece Speaker Removal (Pro), Reassembly information: crwdns2935265:00crwdnd2935265:01crwdnd2935265:03crwdne2935265:0 Motherboard and Earpiece Speaker Removal (Pro), Reassembly information: crwdns2935265:00crwdnd2935265:02crwdnd2935265:03crwdne2935265:0 Motherboard and Earpiece Speaker Removal (Pro), Reassembly information: crwdns2935265:00crwdnd2935265:03crwdnd2935265:03crwdne2935265:0
Reassembly information
  • During reassembly:

  • Use the flat end of a spudger to scrape off any large chunks of thermal paste from the bottom of the motherboard.

  • Use a pipette or syringe to apply a drop of isopropyl alcohol (>90%) to the thermal paste residue.

  • Wipe away all the residue with a coffee filter or lint-free cloth. Wait one minute to allow the alcohol to completely dry.

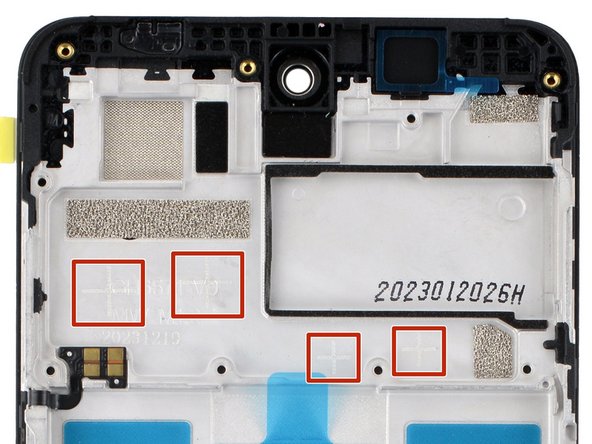
  • Apply a small bead of thermal paste to each of the four plus (+) signs that are lightly engraved in the frame.

Lors du remontage :

Utilisez l'extrémité plate d'une spatule pour gratter les gros morceaux de pâte thermique qui se trouvent sous la carte mère.

Utilisez une pipette ou une seringue pour appliquer une goutte d'alcool isopropylique (>90%) sur les résidus de pâte thermique.

Essuyez tous les résidus à l'aide d'un filtre à café ou d'un chiffon non pelucheux. Attendez une minute pour permettre à l'alcool de sécher complètement.

Appliquez un petit point de pâte thermique sur chacun des quatre signes plus (+) qui sont légèrement gravés dans le châssis.

crwdns2944171:0crwdnd2944171:0crwdnd2944171:0crwdnd2944171:0crwdne2944171:0