crwdns2933423:0crwdne2933423:0

Extracción de la placa principal

crwdns2931527:0crwdnd2931527:0crwdnd2931527:0crwdnd2931527:0crwdne2931527:0

crwdns2935425:01crwdne2935425:0

crwdns2936315:0crwdne2936315:0
crwdns2936331:0crwdne2936331:0
crwdns2931653:01crwdne2931653:0
Main Board Removal, Remove the main board screws: crwdns2935265:00crwdnd2935265:01crwdnd2935265:02crwdne2935265:0 Main Board Removal, Remove the main board screws: crwdns2935265:00crwdnd2935265:02crwdnd2935265:02crwdne2935265:0
Remove the main board screws
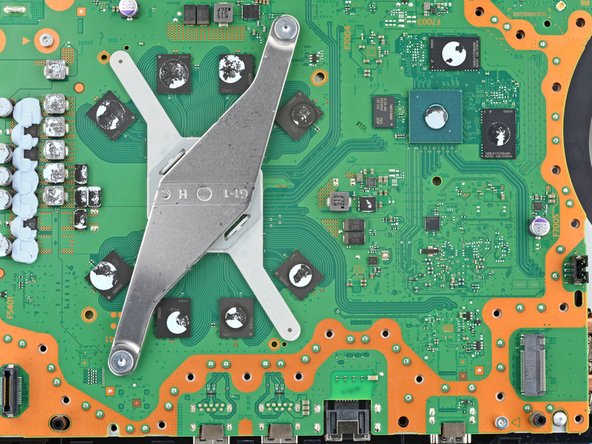
  • Use a T8 Torx Security screwdriver to remove the four remaining screws securing the main board:

  • Two 7.5 mm‑long main board screws

  • Two 16.3 mm‑long screws securing the APU tension bracket

  • Don't remove or install one screw at a time, or you may damage the APU. During disassembly and reassembly, alternate between the two screws a 1/2 turn at a time to maintain even pressure on the bracket.

Utiliza un destornillador Torx de seguridad T8 para retirar los cuatro tornillos restantes que fijan la placa base:

Dos tornillos de 7,5 mm de longitud para la placa base.

Dos tornillos de 16,3 mm de longitud que fijan el soporte de tensión de la APU.

No retires ni instales mas que un tornillo a la vez, ya que podrías dañar la APU. Durante el desmontaje y el montaje, alterna entre los dos tornillos, media vuelta cada vez, para mantener una presión uniforme sobre el soporte.

crwdns2944171:0crwdnd2944171:0crwdnd2944171:0crwdnd2944171:0crwdne2944171:0