crwdns2933423:0crwdne2933423:0

Dismantling the Melitta Caffeo CI brew group in the appliance

crwdns2935425:015crwdne2935425:0

crwdns2936319:0crwdne2936319:0
crwdns2936315:0crwdne2936315:0
crwdns2931653:015crwdne2931653:0
Melitta Caffeo CI Brühgruppe im Gerät zerlegen, Grundstellung prüfen: crwdns2935265:00crwdnd2935265:01crwdnd2935265:03crwdne2935265:0 Melitta Caffeo CI Brühgruppe im Gerät zerlegen, Grundstellung prüfen: crwdns2935265:00crwdnd2935265:02crwdnd2935265:03crwdne2935265:0 Melitta Caffeo CI Brühgruppe im Gerät zerlegen, Grundstellung prüfen: crwdns2935265:00crwdnd2935265:03crwdnd2935265:03crwdne2935265:0
Grundstellung prüfen
  • Die Maschine hat eine Grundstellung. Nur in dieser Grundstellung kann die Brühgruppe eingesetzt oder entnommen werden. Wenn man die Brühgruppe also nicht entnehmen konnte spricht vieles dafür dass man sie auch nicht richtig einsetzen kann.

  • Selbst wenn man sie mechanisch einsetzen kann könnte sie intern eine falsche Stellung haben. Ich würde davon abraten die Maschine ohne weitere Prüfung in Betrieb zu nehmen.

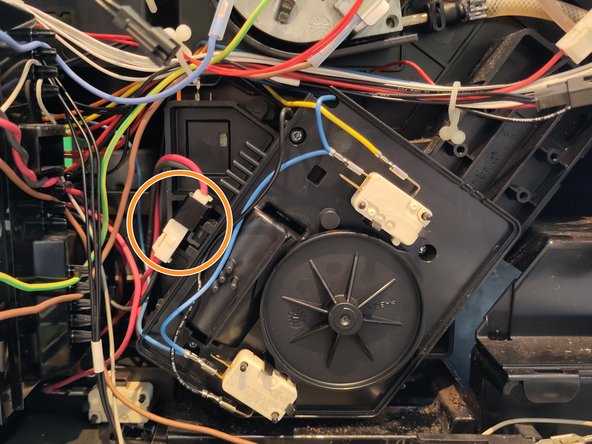
  • Bild 1 zeigt die Grundstellung auf Seite des Motors. Das schwarze Rad hat Nocken, bitte drauf achten dass diese zu den Schaltern stehen wie auf dem Bild 1 in den roten Kreisen gezeigt.

  • Den Stecker (oranger Kreis Bild 2) lösen und den Motor mit 12V Gleichspannung ansteuern. Die Spannung muss auf das Steckerteil gegeben werden welches noch am schwarzen Gehäuse befestigt ist. Plus/Minus kann man tauschen für Vor- und Rücklauf des Motors. Evtl. reicht auch eine 9V Blockbatterie.

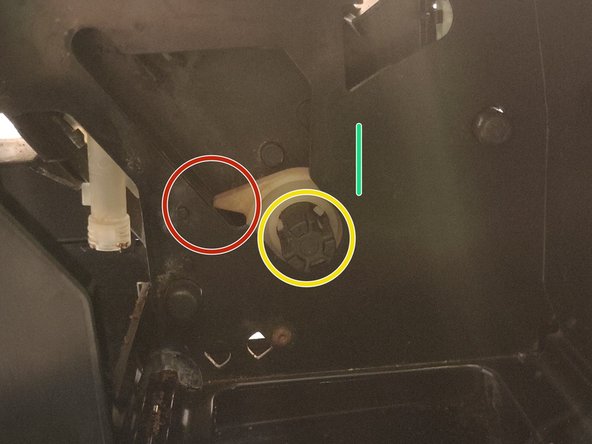
  • Auf der Seite der Brühgruppe muss zur gleichen Zeit eine gewisse Stellung eingestellt sein. Siehe Bild 3. Im gelben Kreis sieht man die Achse der Welle vom Motor. Diese hat 3 Nuten die in den weißen Mitnehmer greifen. Wenn der Motor in Grundstellung ist bedeutet dies es gibt für den weißen Mitnehmer nur 3 verschiedene Stellungen.

  • Auf dem Bild im roten Kreis sieht man einen Haken, den eigentlichen Mitnehmer. Diese Stellung ist nicht die Grundstellung es ist nur so fotografiert dass man den Haken mal gesehen hat. Dieser Haken muss ungefähr die Lage des grünen Striches haben.

  • Wichtig ist dass die Grundstellung auf der Seite des Motors und auf der Seite der Brühgruppe gleichzeitig vorherrscht. U.U. helfen zuvor gemachte Fotos, ansonsten die 3 möglichen (da 3 Nuten) Positionen austesten. Oder aber auf die Fotos hier achten und die Achse beim einstecken schon grob so ausgerichtet haben.

The machine has a home position. The brew group can only be inserted or removed in this basic position. If the brew group could not be removed, there are many indications that it cannot be inserted correctly.

Even if it can be inserted mechanically, it could be in the wrong position internally. It is advised to not place the machine into operation without further testing.

Figure 1 shows the basic position on the motor side. The black wheel has cams, please make sure that they are facing the switches as shown in the red circles in picture 1.

Disconnect the plug (orange circle in picture 2) and control the motor with 12V DC voltage. The voltage must be applied to the plug part which is still attached to the black housing. Plus/minus can be swapped for the forward and return of the motor. A 9V block battery may also be sufficient.

A certain position must be set on the side of the brewing group at the same time. The yellow circle shows the axis of the motor shaft. This has 3 grooves that engage in the white driver. This means that when the motor is in the basic position, there are only 3 different positions for the white driver.

On the picture in the red circle you can see a hook, the actual driver. This position is not the basic position, it is only photographed so that you can see the hook. This hook must be in the approximate position of the green line.

It is important that the basic position on the motor side and on the brew group side prevail at the same time. Previously taken photos may help, otherwise try out the 3 possible (as there are 3 grooves) positions. Or pay attention to the photos here and already roughly align the axle when inserting it.

crwdns2944171:0crwdnd2944171:0crwdnd2944171:0crwdnd2944171:0crwdne2944171:0