crwdns2933423:0crwdne2933423:0

ディスプレイアセンブリの取り外し

crwdns2931529:0crwdnd2931529:0crwdnd2931529:0crwdnd2931529:02crwdnd2931529:0crwdne2931529:0

crwdns2936315:0crwdne2936315:0
crwdns2936323:0crwdne2936323:0
crwdns2931653:09crwdne2931653:0
Display Assembly (Unfasten), Slice the adhesive: crwdns2935265:00crwdnd2935265:01crwdnd2935265:03crwdne2935265:0 Display Assembly (Unfasten), Slice the adhesive: crwdns2935265:00crwdnd2935265:02crwdnd2935265:03crwdne2935265:0 Display Assembly (Unfasten), Slice the adhesive: crwdns2935265:00crwdnd2935265:03crwdnd2935265:03crwdne2935265:0
Slice the adhesive
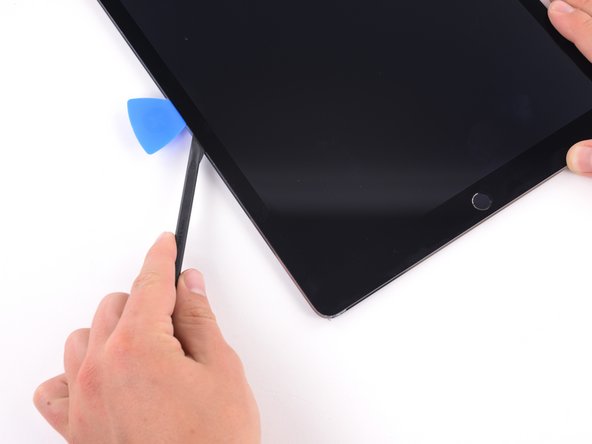
  • Reapply the iOpener to the bottom left corner of the iPad for at least 2 minutes, spanning from the opening pick to the home button.

  • After letting the adhesive soften, insert an opening pick or halberd spudger into the gap next to the opening pick.

  • Don't insert your slicing tool deeper than 3–4 mm, or you risk permanently damaging the display panel.

  • Use an opening pick or halberd spudger to slice the adhesive along the bottom left side of the iPad. If the slicing becomes difficult, reheat the edge and try again.

iOpenerでiPadの左下の角付近を2分以上温めて下さい。温める場所はオープニングピックの刺さっている位置からホームボタンまでです。

接着剤が柔らかくなったら、隙間のオープニングピックのすぐ横に別のオープニングピックかハルバードスパッジャーを差し込んで下さい。

工具は3〜4mm以上深く差し込まないで下さい。ディスプレイパネルが破損して修理できなくなる恐れがあります。

オープニングピックやハルバードスパッジャーを使ってiPadの左下の角に沿って接着を剥がして下さい。剥がすのが難しくなったら、角付近を温め直してからやり直して下さい。

crwdns2944171:0crwdnd2944171:0crwdnd2944171:0crwdnd2944171:0crwdne2944171:0