crwdns2933423:0crwdne2933423:0

Gruppo del display

crwdns2931529:0crwdnd2931529:0crwdnd2931529:0crwdnd2931529:02crwdnd2931529:0crwdne2931529:0

crwdns2936315:0crwdne2936315:0
crwdns2936321:0crwdne2936321:0
crwdns2931653:09crwdne2931653:0
Display Assembly (Unfasten), Slice the adhesive: crwdns2935265:00crwdnd2935265:01crwdnd2935265:03crwdne2935265:0 Display Assembly (Unfasten), Slice the adhesive: crwdns2935265:00crwdnd2935265:02crwdnd2935265:03crwdne2935265:0 Display Assembly (Unfasten), Slice the adhesive: crwdns2935265:00crwdnd2935265:03crwdnd2935265:03crwdne2935265:0
Slice the adhesive
  • Reapply the iOpener to the bottom left corner of the iPad for at least 2 minutes, spanning from the opening pick to the home button.

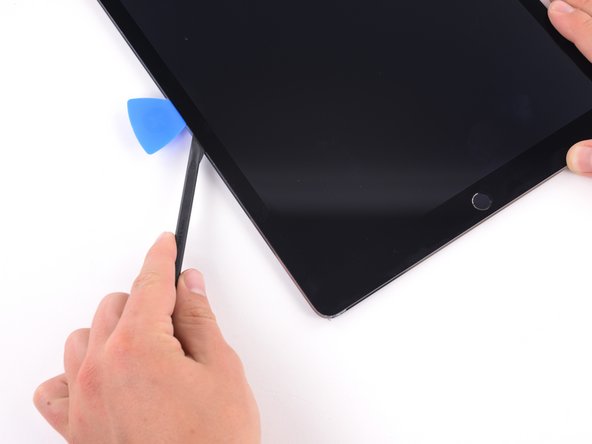
  • After letting the adhesive soften, insert an opening pick or halberd spudger into the gap next to the opening pick.

  • Don't insert your slicing tool deeper than 3–4 mm, or you risk permanently damaging the display panel.

  • Use an opening pick or halberd spudger to slice the adhesive along the bottom left side of the iPad. If the slicing becomes difficult, reheat the edge and try again.

Riapplica l'iOpener nell'angolo in basso a sinistra dell'iPad per almeno 2 minuti, partendo dal plettro di apertura fino al pulsante home.

Dopo aver lasciato l'adesivo ammorbidirsi, inserisci il plettro di apertura o l'halberd spudger nella fessura accanto al plettro di apertura.

Non inserire lo strumento per tagliare più profondamente di 3-4 mm, o rischi di danneggiare permanentemente il pannello del display.

Usa un plettro di apertura o un halberd spudger per tagliare l'adesivo lungo il lato inferiore sinistro dell'iPad. Se il taglio diventa difficile, scalda di nuovo il bordo e riprova.

crwdns2944171:0crwdnd2944171:0crwdnd2944171:0crwdnd2944171:0crwdne2944171:0