crwdns2933423:0crwdne2933423:0

Ensamblaje de pantalla (Desconectar)

crwdns2931529:0crwdnd2931529:0crwdnd2931529:0crwdnd2931529:02crwdnd2931529:0crwdne2931529:0

crwdns2936315:0crwdne2936315:0
crwdns2936331:0crwdne2936331:0
crwdns2931653:09crwdne2931653:0
Display Assembly (Unfasten), Slice the adhesive: crwdns2935265:00crwdnd2935265:01crwdnd2935265:03crwdne2935265:0 Display Assembly (Unfasten), Slice the adhesive: crwdns2935265:00crwdnd2935265:02crwdnd2935265:03crwdne2935265:0 Display Assembly (Unfasten), Slice the adhesive: crwdns2935265:00crwdnd2935265:03crwdnd2935265:03crwdne2935265:0
Slice the adhesive
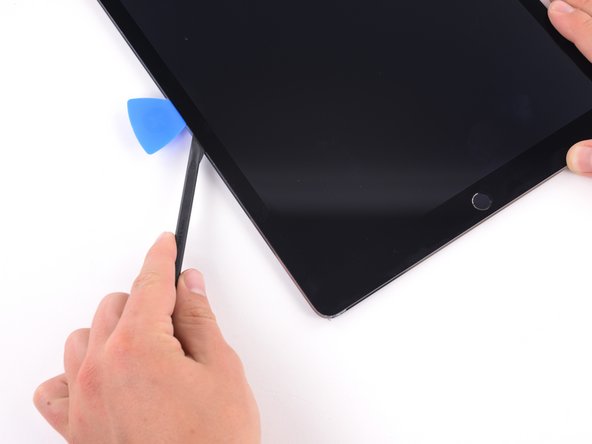
  • Reapply the iOpener to the bottom left corner of the iPad for at least 2 minutes, spanning from the opening pick to the home button.

  • After letting the adhesive soften, insert an opening pick or halberd spudger into the gap next to the opening pick.

  • Don't insert your slicing tool deeper than 3–4 mm, or you risk permanently damaging the display panel.

  • Use an opening pick or halberd spudger to slice the adhesive along the bottom left side of the iPad. If the slicing becomes difficult, reheat the edge and try again.

Vuelve a aplicar el iOpener en la esquina inferior izquierda del iPad durante al menos 2 minutos, desde la púa de apertura hasta el botón de inicio.

Después de dejar que el adhesivo se ablande, inserta una púa de apertura o un spudger de halberd en el espacio junto a la púa de apertura.

No insertes la herramienta de corte a más de 3 o 4 mm de profundidad, o corres el riesgo de dañar permanentemente el panel de la pantalla.

Usa una púa de apertura o un spudger de halberd para cortar el adhesivo a lo largo del lado inferior izquierdo del iPad. Si el corte se vuelve difícil, vuelve a calentar el borde e inténtalo de nuevo.

crwdns2944171:0crwdnd2944171:0crwdnd2944171:0crwdnd2944171:0crwdne2944171:0