crwdns2933423:0crwdne2933423:0

Umbau eines iMac Intel 27" EMC 2639 in einen HDMI-Monitor

crwdns2936315:0crwdne2936315:0
crwdns2936319:0crwdne2936319:0
crwdns2931653:06crwdne2931653:0
Convert an iMac Intel 27" EMC 2639 into an HDMI Monitor, Mount controller hardware inside iMac: crwdns2935265:00crwdnd2935265:01crwdnd2935265:02crwdne2935265:0 Convert an iMac Intel 27" EMC 2639 into an HDMI Monitor, Mount controller hardware inside iMac: crwdns2935265:00crwdnd2935265:02crwdnd2935265:02crwdne2935265:0
Mount controller hardware inside iMac
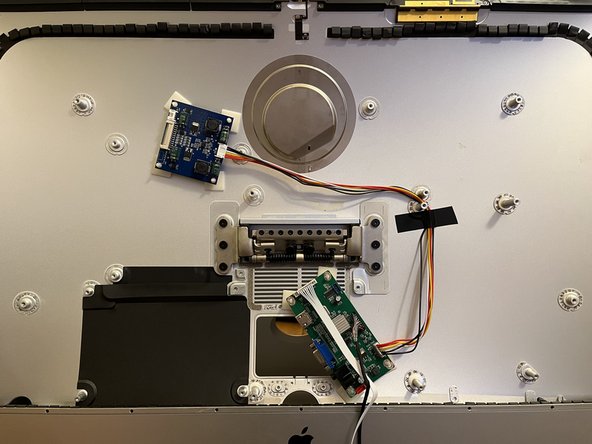
  • Disconnect some or all of the controller board so you can move the board around the iMac case without the heavy glass display getting in your way.

  • Arrange the controller board in the iMac case so that the external connections (HDMI, power) could be accessed from the RAM door and/or power cord hole. I put it somewhere else in my first attempt and regretted it after something went wrong later.

  • Make sure all your cables can reach where their final destination with some slack before you attach the controller board to the case. Also ensure any cables that attach to the board perpendicularly have enough room to turn after the display is attached to the case. I ended up using a slightly awkward arrangement on top of the vents.

  • After you're happy with the arrangement, attach the board with something like these adhesive stand-offs.

  • If your board has a secondary board too, attach that in the same way, making sure all cables can reach their destination. Secure wires with electrical tape.

Trenne die Controller-Platine ganz oder teilweise, damit du die Platine im iMac-Gehäuse bewegen kannst, ohne dass das schwere Glasdisplay im Weg ist.

Ordne die Controller-Platine im iMac-Gehäuse so an, dass die externen Anschlüsse (HDMI, Strom) von der RAM-Öffnung und/oder der Stromkabelöffnung aus zugänglich sind. Bei meinem ersten Versuch habe ich es woanders platziert und es nach einem späteren Fehler bereut.

Achte darauf, dass alle Kabel genügend Spiel haben, bevor du die Steuerplatine am Gehäuse befestigst. Denk auch daran, dass alle Kabel, die senkrecht an der Platine befestigt werden, nach der Endmontage genügend Platz zum Drehen haben. Ich habe mich für eine etwas umständliche Anordnung über den Lüftungsschlitzen entschieden.

Wenn du mit der Anordnung zufrieden bist, befestige das Board mit etwas wie diesen selbstklebenden Abstandhaltern.

Wenn zu deinem Board ein zweites Board gehört, befestige dieses auf die gleiche Weise und achte darauf, dass alle Kabel angeschlossen werden können. Sichere die Drähte mit Isolierband.

crwdns2944171:0crwdnd2944171:0crwdnd2944171:0crwdnd2944171:0crwdne2944171:0