crwdns2933423:0crwdne2933423:0

Google Pixel Fold unteren Lautsprecher tauschen

crwdns2935425:01crwdne2935425:0

crwdns2936315:0crwdne2936315:0
crwdns2936319:0crwdne2936319:0
crwdns2931653:01crwdne2931653:0
Google Pixel Fold Bottom Speaker Replacement, Remove the bottom speaker: crwdns2935265:00crwdnd2935265:01crwdnd2935265:03crwdne2935265:0 Google Pixel Fold Bottom Speaker Replacement, Remove the bottom speaker: crwdns2935265:00crwdnd2935265:02crwdnd2935265:03crwdne2935265:0 Google Pixel Fold Bottom Speaker Replacement, Remove the bottom speaker: crwdns2935265:00crwdnd2935265:03crwdnd2935265:03crwdne2935265:0
Remove the bottom speaker
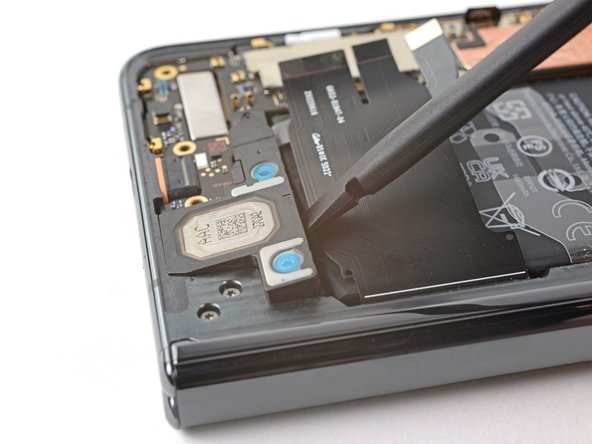
  • The speaker is lightly adhered to the frame.

  • Don't pry with the spudger, as you risk damaging the battery.

  • Insert the flat end of a spudger between the battery and the bottom speaker.

  • Twist the spudger to separate the adhesive securing the bottom speaker.

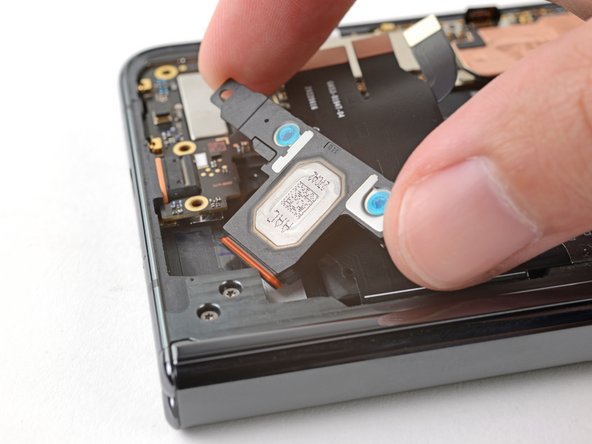
  • Remove the bottom speaker.

  • During reassembly, if your adhesive is still intact and sticky, you can reuse it. Otherwise, follow this guide to replace it with custom cut strips.

  • If you don't have custom cut adhesive strips, use double-sided tape, like Tesa Tape, to secure the speaker to the frame.

Der Lautsprecher ist leicht mit dem Rahmen verklebt.

Heble nicht mit dem Spudger, der Akku könnte sonst beschädigt werden.

Setze den Spudger mit dem flachen Ende zwischen den Akku und den unteren Lautsprecher ein.

Verdrehe den Spudger, bis sich der Kleber des Lautsprechers löst.

Entferne den unteren Lautsprecher.

Wenn der Kleber des Lautsprechers noch in Ordnung ist, kannst du ihn zum Zusammenbau wieder verwenden. Folge anderenfalls dieser Anleitung, um fertig zugeschnittene Klebestreifen zu verwenden.

Wenn du keine fertig zugeschnittene Klebestreifen hast, dann befestige den Lautsprecher mit doppelseitigem Klebeband, wie z.B. Tesaband am Rahmen.

crwdns2944171:0crwdnd2944171:0crwdnd2944171:0crwdnd2944171:0crwdne2944171:0