crwdns2933423:0crwdne2933423:0

Reemplazo del sensor de

crwdns2936315:0crwdne2936315:0
crwdns2936331:0crwdne2936331:0
crwdns2931653:03crwdne2931653:0
Whirlpool Dryer Moisture Sensor Testing and Replacement, Check continuity from strip to connector: crwdns2935265:00crwdnd2935265:01crwdnd2935265:03crwdne2935265:0 Whirlpool Dryer Moisture Sensor Testing and Replacement, Check continuity from strip to connector: crwdns2935265:00crwdnd2935265:02crwdnd2935265:03crwdne2935265:0 Whirlpool Dryer Moisture Sensor Testing and Replacement, Check continuity from strip to connector: crwdns2935265:00crwdnd2935265:03crwdnd2935265:03crwdne2935265:0
Check continuity from strip to connector
  • The next two steps will require a multimeter. If you aren't familiar with how to use one, here is a guide that will help you.

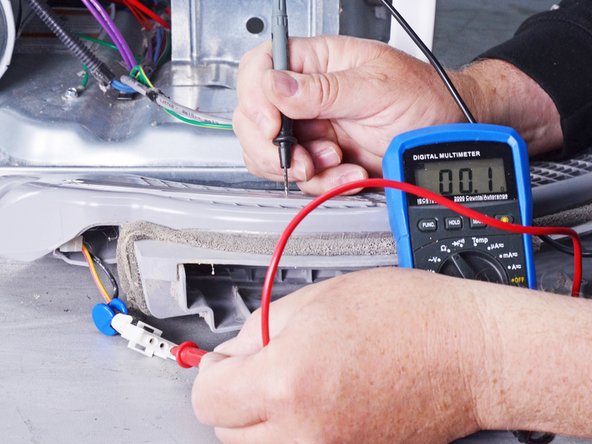
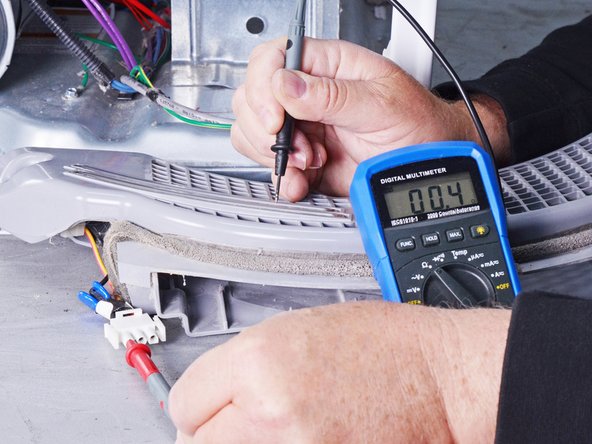
  • Set the multimeter to resistance (Ω) and check the continuity between the two metal strips and their respective ports located on the outside edges of the connector.

  • Trace the connector wires on the back of the module to match each port to a metal strip.

  • If the strips show continuity (less than 1 Ω) to the connector, go to the next step.

  • If either strip shows an open circuit (OL) to its connector, skip the next step.

Los dos pasos siguientes requerirán un multímetro. Si no estás familiarizado con el uso de uno, aquí tienes una guía que te ayudará.

Pon el multímetro en resistencia (Ω) y comprueba la continuidad entre las dos tiras metálicas y sus respectivos puertos situados en los bordes exteriores del conector.

Traza los cables del conector en la parte posterior del módulo para hacer coincidir cada puerto con una tira metálica.

Si las tiras muestran continuidad (menos de 1 Ω) con el conector, pasa al siguiente paso.

Si alguna de las tiras muestra un circuito abierto (OL) con su conector, pasa al siguiente paso.

crwdns2944171:0crwdnd2944171:0crwdnd2944171:0crwdnd2944171:0crwdne2944171:0