crwdns2933423:0crwdne2933423:0

Changement écran Nokia G22

crwdns2936315:0crwdne2936315:0
crwdns2936317:0crwdne2936317:0
crwdns2931653:03crwdne2931653:0
Nokia G22 Screen Assembly Replacement, Remove the foam pad: crwdns2935265:00crwdnd2935265:01crwdnd2935265:03crwdne2935265:0 Nokia G22 Screen Assembly Replacement, Remove the foam pad: crwdns2935265:00crwdnd2935265:02crwdnd2935265:03crwdne2935265:0 Nokia G22 Screen Assembly Replacement, Remove the foam pad: crwdns2935265:00crwdnd2935265:03crwdnd2935265:03crwdne2935265:0
Remove the foam pad
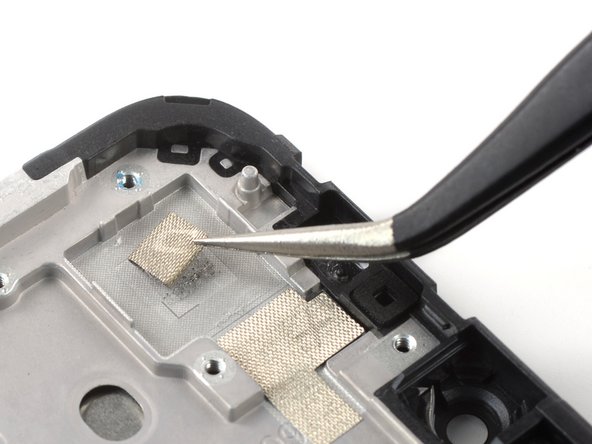
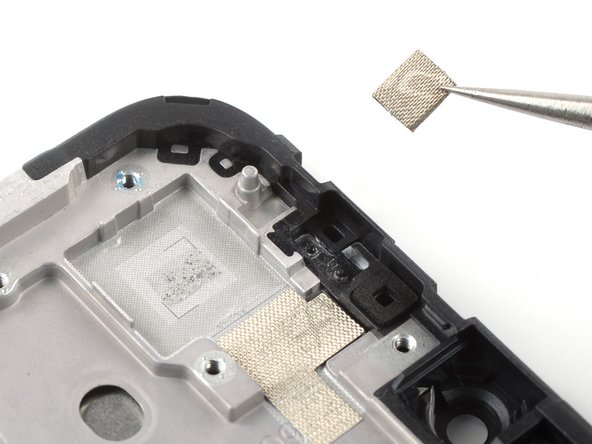
  • If your new screen assembly comes with a foam pad you can skip this step. If not you’ll need to transfer the old pad or apply a new one.

  • Use a pair of tweezers to carefully peel the foam off of the frame to remove it.

  • The foam pad in the camera recess is held in place with mild adhesive.

  • During reassembly, transfer the old foam pad or install a new one for the new screen assembly. You can install the camera bracket first to help orient the foam pad.

Si votre nouvel ensemble écran est muni d'un bloc de mousse, vous pouvez sauter cette étape. Sinon, il va falloir retirer le bloc de mousse pour le transférer.

Utilisez une pincette pour décoller et retirer soigneusement le bloc de mousse du châssis.

Le bloc de mousse est légèrement collé dans l'enfoncement pour la caméra.

Lors du remontage, placez le bloc de mousse sur le nouvel ensemble écran et appuyez légèrement. Utilisez une bande adhésive si nécessaire.

-[title] Foam pad
-[* icon_note] If your new screen assembly comes with a foam pad you can skip this step. If not you’ll need to remove the pad for transfer.
+[title] Remove the foam pad
+[* icon_note] If your new screen assembly comes with a foam pad you can skip this step. If not you’ll need to transfer the old pad or apply a new one.
[* black] Use a pair of tweezers to carefully peel the foam off of the frame to remove it.
[* icon_note] The foam pad in the camera recess is held in place with mild adhesive.
-[* icon_reminder] During reassembly, install the foam pad on the new screen assembly by lightly pressing it down. Use adhesive tape if necessary.
+[* icon_reminder] During reassembly, transfer the old foam pad or install a new one for the new screen assembly. You can install the camera bracket first to help orient the foam pad.

crwdns2944171:0crwdnd2944171:0crwdnd2944171:0crwdnd2944171:0crwdne2944171:0