crwdns2933423:0crwdne2933423:0

Nokia G22 Vervanging van de schermmodule

crwdns2936315:0crwdne2936315:0
crwdns2936313:0crwdne2936313:0
crwdns2931653:02crwdne2931653:0
Nokia G22 Screen Assembly Replacement, Remove the camera bracket: crwdns2935265:00crwdnd2935265:01crwdnd2935265:03crwdne2935265:0 Nokia G22 Screen Assembly Replacement, Remove the camera bracket: crwdns2935265:00crwdnd2935265:02crwdnd2935265:03crwdne2935265:0 Nokia G22 Screen Assembly Replacement, Remove the camera bracket: crwdns2935265:00crwdnd2935265:03crwdnd2935265:03crwdne2935265:0
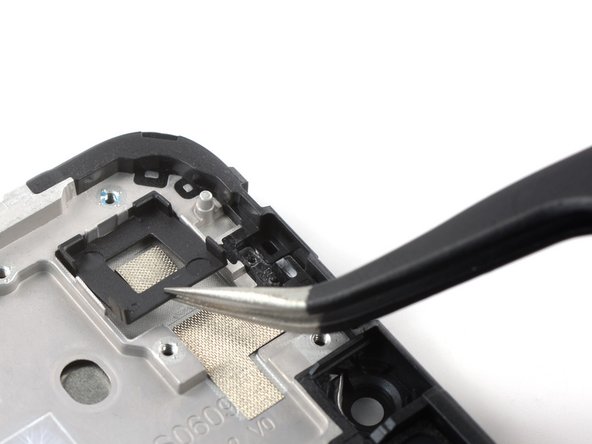
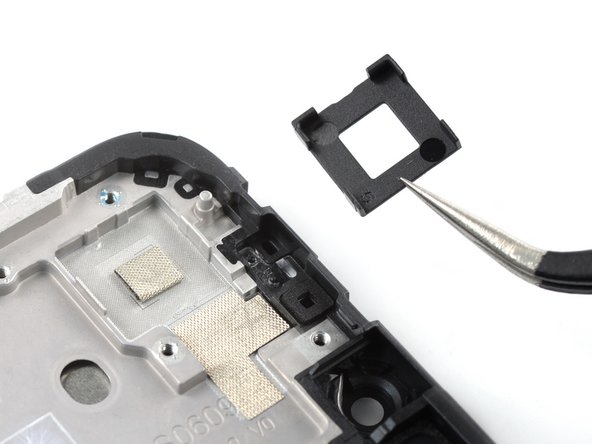
Remove the camera bracket
  • If your new screen assembly comes with a camera bracket you can skip this step. If not you’ll need to transfer the bracket or apply a new one.

  • Use a pair of tweezers to remove the black camera bracket.

  • The camera bracket is held in place with mild adhesive.

  • During reassembly, transfer the old camera bracket or install a new bracket for the new screen assembly.

Als je nieuwe schermmodule al een camerabeugel bevat, dan kun je deze stap overslaan. Als er geen beugel is, zul je de beugel moeten verwijderen om vervolgens naar de nieuwe schermmodule over te zetten.

Gebruik een pincet om de zwarte camerabeugel te verwijderen.

De camerabeugel wordt door middel van wat lijm op z'n plek gehouden.

Zorg dat je de camerabeugel bij het weer in elkaar zetten van je telefoon op de juiste wijze in de nieuwe schermmodule plaatst en ook lichtjes aandrukt. Gebruik indien nodig wat tape.

-[title] Camera bracket
-[* icon_note] If your new screen assembly comes with a camera bracket you can skip this step. If not you’ll need to remove the bracket for transfer.
-[* black] Use a pair of tweezers to remove the black camera bracket.
+[title] Remove the camera bracket
+[* icon_note] If your new screen assembly comes with a camera bracket you can skip this step. If not you’ll need to transfer the bracket or apply a new one.
+[* black] Use a pair of [product|IF145-020|tweezers] to remove the black camera bracket.
[* icon_note] The camera bracket is held in place with mild adhesive.
-[* icon_reminder] During reassembly, make sure to install the camera bracket on the new screen assembly in the correct orientation and press it down lightly. Use adhesive tape if necessary.
+[* icon_reminder] During reassembly, transfer the old camera bracket or install a new bracket for the new screen assembly.

crwdns2944171:0crwdnd2944171:0crwdnd2944171:0crwdnd2944171:0crwdne2944171:0