crwdns2933423:0crwdne2933423:0

Reemplazo de batería en Samsung Galaxy Watch5

crwdns2935425:03crwdne2935425:0

crwdns2936315:0crwdne2936315:0
crwdns2936331:0crwdne2936331:0
crwdns2931653:03crwdne2931653:0
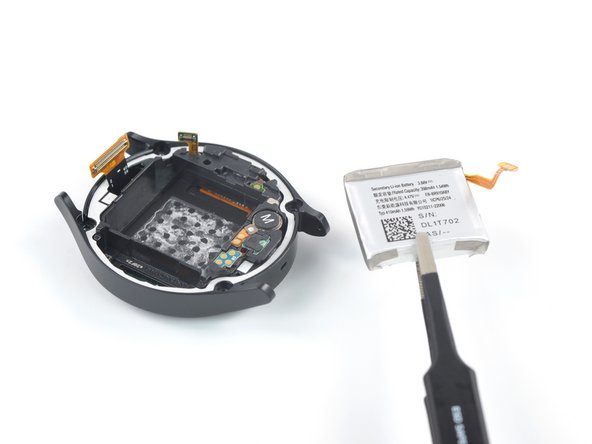
Samsung Galaxy Watch5 Battery Replacement, Remove the battery: crwdns2935265:00crwdnd2935265:01crwdnd2935265:02crwdne2935265:0 Samsung Galaxy Watch5 Battery Replacement, Remove the battery: crwdns2935265:00crwdnd2935265:02crwdnd2935265:02crwdne2935265:0
Remove the battery
  • Use a pair of tweezers or your fingers to remove the battery.

  • Don't accidentally poke or slice the battery with any sharp tools. A punctured battery may leak dangerous chemicals or catch fire.

  • Never reuse a deformed or damaged battery—it's a fire hazard. Replace it with a new battery.

  • To install a new battery:

  • Use tweezers or your fingers to remove the old adhesive from the frame.

  • Use high-concentration isopropyl alcohol (>90%) and a lint-free cloth to remove any remaining adhesive residue.

  • If your replacement battery isn‘t already equipped with adhesive, apply thin, double-sided tape such as Tesa Tape directly to the battery recess where the old adhesive was.

  • Lay the replacement battery in its recess and press down firmly to secure it.

Usa un par de pinzas o tus dedos para remover la batería.

No introduzcas accidentalmente o cortes la batería con herramientas puntiagudas. Una batería perforada puede fugar químicos peligrosos o causar un incendio.

Nunca re-uses una batería deformada o dañada—es una amenaza de fuego. Reemplázala con una batería nueva.

Para instalar una batería nueva:

Usa pinzas o tus dedos para remover el adhesivo anterior del marco.

Usa alcohol isopropílico de alta concentración (>90%) y un trapo libre de pelusa para remover cualquier residuo de adhesivo restante.

Si tu batería de reemplazo no esta equipada con adhesivo, aplica cinta delgada de doble cara como cinta Tesa directamente a la ranura de la batería donde el adhesivo anterior estaba.

Coloca la batería de reemplazo en su ranura y presiona firmemente para asegurarla.

crwdns2944171:0crwdnd2944171:0crwdnd2944171:0crwdnd2944171:0crwdne2944171:0