crwdns2933423:0crwdne2933423:0

Microsoft Surface Laptop 4(15インチモデル)基板の交換

crwdns2931529:0crwdnd2931529:0crwdnd2931529:0crwdnd2931529:011crwdnd2931529:0crwdne2931529:0

crwdns2936315:0crwdne2936315:0
crwdns2936323:0crwdne2936323:0
crwdns2931653:020crwdne2931653:0
Microsoft Surface Laptop 4 (15-inch) Motherboard Replacement, Pry the left edge: crwdns2935265:00crwdnd2935265:01crwdnd2935265:03crwdne2935265:0 Microsoft Surface Laptop 4 (15-inch) Motherboard Replacement, Pry the left edge: crwdns2935265:00crwdnd2935265:02crwdnd2935265:03crwdne2935265:0 Microsoft Surface Laptop 4 (15-inch) Motherboard Replacement, Pry the left edge: crwdns2935265:00crwdnd2935265:03crwdnd2935265:03crwdne2935265:0
Pry the left edge
  • A tab on the upper left of the motherboard presses against protrusions in the frame, preventing the left edge from coming free.

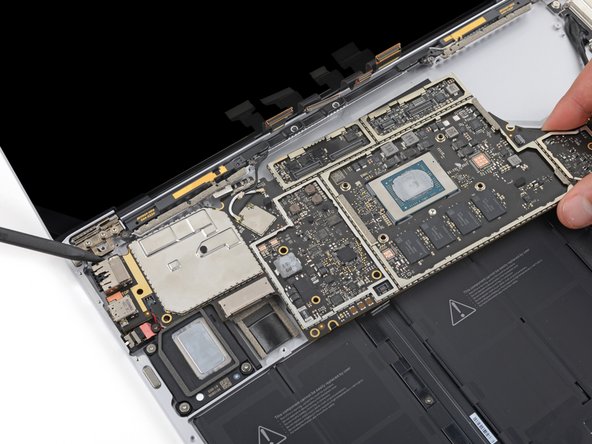
  • Insert the tip of a spudger against the tab in the upper left corner of the motherboard. Wedge the spudger between the frame and the screen hinge.

  • Pry up on the tab with your spudger while you lift the right edge of the motherboard toward the front of the laptop.

  • If the motherboard can't lift over the left speaker, the tab may still be stuck. Change the angle of your spudger and try again.

基板左上にある突起が筐体にある突起に当たっているため、基板の左端は自由に動かせません。

スパッジャーの先端を基板左上の突起に触るように差し込みます。スパッジャーを筐体と画面ヒンジの間にくさびのように差し込んで下さい。

基板の右端をラップトップの手前側に引っ張りながら基板の突起をこじり上げて下さい。

基板が左スピーカーの上まで動かせない場合は、基板の突起が引っかかっているかも知れません。スパッジャーの向きを変えてやり直してみて下さい。

crwdns2944171:0crwdnd2944171:0crwdnd2944171:0crwdnd2944171:0crwdne2944171:0