crwdns2933423:0crwdne2933423:0

HP Star Wars Special Edition 15-an051dx Hard Drive Replacement

crwdns2935425:01crwdne2935425:0

crwdns2936315:0crwdne2936315:0
crwdns2936323:0crwdne2936323:0
crwdns2931653:01crwdne2931653:0
HP Star Wars Special Edition 15-an051dx Hard Drive Replacement: crwdns2935265:00crwdnd2935265:01crwdnd2935265:03crwdne2935265:0 HP Star Wars Special Edition 15-an051dx Hard Drive Replacement: crwdns2935265:00crwdnd2935265:02crwdnd2935265:03crwdne2935265:0 HP Star Wars Special Edition 15-an051dx Hard Drive Replacement: crwdns2935265:00crwdnd2935265:03crwdnd2935265:03crwdne2935265:0
  • Ensure that the laptop is completely powered off and unplugged from any power source from the beginning.

  • Slide the battery release tabs to the left, and then remove the battery.

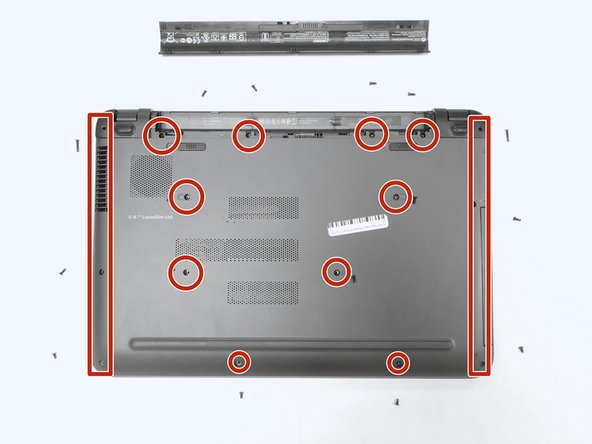
  • Using a Philips #1 screwdriver, remove the following screws from the base panel:

  • Two 12.5 mm screws

  • Four 5.5 mm screws and six 7.25 mm screws

  • Organize and make sure to label the screws by size and location for easy reassembly.

  • Gently remove the two corner panels located at each end of the batteru slot to reveal an additional screw under each panel.

  • Locate and then remove the six remaining 7.25 mm screws hidden in the battery compartment and also beneath the corner panel covers.

crwdns2935429:0crwdne2935429:0

crwdns2935429:0crwdne2935429:0

crwdns2935429:0crwdne2935429:0

crwdns2935429:0crwdne2935429:0

crwdns2935429:0crwdne2935429:0

crwdns2935429:0crwdne2935429:0

crwdns2935429:0crwdne2935429:0

crwdns2935429:0crwdne2935429:0

crwdns2944171:0crwdnd2944171:0crwdnd2944171:0crwdnd2944171:0crwdne2944171:0