crwdns2933423:0crwdne2933423:0

Écran

crwdns2931527:0crwdnd2931527:0crwdnd2931527:0crwdnd2931527:0crwdne2931527:0

crwdns2936315:0crwdne2936315:0
crwdns2936317:0crwdne2936317:0
crwdns2931653:09crwdne2931653:0
Display Assembly, Slice the adhesive: crwdns2935265:00crwdnd2935265:01crwdnd2935265:03crwdne2935265:0 Display Assembly, Slice the adhesive: crwdns2935265:00crwdnd2935265:02crwdnd2935265:03crwdne2935265:0 Display Assembly, Slice the adhesive: crwdns2935265:00crwdnd2935265:03crwdnd2935265:03crwdne2935265:0
Slice the adhesive
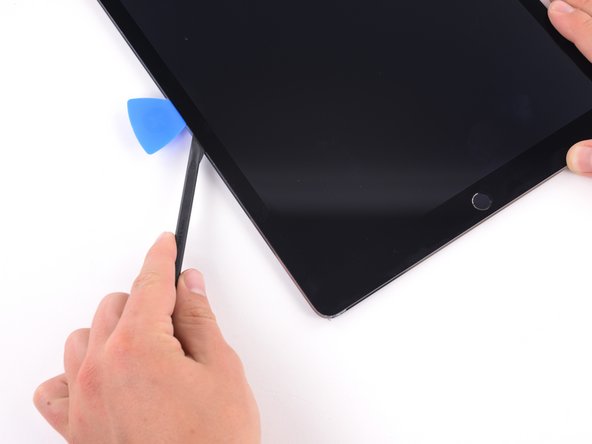
  • Reapply the iOpener to the bottom left corner of the iPad for at least 2 minutes, spanning from the opening pick to the home button.

  • After letting the adhesive soften, insert an opening pick or halberd spudger into the gap next to the opening pick.

  • Don't insert your slicing tool deeper than 3–4 mm, or you risk permanently damaging the display panel.

  • Use an opening pick or halberd spudger to slice the adhesive along the bottom left side of the iPad. If the slicing becomes difficult, reheat the edge and try again.

Appliquez de nouveau l'iOpener dans le coin inférieur gauche de l'iPad pendant au moins 2 minutes, depuis l'endroit où vous avez inséré le médiator jusqu'au bouton Home.

Après avoir laissé l'adhésif ramollir, insérez un médiator ou une spatule antistatique dans l'espace situé à côté du médiator.

N'insérez pas votre outil plus de 3 à 4 mm de profondeur, sinon vous risquez d'endommager définitivement l'écran.

Utilisez un médiator ou une spatule antistatique pour couper l'adhésif le long du côté inférieur gauche de l'iPad. Si le tranchage devient difficile, réchauffez le bord et réessayez.

crwdns2944171:0crwdnd2944171:0crwdnd2944171:0crwdnd2944171:0crwdne2944171:0