crwdns2933423:0crwdne2933423:0

Reemplazo del ensamblaje de la pantalla del Google Pixel 3

crwdns2936315:0crwdne2936315:0
crwdns2936331:0crwdne2936331:0
crwdns2931653:012crwdne2931653:0
Google Pixel 3 Screen Assembly Replacement, Remove the pull tab: crwdns2935265:00crwdnd2935265:01crwdnd2935265:03crwdne2935265:0 Google Pixel 3 Screen Assembly Replacement, Remove the pull tab: crwdns2935265:00crwdnd2935265:02crwdnd2935265:03crwdne2935265:0 Google Pixel 3 Screen Assembly Replacement, Remove the pull tab: crwdns2935265:00crwdnd2935265:03crwdnd2935265:03crwdne2935265:0
Remove the pull tab
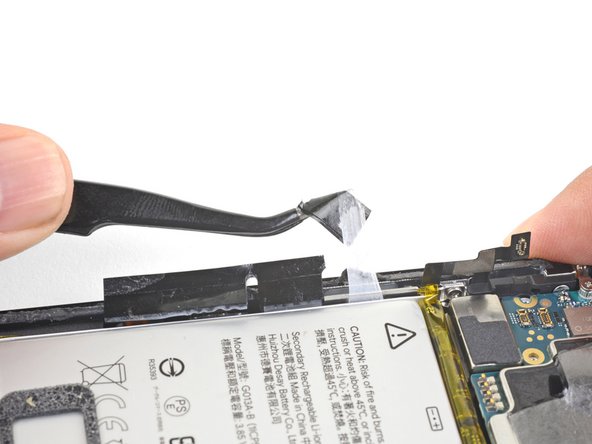
  • Pull on the black pull tab at a shallow angle with steady force. When the adhesive grows long, roll it around some tweezer tips and continue pulling.

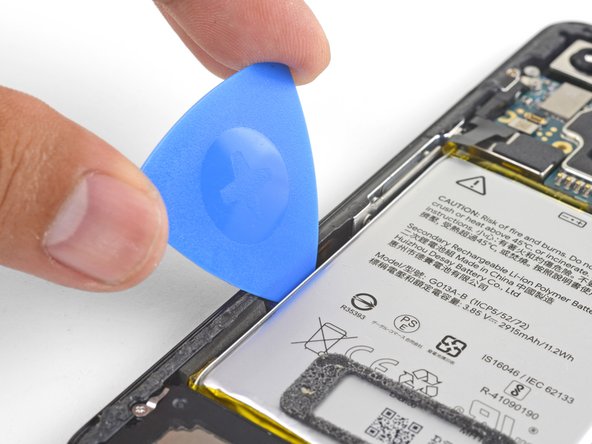
  • If the adhesive strips break, use an opening pick to help pry up and loosen the battery.

  • You can also fill a plastic dropper or syringe with high concentration isopropyl alcohol and apply a few drops under the left edge of the battery. Give the alcohol a minute to weaken the battery adhesive.

Tira de la pestaña negra en un ángulo poco pronunciado con fuerza constante. Cuando el adhesivo se alargue, enróllalo alrededor de unas puntas de pinzas y sigue tirando.

Si las tiras de adhesivo se rompen, usa una púa de apertura para hacer palanca y aflojar la batería.

También puedes llenar un gotero de plástico o una jeringa con alcohol isopropílico de alta concentración y aplicar unas gotas bajo el borde izquierdo de la batería. Deja que el alcohol actúe durante un minuto para debilitar el adhesivo de la batería.

crwdns2944171:0crwdnd2944171:0crwdnd2944171:0crwdnd2944171:0crwdne2944171:0