crwdns2933423:0crwdne2933423:0

Sostituzione dissipatore Steam Deck

crwdns2931529:0crwdnd2931529:0crwdnd2931529:0crwdnd2931529:04crwdnd2931529:0crwdne2931529:0

crwdns2935425:01crwdne2935425:0

crwdns2936315:0crwdne2936315:0
crwdns2936321:0crwdne2936321:0
crwdns2931653:01crwdne2931653:0
Steam Deck Heatsink Replacement, Remove the heatsink screws: crwdns2935265:00crwdnd2935265:01crwdnd2935265:02crwdne2935265:0 Steam Deck Heatsink Replacement, Remove the heatsink screws: crwdns2935265:00crwdnd2935265:02crwdnd2935265:02crwdne2935265:0
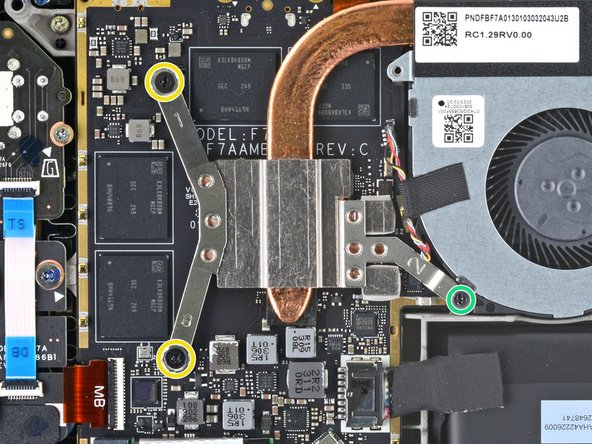
Remove the heatsink screws
  • For original Steam Decks: Use a Phillips driver to loosen and remove the two screws securing the heatsink to the motherboard:

  • One captive 3.5 mm screw

  • One 3.4 mm screw

  • No, your eyes don't deceive you! The third heatsink screw was removed earlier in the disassembly: it doubles as the hidden board shield screw.

  • For refreshed Steam Decks: Use a Phillips driver to remove the three screws securing the heatsink to the motherboard:

  • Two 2.9 mm screws

  • One 3.7 mm screw

  • During reassembly on both versions, tighten these screws in order (1, 2, 3) as stamped into the heatsink.

Per gli Steam Deck originali: Usa un cacciavite a croce Phillips per svitare e rimuovere le due viti che fissano il dissipatore alla scheda madre:

Una vite prigioniera da 3,5 mm

Una vite da 3,4 mm

No, i tuoi occhi non ti stanno ingannando! La terza vite del dissipatore è stata rimossa in precedenza durante lo smontaggio: è anche la vite nascosta dello schermo della scheda.

Per gli Steam Deck aggiornati: Utilizza un cacciavite a croce Phillips per rimuovere le tre viti che fissano il dissipatore di calore alla scheda madre:

Due viti da 2,9 mm

Una da 3,7 mm

Durante il rimontaggio in entrambe le versioni, stringi queste viti nell'ordine (1, 2, 3) come indicato sulla superficie del dissipatore di calore.

crwdns2944171:0crwdnd2944171:0crwdnd2944171:0crwdnd2944171:0crwdne2944171:0