crwdns2931529:0crwdnd2931529:0crwdnd2931529:0crwdnd2931529:06crwdnd2931529:0crwdne2931529:0
crwdns2935425:016crwdne2935425:0


-
Remove the screen.
-
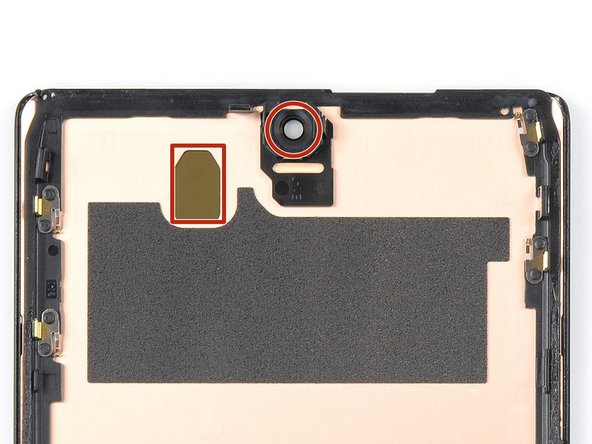
If you replaced the screen, check the screen's front-facing camera hole and sensor cutout for any protective liners. Remove these liners before you close the phone up.
-
This is a good point to test your phone before sealing it up. Temporarily connect your screen, power on your phone, and make sure it works as expected. Before continuing with reassembly, power off your phone and disconnect the screen.
-
Follow this guide if you're using custom-cut adhesives for your device.
-
Follow this guide in case you're using a pre-cut adhesive card.
-
If you're installing a new screen, follow this guide to calibrate the fingerprint sensor.
| [title] Remove the screen | |
| [* black] Remove the screen. | |
| [* icon_reminder] During reassembly: | |
| - | [* |
| - | [* |
| - | [* black] |
| + | [* red] If you replaced the screen, check the screen's front-facing camera hole and sensor cutout for any protective liners. Remove these liners before you close the phone up. |
| + | [* icon_note] ***Remember to reinstall the display cable bracket.*** |
| + | [* black] This is a good point to test your phone before sealing it up. Temporarily connect your screen, power on your phone, and make sure it works as expected. Before continuing with reassembly, ***power off your phone and disconnect the screen***. |
| [* black] [guide|155375|Follow this guide|new_window=true] if you're using custom-cut adhesives for your device. | |
| [* black] [guide|113604|Follow this guide|new_window=true] in case you're using a pre-cut adhesive card. | |
| + | [* black] If you're installing a new screen, follow [guide|166753|this guide|new_window=true] to calibrate the fingerprint sensor. |
crwdns2944171:0crwdnd2944171:0crwdnd2944171:0crwdnd2944171:0crwdne2944171:0