crwdns2933423:0crwdne2933423:0

Changer l'écran du Google Pixel 6

crwdns2931529:0crwdnd2931529:0crwdnd2931529:0crwdnd2931529:06crwdnd2931529:0crwdne2931529:0

crwdns2936315:0crwdne2936315:0
crwdns2936317:0crwdne2936317:0
crwdns2931653:04crwdne2931653:0
Google Pixel 6 Screen Replacement: crwdns2935265:00crwdnd2935265:01crwdnd2935265:03crwdne2935265:0 Google Pixel 6 Screen Replacement: crwdns2935265:00crwdnd2935265:02crwdnd2935265:03crwdne2935265:0 Google Pixel 6 Screen Replacement: crwdns2935265:00crwdnd2935265:03crwdnd2935265:03crwdne2935265:0
  • Heat an iOpener and thread it through the arms of the Anti-Clamp.

  • You can also use a hair dryer or heat gun—but extreme heat can damage the display and/or internal battery, so proceed with care.

  • Fold the iOpener so it lays on the bottom edge of the phone.

  • Wait one minute to give the adhesive a chance to release and present an opening gap.

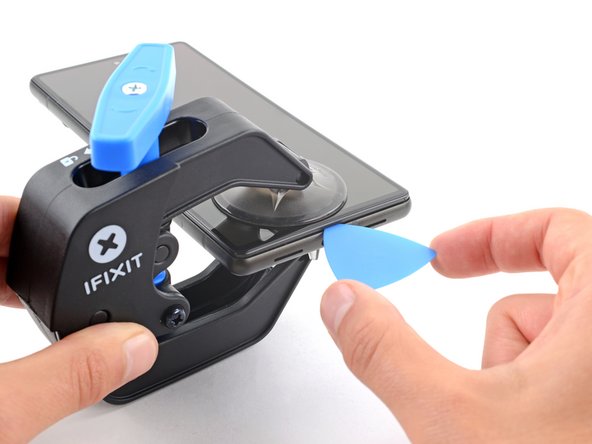
  • Insert an opening pick under the screen frame when the Anti-Clamp creates a large enough gap.

  • If the Anti-Clamp doesn't create a sufficient gap, apply more heat to the area and rotate the handle clockwise half a turn.

  • Don't crank more than a half a turn at a time, and wait one minute between turns. Let the Anti-Clamp and time do the work for you.

  • Skip the next two steps.

Faites chauffer un iOpener et passez-le entre les bras de l'Anti-Clamp.

Vous pouvez aussi utiliser un sèche-cheveux ou un pistolet à air chaud, mais une chaleur extrême peut endommager l'écran et/ou la batterie interne, donc soyez prudents.

Pliez l'iOpener pour qu'il repose sur le bord inférieur du téléphone.

Attendez une minute pour laisser le temps à l'adhésif de se relâcher et de s'écarter.

Insérez un médiator sous le châssis de l'écran lorsque l'Anti-Clamp a créé un espace suffisant.

Si l'Anti-Clamp ne crée pas d'espace suffisant, appliquez davantage de chaleur à la zone et tournez la poignée d'un demi-tour supplémentaire dans le sens horaire.

Ne tournez pas la poignée plus d'un demi-tour à la fois et attendez une minute entre chaque demi-tour. Laissez à l'Anti-Clamp le temps de travailler pour vous.

Sautez les deux étapes suivantes.

crwdns2944171:0crwdnd2944171:0crwdnd2944171:0crwdnd2944171:0crwdne2944171:0